AKA how to cut precision holes in 60 seconds 
After cutting 1,000 holes building test boxes, this I believe is the fastest and most accurate.
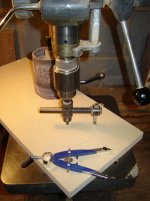
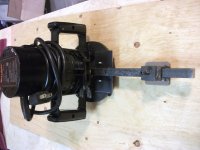
You will need a drill press, doesn't have to be heavy duty, new, etc. the one in pic is older than me
So the steps, use compass to mark and center the hole. Plunge wing cutter into the scrape wood and stop motor.
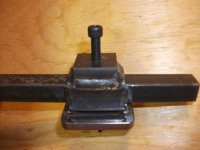
Slide out wing to line and clamp down. Start it back up and check - however it should be right on the money. If you do need to move the wing pinch the horizontal bar and move it carefully, remember that this is double.
The wing cutters work up to a 8" woofer. They come in a lot of sizes, General 55 is very popular. There's one that is solid top/bottom, that works better than the rest, but an extra step is needed.
*Nice to have sanding drum arbor for cleaning up cut.
After cutting 1,000 holes building test boxes, this I believe is the fastest and most accurate.
You will need a drill press, doesn't have to be heavy duty, new, etc. the one in pic is older than me
So the steps, use compass to mark and center the hole. Plunge wing cutter into the scrape wood and stop motor.
Slide out wing to line and clamp down. Start it back up and check - however it should be right on the money. If you do need to move the wing pinch the horizontal bar and move it carefully, remember that this is double.
The wing cutters work up to a 8" woofer. They come in a lot of sizes, General 55 is very popular. There's one that is solid top/bottom, that works better than the rest, but an extra step is needed.
*Nice to have sanding drum arbor for cleaning up cut.
Attachments
Last edited:
doug - what RPM do you set the pulleys for with the wing cutter? I've only ever tried a smaller version for hand drill and found it was much harder to maintain accurate control of speed in middle of range
Newer drills have lots of torque, and the variable clutch stop on cordless are great for screw setting, but I can't remember the last time I saw a hand held drill with adjustable speed stop like on a very old cheap Skil.
Might I add that you'll want to secure the work piece and sacrificial scrap to drill press table with at least 2 clamps - this is not shown in your photo.
Last edited:
Slow - that's all I can tell you, its a very basic table top drill press, no bells or whistles (my dad bought it before I came along).
No, No, don't use a hand drill, that would very dangerous.
If I had to pick three tools for a shop, I would want a drill press. It one of the things you can find used easily, I bet ebay has a 100.
No, No, don't use a hand drill, that would very dangerous.
If I had to pick three tools for a shop, I would want a drill press. It one of the things you can find used easily, I bet ebay has a 100.
Bonus!
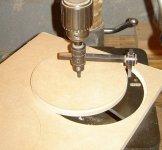
With a general cutter and a sanding kit, you can make templates for those ornery speakers that have bow, or rounded corners, e.g. Fostex
Template work: cut a hole close to the size you need, then place driver upside down over hole mark carefully.
Used sanding drum kit below and sand to line. Takes about 15 minutes, but works every time.
Amazon.com: 26 Piece Sanding Drum Kits: Home Improvement
Last edited:

Yes! But need a drill press (again).
I found on the BB ply its not a bad idea to touch the cutter head to a grinder for a quick sharpening - as needed. Of course the larger the hole, the longer it takes.
E.g. 3" or less, just a few seconds, when you max it out to 7" it takes a lot longer.
Clamping is always a good idea.
Used one today matter of fact - does a beautiful job.
Attachments
Bonus II
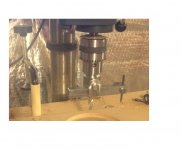
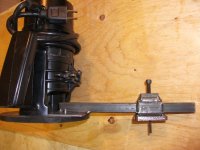
Motor Capacitor went bad years ago, but not all bad, easy to flip start - either direction
Here is the cutter again - although flipped and motor started backwards, to make disks vs. holes.
 made me laugh
Nice holes, very clean
@ Lanchile - no router? Bet you could find a deal on one.
Hard to get 90 degree cut with a jig saw, I guess you could cut small and use sanding drum kit to clean it up.
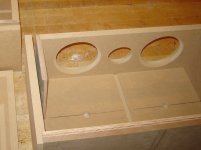
The mid/woofer for box in post 7 only have about 1/8" lip, so no room for error.
Tip of the day: can always replace the 1/4 drill bit with 1/4" steel rod; which works a little better than the drill bit. A pilot hole is needed, but the steel rod won't round out the center (which cause other problems).
Hard to get 90 degree cut with a jig saw, I guess you could cut small and use sanding drum kit to clean it up.
The mid/woofer for box in post 7 only have about 1/8" lip, so no room for error.
Tip of the day: can always replace the 1/4 drill bit with 1/4" steel rod; which works a little better than the drill bit. A pilot hole is needed, but the steel rod won't round out the center (which cause other problems).
The BEAST!!!
Ahhh the beast!!
Found this at a woodworking show for $15.
Heavy wing cutter with thin cutter bit, a perfect combination for speaker building. Called a Bruno 105, looks like it was ordered from the back of a Popular Mechanic magazine 50 years ago.
Note the clamp on the drill press, that sat around for a long time, but can't live without now. With that and a spring clamp can move fast and cut really nice circles.
I've been finding circles cutters on ebay in the same price range, nice to have a few set (and left alone) for the popular sizes.
Attachments
After cutting 1,000 holes building test boxes, this I believe is the fastest and most accurate.
I knew you had made a lot of speakers Doug, but WOW!
I think you may just take the prize for the most prolific speaker builder Tony.
I don't have a compass big enough for 18 inch speaker holes.
So I use a piece of wood with two screws in it.
One screw is screwed through piece of wood in to centre of speaker hole to be.
Then other screw is screwed through wood with just a 1/8 inch showing.
I then use the second screw to score the work.
Gives a perfect circle every time.
So I use a piece of wood with two screws in it.
One screw is screwed through piece of wood in to centre of speaker hole to be.
Then other screw is screwed through wood with just a 1/8 inch showing.
I then use the second screw to score the work.
Gives a perfect circle every time.
I built this some time ago for my guitar/bass amp projects.The maximum diameter accomodates 15'' speakers. The router is an ancient and very inexpensive 5amp Black and Decker,which is more than adequate for the 1/4'' end mills I use. Nothing fancy,I just set it with my vernier,drill a center hole for the pin,and off I go.
Attachments
Right, that looks handy. A lot of the mid size routers have horizontal holes in the route base and supply a adjustable guide that can be modified quickly. Which is fine, but if not, a plywood strip bolted to the base works fine. OR just make a large disk and replace the base-plate on the router, drill a hole where needed.
**
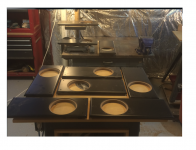
Bruno is cool, made quick work out of this yesterday, tolerances down to 1/2mm.
**
Bruno is cool, made quick work out of this yesterday, tolerances down to 1/2mm.
Attachments
- Status
- This old topic is closed. If you want to reopen this topic, contact a moderator using the "Report Post" button.
- Home
- Design & Build
- Equipment & Tools
- Gone in 60 seconds