You could use a belt sander but if you wander at all it ruins the effect. I found if you make a jig with some 1x1 screwed to a panel of 3/4" board that traps your sanding block from wandering left or right, you can then pass the sand paper back an forth over your face plate to get the nice finish.
Anthony
Anthony
I'm using 6" belt sander with 100 or 120 grid belts. Depending on the tension on a belt you will get more or less of the rolling of the edges. To wet the surface I'm using Varsol (or paint thinner) with very good results.
If you really want to avoid rolling of edges, the best approach would be making part longer and after sanding, trimming it off.
It's hard to get perfectly uniform finish on a belt, so after that I'm using Sotch Brite pads to further smooth the surface. Depending how long you do that, the finish can become really nice and pro looking.
Recently I started using Alodine at home and I'm getting fast and satisfying results, without having to wait 2 weeks for anodizing house to finish my panels.
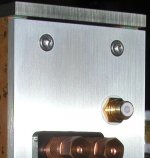
I recently acquired Mark Levinson top cover door from their top of the line CD transport, and to my surprise their sanding job (done on a belt) was inferior to mine")
If you really want to avoid rolling of edges, the best approach would be making part longer and after sanding, trimming it off.
It's hard to get perfectly uniform finish on a belt, so after that I'm using Sotch Brite pads to further smooth the surface. Depending how long you do that, the finish can become really nice and pro looking.
Recently I started using Alodine at home and I'm getting fast and satisfying results, without having to wait 2 weeks for anodizing house to finish my panels.
I recently acquired Mark Levinson top cover door from their top of the line CD transport, and to my surprise their sanding job (done on a belt) was inferior to mine
Attachments
the problem i see by doing the sanding manually with a belt sander is that if your workpiece is wider than the belt it would be difficult no to leave steps. Scotch brite may take it out but if you are doing several parts consistancy comes into play.
I have seen another process where acid is used to create the brushed finish. Very professional but also very expensive.
Beautiful looking work Peter!
I have seen another process where acid is used to create the brushed finish. Very professional but also very expensive.
Beautiful looking work Peter!
I recently found that using a random orbit palm sander, with 80, 100, then 220 grit paper works great for taking out scratches in aluminum panels, then using a kitchen type brillo pad works great to give it that brushed look. I like using the kind with the sponge attached, as it allows for a more uniform pressure on the metal. The brillo pad easily takes up the scratches left from the 220 grit paper on the sander. I got the advice on the brillo pads from the machine shop guy here at school. That is what they use before anodizing aluminum panels. Before I used synthetic steel wool, but had problems with a non-uniform finish.
--
Brian
--
Brian
Try dragging a coarse hand-file sideways in the direction of the brushing. Takes more time than power tools, but you have much more control. I like to use a palm sander to get most of the surface, then drag my file to finish the "brushed" effect. A sanding block can work, but the softness of the block can really make for uneven corner radii.
ensen.
ensen.You can make a block out of soft wood, like cedar.
I use belt sander as it is faster and deep scratches are easily removed. But I've herd from some memvers that using coarse scotch brite type pads works very well too.
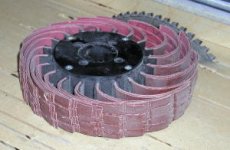
Professional finishers use this type of wheel and as far as I know it's done manually. This leaves short lines (different than from belt sander).
We had Amp-1 finished this way, but I still wasn't much satisfied with the quality of a job. After first inspection 30% had to be redone.
I use belt sander as it is faster and deep scratches are easily removed. But I've herd from some memvers that using coarse scotch brite type pads works very well too.
Professional finishers use this type of wheel and as far as I know it's done manually. This leaves short lines (different than from belt sander).
We had Amp-1 finished this way, but I still wasn't much satisfied with the quality of a job. After first inspection 30% had to be redone.
Attachments
for home use, ive been using a bench sander, then a hand sander (wooden block with paper attached), then finishing it off with scotch pads.
its slow going, but has predictable results. its pretty fool proof. the face plates on my avatar are taking around 1.5 hours per fin. because of the perfection of the machining work, we have to get the finish perfect too. you could easily get this done in an hour or less if you werent trying to get it perfect.
its slow going, but has predictable results. its pretty fool proof. the face plates on my avatar are taking around 1.5 hours per fin. because of the perfection of the machining work, we have to get the finish perfect too. you could easily get this done in an hour or less if you werent trying to get it perfect.
I've used the hand method - a sanding block wider than the workpiece starting with moderately coarse wet&dry (use wet) paper until the scratches and dings are gone, then progressively finer paper until it looks right. Tricks: find a way to hold the workpiece adsolutly immobile B: stand, sit ot squat in a postion that helps you make complete strokes from one end to the other and as straight as possible C: count the strokes after fixed number reverse the workpiece and make the same number from the opposite direction (otherwise one end will tend to look different from the other) D: lots of soapy water E: wear old clothes and don't be afraid of making a mess.
I have not bothered with alodine yet - I'll try that on the next project
I have not bothered with alodine yet - I'll try that on the next project
You can spray it with a polyurethane or Lacquer it has to be clean of all oils. Don't get you finger on it. If you spray it, the aluminum will lose some of it ability to conduct heat, so don't spray the heat sinks. Anodizing is cheap and doing Alodining is cheaper, call around and anodizing can be done in many colors .
Alodine questions?
Anyone know a good source for the solution?
Can anyone suggest a URL with instructions for applying it?
I did a Google search and got a huge listing that I haven't had time to sort out so if anyone can point to some sources they can recomend from their own experierce . . . .
Anyone know a good source for the solution?
Can anyone suggest a URL with instructions for applying it?
I did a Google search and got a huge listing that I haven't had time to sort out so if anyone can point to some sources they can recomend from their own experierce . . . .
http://www.airtechcoatings.com/cgi-local/shopper.cgi?category=PRIM&search=action
Buy the smallest amount in powder form. When making solution Use quater or less of what they recommend (when mixing) as the original receipe makes the liquid too strong.
Don't buy aluminum prep (or any cleaner) as it doesn't work well and you don't need it.
When doing actual alodining, clean the parts directly before dipping (with scotch brite). Don't dip it for more than few seconds, as the color becomes too strong and you might not like it. Extent time for required appearance. If finish is too strong or uneven, additional scotch brite brushing (after alodine) fix the problem.
Check also this older thread for more suppliers http://www.diyaudio.com/forums/showthread.php?s=&threadid=3982&highlight=
- Status
- This old topic is closed. If you want to reopen this topic, contact a moderator using the "Report Post" button.
- Home
- Design & Build
- Construction Tips
- brushed aluminum finish, how to?