ive found using a knife to cut back under an inch, then a trimmer, run in every inch or so then you can run the trimmer along the edge. but a trimmer with the right router bit will fly thru it
I've found you still need to be careful with the laminate trimmer - it's rather easy to bruise the veneer with a line following the bearing, which will need to be sanded out - so I generally avoid that step and just trim with chisel or plane iron and then sand - but we all find our own way and tend to stick with it.
First, special thanks to both kevinahcc20 and prarieboy who in posts #6 & #7 suggested I ditch the exacto knife in favor of a veneer saw....infinitely easier and more effective! Contact cement, an iron (thanks Chrisby) and a veneer scraper were also employed.
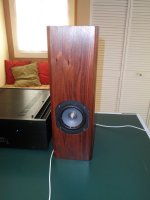
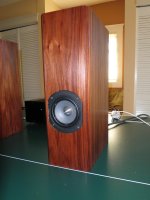
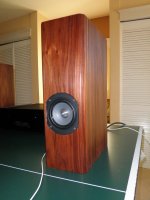
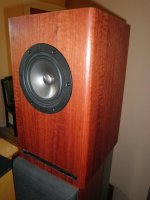
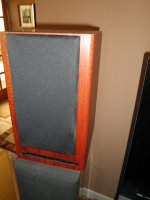
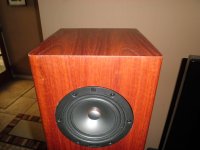
These folded TABAQ TL's use TangBand W4-1320SJ's and are veneered with South American, quartered 10m paperback rosewood...the photos don't really do them justice IMHO. After a couple of earlier attempts, I've gotten the hang of this jellied polyurethane/tong oil/mineral spirit finish...after rubbing it in can't let it set more than a minute or so before the straight, with-the-grain final wipe. No problems with WAF.
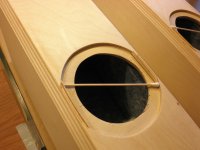
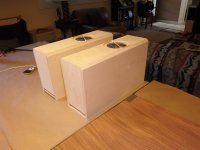
I used a small palm router to recess the front baffle with a complete circle and truncated the sides of the recess with small strips of wood. The small voids on the sides were then filled with wood filler and sanded down flush. I do need to create a driver gasket, however, to bring the drivers out a couple mm as currently they're a little too recessed.
...next up: Jarrah veneer on a couple TA cabs that use Alpair 10.2's....this is just starting to become a little more fun and a little less torturous.
Regards,
Mario
These folded TABAQ TL's use TangBand W4-1320SJ's and are veneered with South American, quartered 10m paperback rosewood...the photos don't really do them justice IMHO. After a couple of earlier attempts, I've gotten the hang of this jellied polyurethane/tong oil/mineral spirit finish...after rubbing it in can't let it set more than a minute or so before the straight, with-the-grain final wipe. No problems with WAF.
I used a small palm router to recess the front baffle with a complete circle and truncated the sides of the recess with small strips of wood. The small voids on the sides were then filled with wood filler and sanded down flush. I do need to create a driver gasket, however, to bring the drivers out a couple mm as currently they're a little too recessed.
...next up: Jarrah veneer on a couple TA cabs that use Alpair 10.2's....this is just starting to become a little more fun and a little less torturous.
Regards,
Mario
Attachments
The yellow glue/ paper back/ iron method is the method we use on boats.To trim the edge regardless of the overhang I prefer to make my oun knife.I use a jigsaw blade.
A good one like a bosch or lennox.The steel is very good and will take an edge.
Grind it to the shape of an arrow ,but rounded point and on one side only.
Then hone it on a stone or VERY fine sandpaper.
Exacto knives are for paper and crafts.
Trim with the flat side against the cab,with a block or laying down against a piece of scrap mdf etc as mentioned earlier.
If plywood .do it cross grain so not to get caught in the grain pattern.
Make light multiple passes.
Practice on scrap.
Hope this helps.
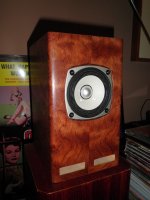
Jarrah and Bubinga Burl paperbacked veneer
I've finally used all four veneers that I bought some time ago! The Jarrah veneer was unexpectedly much harder to cut and trim than the other veneers I worked with. I used this on a pair of Alpair 10.2 TwinAudio cabs that arrived via post pretty badly beaten up...the return would have cost me much more than the price paid for the veneer.
So I filled (a lot), sanded and routed a .5" radius on the baffle edges. Magnets were placed before veneering so I could use standard PE grills. I'm pleased with the outcome but I'd like to eventually rip out the foam lining that came with cabs and replace with Ultratouch. On samples I found that plain wipe-on polyurethane highlighted the grain better than the polyurethane/tung oil/mineral spirit mixture used on past projects
The other pics are uFonken veneered in Bubinga Burl which was the easiest (so far of 4 veneers tried) to cut and wrap across baffle edges. Contact cement, veneer saw and the above described finish mixture were used.
Mario
Attachments

Toobhed,
Like you I had growing pains when it came to veneering, and I searched the web for all the tips and advice I could find. In the end it simply came down to the more I practiced the better I got. With patience and time my skill improved to where veneering has become second nature.
However, and I must agree with Chrisb, the single biggest improvement I made was when I purchased a Porter-Cable laminate trimmer and a flush-mount trim bit. Using the flush-mount bit made edge trimming of all types easy and precise, and only minimal block sanding with 320 grit paper was necessary to perfect the edge. Now all my veneer edges look factory made and I never have to worry about splits, pulls, or chunks in the wood.
Also, don't skimp on the bit... the better the bit the less chance there will be of leaving that bearing line Chrisb mentioned above. I found that by simply leading the router rather than forcing it along greatly reduced the chance of that happening.
Hope this helps.
William
Last edited:
I've found you still need to be careful with the laminate trimmer - it's rather easy to bruise the veneer with a line following the bearing, which will need to be sanded out - so I generally avoid that step and just trim with chisel or plane iron and then sand - but we all find our own way and tend to stick with it.
sorry i should add that i put a few layers of masking tape around the top to stop this. also leaves a little bit of overhang so you can sand back.
- Status
- This old topic is closed. If you want to reopen this topic, contact a moderator using the "Report Post" button.