Hi
I am having some trouble cutting 45 degree angles and other angles. Also i want to know of a table saw is better at cutting angles than a circular saw.
Here is an eg. of the problem, if i have a peice of plywood that measures say 9" and both ends need to be cut at 45 degree angle. After cutting both ends of the plywood at 45 Degree and try to fit it the plywood measurement would came short.
Tips please
Last edited:
For miter cuts in material of moderate width a good sliding chop saw is the best tool, but its capacity is limited to the travel of the slides and the degree of the angle. Most 10" sliders will cut 12" widths at 90° and a bit over 8" (12*0.707) at 45°. At larger widths the tablesaw provides more capacity depending on the size of the table and miter bar...best results come with a sled set up to cut angles. There are two issues you need to address to get a successful miter joint. The 1st is setting the angle accurately which should be done with a 45° miter square. Then you have to mark and make the cuts at the proper location on the workpiece. A small angular error in a wide workpiece can leave a large gap when the pieces are mated together.
The same tip as how to get to Carnegie Hall. "Practice man, practice"
Of course, the table saw with a big sled is better, but it takes up a lot of space and is not cheap. The little portable ones are for, well little portable use. ( They scare the heck out of me to use) Even with my big "Rigid" which is actually built by Emerson and the same as the bigger Sears, getting perfect miters is not easy.
Quality of the blade matters. Support for the saw and sufficient fence helps. I have seen work done with a $20 circular saw that could put a cabinet maker to shame. Getting the perfect 45 is a matter of cutting a a angle, flopping the board and placing then along a straight edge. You will see twice the error in the joint. Adjust , repeat, adjust, repeat.
If you happen to be in Maryland, I could make you a heck of a deal on a radial arm saw.
Yo Kornnylike,
There are several ways:
> 9” miters can be cut on one of the new sliding miter boxes.
> Use good quality 45degree router bit, use straight edge.
> Put a good size piece of scrap wood on a table saw fence. Bring the bade up until you are touching the wood (at the 45 degrees). Run the wood edge (only) through the saw – this will take micro adjustments to get it right, but works beautifully.
Issues cutting miters in a small shop:
Is the material perfectly flat? If not the material will “lift” and run off course.
Is the blade super sharp? If not the material will “lift” and run off course.
Is the table saw set up perfectly? Not at easy as it sounds.
An outboard table for a table saw is a must, level up everything.
It threw me too when I first heard of this. The panel will have to be cut “perfect size” – before the miter.
In short: the table saw is converted into a 45degree cutter; almost like a shaper.
You can miter cut 8”, 12", 36"…whatever, the fence never moves; also the blade would cut into the fence if it wasn’t for the scrap wood.
I didn’t believe it would work until I tried it.
I'll send you a photo.
In short: the table saw is converted into a 45degree cutter; almost like a shaper.
You can miter cut 8”, 12", 36"…whatever, the fence never moves; also the blade would cut into the fence if it wasn’t for the scrap wood.
I didn’t believe it would work until I tried it.
I'll send you a photo.
It threw me too when I first heard of this. The panel will have to be cut “perfect size” – before the miter.
In short: the table saw is converted into a 45degree cutter; almost like a shaper.
You can miter cut 8”, 12", 36"…whatever, the fence never moves; also the blade would cut into the fence if it wasn’t for the scrap wood.
I didn’t believe it would work until I tried it.
I'll send you a photo.
Thanks for the help
I will go with a table saw....but even with this tool available, the calibration must be perfect to the 0.0001"
Is one of the most demanding cuts to do perfect. The longer the cut, the more prone to errors.
Practice, Practice and more practice, even with the right tool.
No. A 1/32" will work. Nobody can do a ten thousandth of inch on a table saw. The angle accuracy is as important as the x-y.
P
The table saw calibration should be good as you can get it (not as easy as it sounds).
As mentioned in #4, the material is an issue; impossible to cut a good 45 on a warped/twisted board.
#3 is not a bad way to go if the material is not flat/straight, make up a long sled for the "skill saw" to ride on.
As mentioned in #4, the material is an issue; impossible to cut a good 45 on a warped/twisted board.
#3 is not a bad way to go if the material is not flat/straight, make up a long sled for the "skill saw" to ride on.
No. A 1/32" will work. Nobody can do a ten thousandth of inch on a table saw. The angle accuracy is as important as the x-y.
P
Actually, to get to any level of accuracy you always need to start with the best calibrated tool you can get. Adjusting the table saw to a 0.0001" accuracy is not impossible and using a dial caliper is the usual method.
You start with the blade and then the fence. Once all is adjusted, you check the angle accuracy of the blade. Finally, your cutting material must be as flat and even in thickness as possible.
If you minimize the variables you will probably end with a nice 45 degrees cut.
I do woodwork as my main hobby and have no idea about speakers (want to learn and that is the reason to be around here...) but if you feel I can help you in any way with the "wood" part of your project, please count on me!
Regards!
Last edited:
Itorcida, you came to the right place!!
Welcome Itorcida, you came to the right place!!
The adjustment most people take for granted is the trunnion, the assembly that holds the blade, you have to get that as precise as you can, before you move on to the fence.
I’m pretty new also; woodworker (and PT electrician). I’ve been finding the full range speakers a very interesting build: they (the full range folks) like to use Baltic Birch. I always used it for “drawers” never thought it would be good for speakers.
You’ll really enjoy building these, of course they sound great; the simplicity and the imaging are the highlights.
As far as plans, jump over to the full range page, say hello, somebody will help you out.
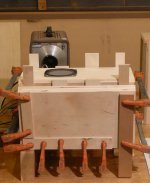
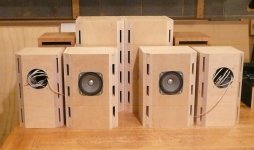
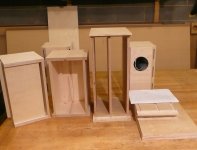
I hope kornnylike won’t mind a few “off topic” pics on this thread… These are called Fonkens and Onkens
I’m finishing up a pair today.
[Wish I was down south today; old man winter is rolling in here today]
Welcome Itorcida, you came to the right place!!
The adjustment most people take for granted is the trunnion, the assembly that holds the blade, you have to get that as precise as you can, before you move on to the fence.
I’m pretty new also; woodworker (and PT electrician). I’ve been finding the full range speakers a very interesting build: they (the full range folks) like to use Baltic Birch. I always used it for “drawers” never thought it would be good for speakers.
You’ll really enjoy building these, of course they sound great; the simplicity and the imaging are the highlights.
As far as plans, jump over to the full range page, say hello, somebody will help you out.
I hope kornnylike won’t mind a few “off topic” pics on this thread… These are called Fonkens and Onkens
I’m finishing up a pair today.
[Wish I was down south today; old man winter is rolling in here today]
Attachments
Yes, while a handheld circular saw can cut bevels, a well tuned table saw will make much quicker, accurate and repeatable work of them.
Depending on the quality of the saw, the trunion may not be adjustable at all, and don't forget another factors affecting accuracy of cuts - the parallelism of machined slots for sliding miter square. We have an 40 yr old Delta Unisaw that is "right" on one side, but not the other (i.e. the machined grooves are not parallel to each other), so even if the blade and rip fence are aligned perfectly the same miter square on the other side will be out almost 1/4 degree - far more of a problem than extreme dimensional accuracy to "a thou" . For repetitive cutting of small parts with or without bevels, the time invested in a sled is well worth it.
Unless you have a left tilting blade, Doug's suggestion of using a sacrificial strip on the rip fence is certainly the easiest way to get clean accurate bevels of any angle on a table saw, but be wary of kick-back of the small scraps stuck between the fence and underside of blade - don't stand in the path as they can be spit out at an uncomfortable speed.
The quickest way to confirm accuracy of the tilt gauge on the saw is to cut two test pieces, join them together and check the squareness of closed joint.
I bumped into this article on cutting 45s, interesting.
Small Parts Mitering Jig | Products | Store | Woodworkers Journal
Small Parts Mitering Jig | Products | Store | Woodworkers Journal
I bumped into this article on cutting 45s, interesting.
Small Parts Mitering Jig | Products | Store | Woodworkers Journal
ODougbo thanks for the article.
Absolutely correct. The point of contact (blade and work) is all that is important. Here the work must be firmly pressed to the table (with feathers preferably) and held to the fence. Doesn't matter if the work is bent (or bowed for that matter) fore or aft of the blade area.great for small parts, but many of the panels for larger speaker enclosures could get very awkward - for cutting those re-assembly I think a well tuned rip fence and feather-boards to maintain pressure on workpiece would be as accurate and less time consuming
More critical actually is the cut itself. (difference between a blunt mitre and one that finishes to a point) You may find that getting an exact blade/fence/work thickness relationship with the "finished mitre" kind of tough. Run the panel in a ways and check to see if (or not) that the finished point is contacting the fence after the cut. (if parts came out of different panels, it may not be "finishing" on all) Better to allow for this on purpose .... add a thin veneer/laminate to the "outfeed" section of the dummy fence to make up for the cut and to keep the blade from "sniping" the last few inches of the cut ... ruining the mitre.
- Status
- This old topic is closed. If you want to reopen this topic, contact a moderator using the "Report Post" button.
- Home
- Design & Build
- Construction Tips
- Cutting 45 degree angles