Hey, I seemed to have lost my other account and cannot retrive it so I am posting under this name.
Ok, I am building a set of speakers and I have no clue on veneering. I don't have a vacuum to use to bond the veneer , so I wondering if anyone could point me to any good web pages on veneering or give me and advise on how to go about it?
Cheers
Ok, I am building a set of speakers and I have no clue on veneering. I don't have a vacuum to use to bond the veneer , so I wondering if anyone could point me to any good web pages on veneering or give me and advise on how to go about it?
Cheers
I'd suggest a search, but here's a bone.....
http://www.diyaudio.com/forums/construction-tips/170748-wood-veneer-techniques.html
http://www.diyaudio.com/forums/construction-tips/170748-wood-veneer-techniques.html
I found this document very helpful http://www.woodveneer.asn.au/downloads/prep_apply_veeneers_inlays.pdf
couple of tips. Cut with a stanley knife rather than a veneer saw, I bought a veneer saw but it was useless.
spray the veneer with a mix of glycerine and water (10% glycerine from memory) and place between boards with brown paper to flatten (and soften) the veneer before applying. Allow to dry for a few days changing paper as well.
If you use PVA glue make sure the ambient temperature is not too high or it will set very fast! I made the mistake of doing one of the panels in 30+ deg heat.
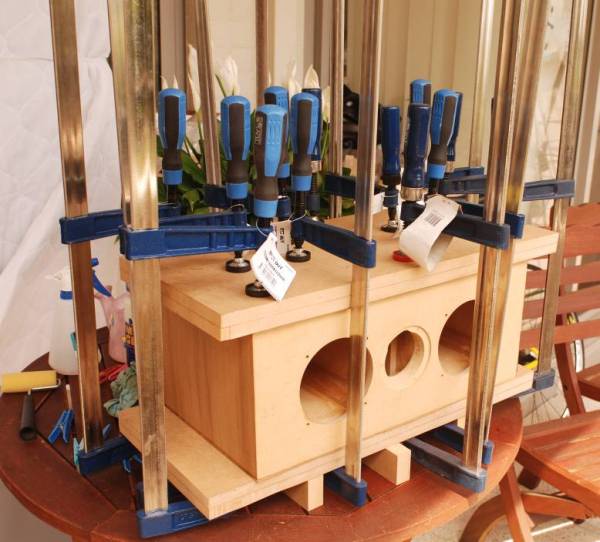
Get lots of clamps") see picture...
see picture...
Tony.
couple of tips. Cut with a stanley knife rather than a veneer saw, I bought a veneer saw but it was useless.
spray the veneer with a mix of glycerine and water (10% glycerine from memory) and place between boards with brown paper to flatten (and soften) the veneer before applying. Allow to dry for a few days changing paper as well.
If you use PVA glue make sure the ambient temperature is not too high or it will set very fast! I made the mistake of doing one of the panels in 30+ deg heat.
Get lots of clamps
see picture...
Tony.
This should help.
The first time out of the gate you may consider the PSA products.
Joe Woodworker - Woodworking, Vacuum Pressing and Veneering Information Website
The first time out of the gate you may consider the PSA products.
Joe Woodworker - Woodworking, Vacuum Pressing and Veneering Information Website
wintermute, how did you ensure you got the grain straight?
cheers
That was tricky, I used one continuous piece for sides and top (cut in three), I cut it about 3mm bigger all round. I placed the top piece first and trimmed it with the flush trim bit on the router (I basically just positioned it so that it had an even overlap on all four edges). Then I lined up the sides (as best I could with the 3mm overlap) to match the grain on the top, whilst making sure the overlap down the sides was even top to bottom.
The result was pretty good I thought
This is the best pic I have of the grain matching, which was taken before they were oiled. 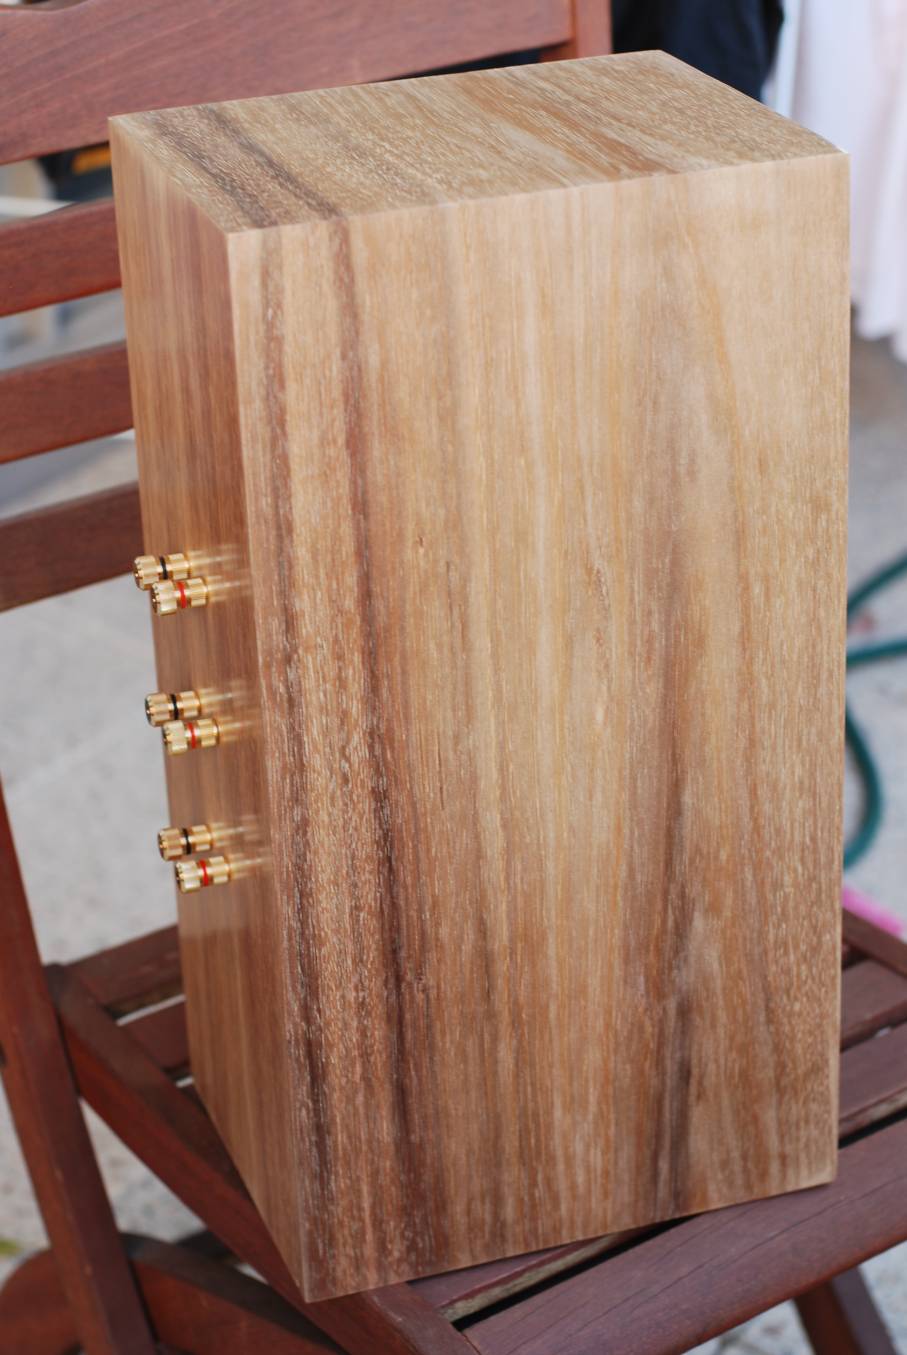
edit: one thing I didn't mention before,was that I used a rolling pin to ensure everything was flat before putting the upper caul on and clamping. I used a paint roller to apply the pva glue to the box surface before placing the veneer on, and had a damp cloth handy to wipe up any over runs quickly.
Tony.
Last edited:
I used PVA glue also, although I had a different approach. It worked extremely well. Titebond 3, rolled both surfaces, let dry then Iron. Its still looking perfect and you cant tell where the seams are. Do a search for "Curved Thor's" if you care to try this method.
Almost forgot, I used an exacto knife with a new blade to cut the edges of the veneer down to within 1/32" flush then sanded with a block wrapped with 400grit paper.......smoooooth.
Ron
Almost forgot, I used an exacto knife with a new blade to cut the edges of the veneer down to within 1/32" flush then sanded with a block wrapped with 400grit paper.......smoooooth.
Ron
Last edited:
Nice job Winter!
Let me preface this by saying I was a professional furniture and cabinet maker for a long time
Winter's first photo shows a good setup for home veneering. You need lots of clamps and a thick, flat, rigid platten to evenly distribute the pressure. I personally would not recommend ironing on as Renron has done, no offense man Though it can work, it can also be very difficult to do. It is easy to scortch the veneer, the veneer will shrink, if you don't do it right the veneer can crack, etc, etc. I realize doing curved surfaces at home can be hard w/o a vacuum bag, but you can use flexible but rigid plattens (1/8" masonite, 1/4" mdf) and a layer of rubber between the veneer and the plattens to distribute the pressure for clamping.
Yellow glue (PVA) works perfectly fine for veneering, as do polyurethane glues like Gorilla Glue. As several have mentioned, use fresh razor knives to cut veneer, not saws.
I have never flattened veneer with glycerine, even really old veneer. If it is really fragile (burly claro walnut that is 50 years old) it might be nice, but a warm water mist works fine to. If you use polyurethane glues the water makes it set better, PVA glues will still dry fine but may take longer. PVA glues are water based and I have often thinned thicker yellow glue for veneering. I used to work at a place that bought industrial PVA by the 5gal pails. Great for soldwood glue-ups but a little thick for veneering. Thinning 3-5%-ish with water made it usable.
A couple tricks can be used to keep the veneer perfectly positioned for cases where you are trying to match the grain as Winter has done. You can simply let assemble the parts and let the glue begin to setup with only a slight amount of weight. Essentially, the glue will allow the parts to slide around for a few minutes (temperature and how heavy you applied the glue dependent). The moment they stop sliding around easily, make sure you slide the parts to the proper alignment as you apply pressure. This method is easiest to mess up and miss your window.
Second, you can simply use blue painters tape (not white masking as it is to sticky to remove after it is pressed) wrapped tightly around. Using tape in each direction at the corners and every 8-12" in the middle will prevent the veneer from moving. This is the easiest and relatively fool proof most of the time.
Last method is the most foolproof but longest to setup. Place the veneer face down on a flat surface and place the substrate on top of it. Use yellow, white or hot-melt glue to attach small wooden blocks (1/4"x1/4"x3/4" long are plenty large enough) to the veneer and tight to the edge of the substrate. Let dry and then use these to align the veneer for gluing.
Glue should be applied evenly with a hard rubber roller, like is used for hobby printmaking. larger surfaces (like whole sheets of plywood) can be done using black foam rollers. Apply enough glue to completely cover the substrate surface without holes or dry looking areas. If I had to guess, Id say the the thickness of yellow PVA glue applied (use general purpose stuff here, not fast set, outdoor, water-resistant, etc) would be about the thickness of 1-2 sheet of good quality paper-towel. Never thought about it before, I just know how much looks like enough
Always start by applying modest pressure from the middle of the panel first then work your way to the edges. The thicker your platten the fewer clamps you will need but more is always better. WinterMute has just about the right amount on that.
Be careful about already glued up parts though as the panels may no longer be flat. Check with a really good straightedge and flatten with a large block of flat wood (say 4'x12") wrapped with some 120 sandpaper. Sand all directions until the whole surface if flat, be careful you don't round the edges. Any rounding of edges, no matter how slight, will create voids where the glue (which has no gap filling properties at all and will soak in) will not make a good bond. Similarly, when clamping something up, be sure you are not somehow flexing the box so as to make the middle of the substrate bow inward and create a pocket in the middle.
Finally, use 2-3 layers of newsprint between the veneer and the platten or you will glue everything together forever Been there <sad face>.
Final trick: if you want all 4 corners to match as Winter did, you need to use two consecutive sheets of veneer flipped so that the two mating surfaces are on the outside, then imagine opening them like a ziplock bag. Did that make sense? When I say flip, imagine one short grain edge is a hinge and pivot one sheet all the way around on that hinge. This puts the original "insides" of the sandwich now on the outside and all edges will perfectly match visually providing your keep your overlaps the same. Nice way about this is that you can leave as much overhang as you want (say to glue on alignment blocks) and as long as you leave the same amount at matching edges, the veneer will still perfectly line up
Let me preface this by saying I was a professional furniture and cabinet maker for a long time
Winter's first photo shows a good setup for home veneering. You need lots of clamps and a thick, flat, rigid platten to evenly distribute the pressure. I personally would not recommend ironing on as Renron has done, no offense man
Though it can work, it can also be very difficult to do. It is easy to scortch the veneer, the veneer will shrink, if you don't do it right the veneer can crack, etc, etc. I realize doing curved surfaces at home can be hard w/o a vacuum bag, but you can use flexible but rigid plattens (1/8" masonite, 1/4" mdf) and a layer of rubber between the veneer and the plattens to distribute the pressure for clamping.Yellow glue (PVA) works perfectly fine for veneering, as do polyurethane glues like Gorilla Glue. As several have mentioned, use fresh razor knives to cut veneer, not saws.
I have never flattened veneer with glycerine, even really old veneer. If it is really fragile (burly claro walnut that is 50 years old) it might be nice, but a warm water mist works fine to. If you use polyurethane glues the water makes it set better, PVA glues will still dry fine but may take longer. PVA glues are water based and I have often thinned thicker yellow glue for veneering. I used to work at a place that bought industrial PVA by the 5gal pails. Great for soldwood glue-ups but a little thick for veneering. Thinning 3-5%-ish with water made it usable.
A couple tricks can be used to keep the veneer perfectly positioned for cases where you are trying to match the grain as Winter has done. You can simply let assemble the parts and let the glue begin to setup with only a slight amount of weight. Essentially, the glue will allow the parts to slide around for a few minutes (temperature and how heavy you applied the glue dependent). The moment they stop sliding around easily, make sure you slide the parts to the proper alignment as you apply pressure. This method is easiest to mess up and miss your window.
Second, you can simply use blue painters tape (not white masking as it is to sticky to remove after it is pressed) wrapped tightly around. Using tape in each direction at the corners and every 8-12" in the middle will prevent the veneer from moving. This is the easiest and relatively fool proof most of the time.
Last method is the most foolproof but longest to setup. Place the veneer face down on a flat surface and place the substrate on top of it. Use yellow, white or hot-melt glue to attach small wooden blocks (1/4"x1/4"x3/4" long are plenty large enough) to the veneer and tight to the edge of the substrate. Let dry and then use these to align the veneer for gluing.
Glue should be applied evenly with a hard rubber roller, like is used for hobby printmaking. larger surfaces (like whole sheets of plywood) can be done using black foam rollers. Apply enough glue to completely cover the substrate surface without holes or dry looking areas. If I had to guess, Id say the the thickness of yellow PVA glue applied (use general purpose stuff here, not fast set, outdoor, water-resistant, etc) would be about the thickness of 1-2 sheet of good quality paper-towel. Never thought about it before, I just know how much looks like enough
Always start by applying modest pressure from the middle of the panel first then work your way to the edges. The thicker your platten the fewer clamps you will need but more is always better. WinterMute has just about the right amount on that.
Be careful about already glued up parts though as the panels may no longer be flat. Check with a really good straightedge and flatten with a large block of flat wood (say 4'x12") wrapped with some 120 sandpaper. Sand all directions until the whole surface if flat, be careful you don't round the edges. Any rounding of edges, no matter how slight, will create voids where the glue (which has no gap filling properties at all and will soak in) will not make a good bond. Similarly, when clamping something up, be sure you are not somehow flexing the box so as to make the middle of the substrate bow inward and create a pocket in the middle.
Finally, use 2-3 layers of newsprint between the veneer and the platten or you will glue everything together forever
Been there <sad face>.Final trick: if you want all 4 corners to match as Winter did, you need to use two consecutive sheets of veneer flipped so that the two mating surfaces are on the outside, then imagine opening them like a ziplock bag. Did that make sense? When I say flip, imagine one short grain edge is a hinge and pivot one sheet all the way around on that hinge. This puts the original "insides" of the sandwich now on the outside and all edges will perfectly match visually providing your keep your overlaps the same. Nice way about this is that you can leave as much overhang as you want (say to glue on alignment blocks) and as long as you leave the same amount at matching edges, the veneer will still perfectly line up
Last edited:
I generally work with paper backed sheet veneers, and the iron-on method works like a charm.
After careful layout and marking for grain pattern matching/wrapping, trim slightly over sized, apply a light coat of slow tack set yellow or white PVA glue with velour paint roller to each surface and let dry to touch ( 10-15 minutes). Then align pieces on pre-marked panels, and apply even firm pressure with clothes iron set to high. Don't worry too much about scorch marks - they'll sand out. Trim all edges with razor knife, 2" chisel or plane iron before proceeding to next panel surface. Use masking tape to prevent glue contamination when preparing adjacent surfaces.
I've also used this method to reveneer small panels, turntable bases, etc, with solid wood (i.e. no backing) veneers. So far the only part I've found a bit trickier is the cross grain overhang trimming - without the flexible paper backing, the solids are much more brittle and can splinter - "sawing" gently downwards with a chisel or plane iron seems to work best here.
Forgot about the paper backed veneers. Those are easier to iron on, but then you get the paper line at the edge. I still prefer regular veneer and small areas are easy to clamp since they require few clamps and smaller plattens.
I should also mention that if you have boxes with butt joints rather then mitered corners, the seam usually will transfer through. In that case, you can first veneer with low grade veneer having the grain perpendicular to the final veneer, then sand flat before final veneer. You can also use a stiff pressed "paper" made for this purpose, again sanding flat before final veneer is applied. These two methods will prevent the seam from telegraphing through later, or at least minimize how bad it happens.
I should also mention that if you have boxes with butt joints rather then mitered corners, the seam usually will transfer through. In that case, you can first veneer with low grade veneer having the grain perpendicular to the final veneer, then sand flat before final veneer. You can also use a stiff pressed "paper" made for this purpose, again sanding flat before final veneer is applied. These two methods will prevent the seam from telegraphing through later, or at least minimize how bad it happens.
This should help.
The first time out of the gate you may consider the PSA products.
Joe Woodworker - Woodworking, Vacuum Pressing and Veneering Information Website
I buy from them. He's a good supplier with tons of information on his site.
The NBL veneer from formwood is great. works like paperback and the edge is not noticeable.
NBL (No Black Line): FormWood Industries
available here
Two-Ply Wood on Wood Veneer Stock List
Most of my veneering is done with unibond two part glue and a vacuum press.
for more "production" jobs contact cement works great. It seems to be the standard in cabinet shops around here.
The trick to contact cement is sticks. When the glue is dry on both surfaces and you are ready to bond the veneer cover the substrate with sticks and put the veneer on them. Then remove the sticks from the middle out pressing the veneer down as you go. This lets you get the veneer lined up and pressed with very little drama .
Nice job Winter!
Let me preface this by saying I was a professional furniture and cabinet maker for a long time
Thanks ddietz! and thanks for the very comprehensive writeup too!!
That multiple clamp pic is priceless.
and I was wishing I had a few more too don't underestimate how many clamps you need if doing it that way! Man that come up wicked. I hope I get my speakers to look that good
Thanks jonesy. After oiling a couple of times I thought I had a beautifully smooth satin finish, unfortunately after a few weeks the grain came back up again, but I've decided to live with it (as they were already installed and running). The colour and look is very nice, just wish they were smooth as well. I may redo them again sometime.
Tony.
- Status
- This old topic is closed. If you want to reopen this topic, contact a moderator using the "Report Post" button.
- Home
- Design & Build
- Construction Tips
- DIY veneer, any tips?