Not sure if this is the right place to ask, but someone can always point me there...
I am after some advice or reading material regarding listening room treatment. Being who I am I would rather make it than give away my money, but I am willing to buy specific materials.
Whenever I search I only find people talking about bass traps and hanging paintings with no paint on them, on the walls
Is there a good place to start?
Thanks in advance
Martin
Thanks for that - it was inspiring. I will make my own for sure but I guess I need to know what I need before I embark!
I know that there is some benefits to reducing mid-range from directly besides and in-between the (single driver) speakers as I can simulate this with seat cushions I can hear a difference.
I also know there is some areas that bass sounds stronger and others less so. Do I go by ear or do I need to blow my budget on measurement equipment?
Any thoughts welcome.
I know that there is some benefits to reducing mid-range from directly besides and in-between the (single driver) speakers as I can simulate this with seat cushions
I can hear a difference. I also know there is some areas that bass sounds stronger and others less so. Do I go by ear or do I need to blow my budget on measurement equipment?
Any thoughts welcome.
You may want to read The Master Handbook of Acoustics by F. Alton Everest.
The above article is good, but I make a few things differently. I don’t drill 50 holes in the frame of one panel; I make 8 long holes (2 per each side of the frame) – bigger open surface, less drilling, less work. I don’t use plywood – it is easer to staple fabric to wood. I don’t use grille fabric – it’s too expensive and also, not necessary. It’s good on a speaker, where absolute sound transparency is needed. Absorbing panel is a different story, the fabric can be absorbing just should not be reflective at designed frequency range of the panel. Many grill and other fabrics do not block nasty fiberglass dust. I use cotton or poly padding (thin, soft felt) for the first layer to cover the whole thing which also takes care of rough frame edges. For 2nd layer on visible surfaces I use fabric chosen for desired frequency range; burlap for broad band. For bass you can use canvas and paint pictures on it, just leave space between canvas and fiberglass and canvas will work as a membrane. In your country rigid fiberglass may be available under different name and different density than in the article.
You do not need measuring equipment but you need a test tone CD.
Good lack,
Marek
Attachments
Marek
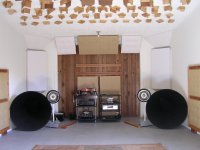
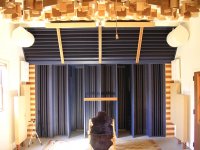
What an amazing room! If only I had a dedicated space. I am listening in our 'front room' which in a small cottage is also the lounge and TV room.
I really like the idea of making my own as I can cover with material to suit the decor. I have found some panels (ready made) that are about right and not too expensive but I do need to build a reflector of some sort for the rear wall. I am thinking about a frame with balsa wood blocks of differing sizes and copy a few of the designs I see around.
Thanks for posting I will source the book ref too. One other thing, I hear a lot about burlap but am not sure what this is. I guess it is called something else in the UK. Can you help by describing it for me?
I would love to ask you a few questions as and when they arise as it seems you are at the other end of my exploration path and you can help me to not take too many wrong turns!
Thanks
Martin
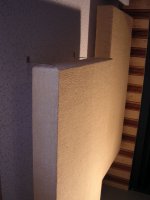
Burlap, according to Webster’s dictionary: a plain woven, coarse fabric of jute, hemp, or the like; gunny. That’s the material on the panel in the first picture.
Feel free to ask any question - I am not a pro, I don’t have secrets or hidden agenda.
You're attacking one of the true Big Problems in audio, so I can only give you a
 .
.However... after my wife saw your pictures, she put up an IP block so I can't look at or talk about this stuff anymore. I have to sneak off to the McDonalds wifi spot now.
INFO SOURCES
First, please read Dr. Floyd Toole’s latest book as he’s an audio engineer ‘GOD’ and highly respected scientist and not affiliated with any acoustical treatment manufacturers. Therefore, he’s unbiased and not afraid to call a spade a spade.
Second, the manufacturers of acoustic treatment all have informative websites so I'd recommend you study websites from: RPG, RealTraps, GIK, Auralex, Acoustic Sciences Corp (ASC) and probably others but these are the main players from what I can tell.
APPROACH
Before you begin any DIY acoustical project you need to know what the problems are so you can develop a strategy to dealing with them. Too often people go crazy adding fiberglass absorbers and create ‘dead’ sounding rooms because they used too many or used them in the wrong locations or ineffectively and not at their maximum potential.
I’d suggest you get a sound pressure level meter and test tones and plot then dB rating of each test tone. I’d recommend downloading the test tones from RealTraps which spans 10-300Hz I think. You can save a lot of time by using the following link to only test those tones that correspond to the musical scale of western music http://www.soundoctor.com/freq.htm I don’t see much merit in measuring fractions of semi-tones that aren’t likely to be played by an instrument or seldomly played.
Next treat the room’s bass region <=300Hz differently than the mid/high frequency region >300Hz. 300Hz is the approximate delineating point within most residential buildings where the bass modes become loosely spaced and problematic whereas above this “transition zone” or “Schroeder frequency” the tightly and densely packed waves exhibit different characteristics and challenges. So, roughly two zones with different approaches to dealing with each.
BASS FREQUENCY ZONE (<300Hz)
It’s recommended that you first treat the bass zone to reduce the bass peaks and nulls which is likely to improve other areas of the frequency spectrum as well. Treating the bass region requires low-frequency absorption.
There are several types of bass traps which work differently from each other.
The most popular DIY bass trap is the "resistive" broadband type usually filled with fiberglass (or cotton etc) which should have a minimum thickness of 4" with the thicker the better. The, resistive traps works best when the sound air particle SPEED is maximized (not its pressure) which occurs at one-quarter of the wavelength's distance out from the wall. For example, 100Hz has a wavelength of 11.3feet so one-quarter equals 34". It’s very important to pull the resistive bass traps away from the wall boundaries to create an air space with the minimum being between 6.8” and 11” which corresponds to ¼ the wavelength of 500Hz and 300Hz respectively. Walls with doors in them or open areas will measure acoustically as having longer dimensions than the physical room’s dimensions due to bass leakage so experimentation and iterative testing and measuring is key. Remember to document every bass trap placement change with what the dB reading is pre- and post-change and a short blurb on the subjective change in the music you’re hearing.
Another bass trap type is the "membrane" or "diaphragmatic" which works on the principle of absorbing sound most efficiently when the sound wave's PRESSURE is maximized, which is right at the point on impact with the wall - so diaphragmatic absorption traps hang on the wall and take up much less room foot print.
Since all small rooms suffer from bass modes you will need a combination of bass traps, multiple subwoofers, and parametric EQ to get the bass right. Typically the more bass traps you use the better the peaks and nulls become (i.e. lowering a peak and raising a null) while reducing ringing time and reverb time. BUT you will also need to turn up the bass volume. There are 2 other problems: (i) the bass traps don't magically stop working at say 300Hz which would be ideal, they keep on absorbing higher frequencies, albeit less effectively the higher up in freq you go, which only compounds the dead sounding room problem, and (ii) manufacturers don't always tell you how to properly set the bass traps up to maximize their effectiveness which may be self serving to get you to buy more of them.
To counter the bass traps absorbing higher frequencies, try putting something hard like a thin sheet of plywood in front of them so that mid-higher frequencies will reflect off of it while bass frequencies won't "see" the plywood.
MID/HIGH FREQUENCY ZONE (>300Hz)
After the bass region has been treated with absorption, turn your attention to the mid/high frequency zone by using reflections, diffusion, and absorption as the tools.
For the enjoyment of listening to music, treating 1st reflection points isn't really required (unless large slap echo exists between hard parallel surfaces) as Dr Floyd Toole points out in his latest book. The reflections actually add to the sense of listener envelopment and apparent sound source width and helps create a low "Inter Aural Cross-Correlation" which is a fancy scientific term that means that the left and right ears are hearing different things; A high IACC means the ears are hearing very similar or the same thing, which is bad and not as musically satisfying – think mono vs stereo recordings. Toole goes on to say that treating 1st reflection points is a good idea IF you're a musician who is mastering their music or someone doing comparative stereo component evaluations (magazine reviewers?) who does not want to hear any impacts of the room on their work.
To keep the energy within the room and avoid making a dead sounding room, I'd recommend you use diffusion, Where you think you want to put diffusion will dictate whether it should be 1Dimensional or 2Dimensional. 1D is recommended for scattering sound latterly (horizontally) and should be placed on the front wall and side walls in front of the listening seat to widen the apparent sound stage width. 2D should be placed on the rear parts of the side walls and back wall behind the listener to create a sense of listener envelopment.
Common 1D types include QRD, hemi-cylindrical, binary-amplitude (and others?) while 2D would include Skylines and derivations thereof.
Secondly, you want the diffuser to work as broad range as possible so as not to act as a low pass filter and throw off your spectral balance that you paid dearly for in your selection of speakers High frequency effectiveness for:
* Skylines is determined by the size of the block (not the depth) with small sizes allowing for higher freq diffusion effectiveness. I could only find 1.5" *1.5" blocks of wood for my Skyline which will work up to and likely beyond 4.5KHz which is higher than the highest note on a piano. Even George Massenberg's famous 'Studio C' uses 1"*1" sized blocks which will take it up to 6.75KHz or so.
* Hemi-cylindrical diffusers is a function of how hard the outer material is (so as not to absorb mid/high frequencies) and the angle of incidence; the max diffusion occurs head-on (meaning perpendicular) to the centre of the hemi diffuser.
* QRD is determined by the thickness of the wells with thinner being better.
The diffuser should work down to your room's transition (or Schroeder) frequency which is about 300Hz. Low frequeny effectiveness for:
* Skyline is determined by the max cell depth which should be a substantial % of the 300Hz freq wavelength. 50% would mean a depth of 22.6". Of course you could opt for 25% (11.3") or even 14% (6.5") but it would mean less and less effectiveness at 300Hz .
* Hemi-Cylindrical is determined by the length of the radius or strictly speaking the 'Sagita' which is that part of the radius that sticks out from the wall into the room when the hemi's arc is less than 180 degrees. The farther out into the room the radius extends the deeper the depth it diffuses to. The same calculations would apply as above meaning a radius of 6.5" will only be about 14% of the 300Hz freq wavelength and be less effective than a 11.3" or 22.6" radius.
* QRD well depths determine the LF limits. I've only seen one manufacturer which makes a 15" well depth. Good on them!
Lastly, the diffusion and scattering coefficients are useful metrics for evaluation purposes except that they haven't been standardized nor widely accepted or mandated for inclusion as part of a company's stock marketing collateral for their respective diffusers lines . . .
If you're planning on putting diffusion on the back wall behind the listening chair, then ponder the following considerations:
1.) LOW FREQUENCY OPERATING RANGE - as diffusers need to handle long wavelengths and should work down to your room's Schroeder or Transition frequency (typcially 300Hz), pick a design with the deepest cell/well depth as you can find or build yourself, with the limitation being distance from diffuser to listening chair (see point 2. below).
2.) DISTANCE BETWEEN BACK WALL & LISTENING CHAIR - should be 3 wavelengths of the lowest frequency that the diffuser will perform well at, so that the sound coalesces before it reaches your ears and troublesome lobbing isn't heard. If you're considering the more popular QRD- or Skyline-types of diffusers, then a conservative calculation of the lowest frequency wavelength will be to multiply the deepest cell depth in inches by 2 to get the entire wavelength of the lowest freq that the diffuser will work well at and then express it in feet by dividing it by 12 and then divide it into the speed of sound of 1130. For example, a Skyline of max cell depth of 7.5" will perform well down to 904Hz [ 1130/((7.5*2)/12) ]. The diffuser will continue to perform to lower frequencies but with diminishing ability. Now calculate 3 wavelengths of 904Hz as follows: 1130/904 * 12 * 3 = 45inches. So you'd need to sit at least 45inches away from the rear wall with a diffuser of max depth equal to 7.5 inches.
3.) DIFFUSER PLACEMENT - be sure they are centered at ear level and should cover 2ft below and above your ear level so a minimum dimension of 4ft.
4.) WALL COVERAGE AREA - Prof Trevor Cox a diffusion expert, told me that some general diffusion principles exist, most relevant is the less periodicity the more diffuse the scattering. Dr. Floyd Toole concurs saying "these designs get better as they get larger." So, to improve scattering efficiency over your desired wall area, choose a Skyline diffuser with the largest prime number or QRD diffuser with the largest number of wells to cover the desired area, and in both cases a max cell/well depth as calculated above. So it's better to have one large diffuser than several smaller ones put together. For a hemi-cylindrical diffuser, pick one with at least a 12" radius however when combined with other hemi-cylindrical diffusers it loses its ability to diffuse low frequencies, so space them apart, change angles, and change their radius depths too if possible.
The front wall is likely the least important wall to treat within the context of forward firing two channel stereo (not HT) speakers. The reason being is that a number of factors combine to make the sound from the front wall much less audible than say 1st reflection points off side walls, ceiling, and floor. From Toole's book, these factors include:
* sound energy propagation loss or decline in steady-state sound level as a function of distance through air at about -6dB per double distance
* reduced sound energy upon impact with surfaces that are absorbing or diffusing before traveling to the front wall
* precedence effect caused our attention to focus on the first arrival/direct sound and we simply are not aware of the reflections as spatially separate events, or much less so.
I know this is a lot of info to absorb (pin intended) so pm me if you like.
cheers,
kevin
Wow
Many thanks for the thorough and hugely informative contribution.
I have been busy elsewhere lately and not looking at the forum pages hence my delayed reply.
I have borrowed a fairly basic sound pressure meter and set it up at ear level in my usual sweet spot listening position. I also created a CD of test tones and measured the outputs and plotted this onto a graph.
The results are a little unscientific for several reasons. One is that for a few of the frequencies the perceived volume was higher but the meter said it was lower...and another is that at higher frequencies (where most of my issues are) the are of focus from the speakers is very tight. I can move my head a few inches left or right and hear slight shifts in amplitude. This is also measureable. I could actually see the meter changing as I moved in to read it and stepped back again! It has proved very difficult to be accurate but has given me a useful picture of the obvious peaks and nulls.
I just need to think about what I am prepared to live with as this is our home as well as my hifi space. I will have to compromise somewhere between getting the best sound possible and not filling my space with large traps etc.
One more thing to note to anyone that might be really new to this like me. I was amazed about how much difference simply moving the speakers makes. A couple of inches out from the rear wall and the same to one side or another really changed the character of the sound emphasising and de-emphasising certain frequencies. I think I have improved some aspects already just by carefull speaker placement and measuring the results.
Many thanks and I'll post again if I get something worth writing about!
Martin - congrats on getting a SPL meter and using test tones to measure dB for the various frequencies your test tones span.
It sounds like your SPL meter is working fine, and here's why:
"for a few of the frequencies the perceived volume was higher but the meter said it was lower"
If your head is not at the exact same spot as the meter then you will hear different SPL levels so it's very plausable that what you heard as a louder sound was in fact quieter at the mic of the SPL meter.
"higher frequencies (where most of my issues are) the are of focus from the speakers is very tight"
High frequenices have smaller wavelenghts which are much more directional than longer bass wavelengths. So it's not surprising that the tweeter's dispersion pattern is smaller and tighter.
Moving the SPL meter forward 6" or backwards or side to side or up and down shoud show differences in SPL levels as waves combine to create louder peaks or cancel each other out to form nulls so you're experiencing sound acoustical physics in the comfort of your personal home flat.
Read up on acoustics and do buy Dr Floyd Toole's latest book like I suggested elsewhere. You won't regret the education and how it could help shape your treatments etc.
- Status
- This old topic is closed. If you want to reopen this topic, contact a moderator using the "Report Post" button.
- Home
- Design & Build
- Construction Tips
- DIY room treatment