split off from http://www.diyaudio.com/forums/multi-way/159029-large-3-ways-design-build.html 
I'll take a side track into the wild world of horn flare design and construction.
The concept:
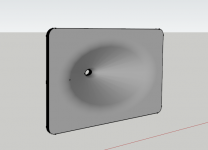
Top view:
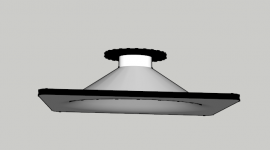
Side view:
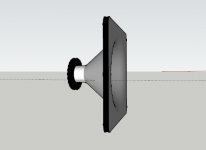
My original idea was to cut this shape right into the front baffle, as I did here:
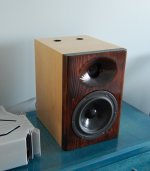
That is labour intensive and pretty much one-off, my hard work goes into the baffle and that's it. I wanted to play with mold building and casting so where to find a better place to start than with a horn flare
Basic idea is a elliptical flare, conical in shape with 90 degrees horizontal dispersion, 40 degrees vertical.

Moving to a compression driver is something I've been meaning to try and this is a good opportunity.
The horn flare will not be a problem to construct - I won't need a CNC (there were and are people that can fabricate accurately without them) and I'll try to go through the process with a few pics to show what I'm doing. I'm a bit pressed for time right now with a few different things happening but I may find time on the weekend to get started on the flare..
I don't want to cross the HF driver too low - 2-2.5k is where I want to be.
I'll take a side track into the wild world of horn flare design and construction.
The concept:

Top view:

Side view:

My original idea was to cut this shape right into the front baffle, as I did here:

That is labour intensive and pretty much one-off, my hard work goes into the baffle and that's it. I wanted to play with mold building and casting so where to find a better place to start than with a horn flare
Basic idea is a elliptical flare, conical in shape with 90 degrees horizontal dispersion, 40 degrees vertical.
Make a positive mold, throw it in an oven at like 250C, with a piece of 3mm PET on top. Wait a few minutes, take it out of the oven, trim.
Presto! and you got a real good looking horn flare.
Magura
EDIT: I think it's about time, to direct your attention towards your stats.....now we are 13 whom will laugh when it won't work
Presto! and you got a real good looking horn flare.
Magura
EDIT: I think it's about time, to direct your attention towards your stats.....now we are 13 whom will laugh when it won't work

I have to say I'm impressed with the thought put into the cabinet design. And you even thought out the construction in detail as well. I convinced it will work the way you think it will. Most of the naysayers seem to have fallen away. I voted "It'll Work" early.
Thanks
More of the design concept:
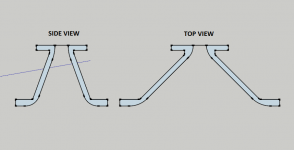
A section view through the centre axis vertical and horizontal showing the details of the throat and mouth.
To construct a mold for this shape is tricky (obviously) but not outside the realm of possibility. Suggested was a CNC machine to cut the profile but I don't have access to one of those. I'm relatively old school in any case and can usually come up with a way of doing things differently.so...
It starts with cardboard. From cardboard I lay out and cut an ellipse of the mouth. This will be where the sides of the flare meets the front baffle, without a roundover. I then make a cone, ordinary straight round cone from paper. Trial and error gets me to the exact dimensions after a few tries and I wind up with this:
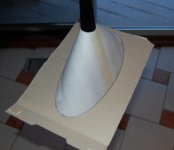
That is the ellipse cut out from cardboard (Frosted Flakes cereal box side
 ) forcing the cone into the correct shape. The throat opening of the cone is 1".
Using a careful, steady hand I trace around the cone where it meets the cardboard, cut on the line on the paper to get this:
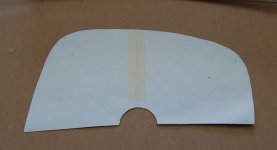
I then transfer that shape to cardboard.
Last edited:
Make a positive mold, throw it in an oven at like 250C, with a piece of 3mm PET on top. Wait a few minutes, take it out of the oven, trim.
That's not a bad idea! I'll try that I think.
EDIT: I think it's about time, to direct your attention towards your stats.....now we are 13 whom will laugh when it won't work
I'll laugh too.
next step is to make the form. I use a scrap of OSB and screw a large dowel to the centre, making sure the it is perpendicular. The dowel I used (old broom handle) was a bit small so I had to add a couple layers of cardboard and masking tape to build it out to 1".
The cardboard elliptical cone is then slid in place with the dowel through the throat hole:
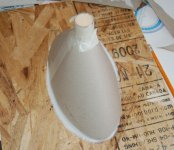
I line it up and trace around it where it meets the OSB. I use silicone on this line to glue the cone in place.
The cardboard elliptical cone is then slid in place with the dowel through the throat hole:

I line it up and trace around it where it meets the OSB. I use silicone on this line to glue the cone in place.
After the silicone cured, I sprayed on some polyurethane to seal the cardboard then I drilled a few hole in the back of the OSB to access the cavity. I used spray foam to fill the cavity and let that cure overnight.
Next came some filling and sanding:
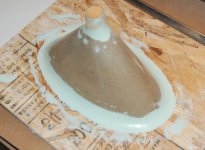
More filling, sanding and several coats of polyurethane:
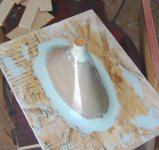
It is glassy smooth now and is getting several coats of wax as a release agent.
Next came some filling and sanding:

More filling, sanding and several coats of polyurethane:

It is glassy smooth now and is getting several coats of wax as a release agent.
With the "plug" built, I built a form on it to make a negative of the shape:
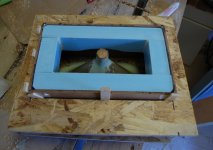
While the plug is very near perfect, it can be improved upon and this gives me the opportunity. Making a negative from plaster of Paris will serve two functions: First, it will allow me to create a smoother and more perfectly shaped positive for future castings since I can correct any of the defects in the negative before casting a new positive.
Second, once the new positive is created, the negative can be cut in half and modified to form the outer cast for backside of the horn flare.
It took 5 litres of plaster to fill:
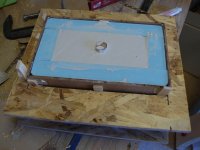
I'll let this set overnight and reveal my masterpiece tomorrow.

While the plug is very near perfect, it can be improved upon and this gives me the opportunity. Making a negative from plaster of Paris will serve two functions: First, it will allow me to create a smoother and more perfectly shaped positive for future castings since I can correct any of the defects in the negative before casting a new positive.
Second, once the new positive is created, the negative can be cut in half and modified to form the outer cast for backside of the horn flare.
It took 5 litres of plaster to fill:

I'll let this set overnight and reveal my masterpiece tomorrow.
Again i have to spout the "ingenious" bitI'll let this set overnight and reveal my masterpiece tomorrow.
If there is one thing i have learn't it's that virtually anything can be done! It's just a question of working out how to do it simply & cheaply without compromise.
By the way, i voted that your enclosure will work
Nice one, great work & ideas
Good looking work on the horn casting! Look forward to seeing how that comes out
Thanks
Very nice indeed John.
Thank you
This is a great tutorialKeep it coming!
By the way, what did you use for making those rendered images / drawings of the waveguide?
Thanks but a tutorial indicates a tutor, as in someone who knows what he is doing. I'm learning as I go.
I'm using Sketchup for the drawings.
Again i have to spout the "ingenious" bit
Nice one, great work & ideas
Thanks again,
Waiting game now while the plaster cures. It is very hard already but I'd rather not take the chance of breaking it un-molding the plug.
Tomorrow is another day.
Oh go on, warm up the oven and shove 'er in. Done before 8 this evening
Pizza in one oven, apple pie in the other

You should know you can't rush perfection!
Ok, I couldn't wait either - I took it out:
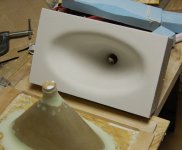
It slipped out easily - release agent was 3 coats of car wax and a light coating of vasoline. Nice to see that there were no bubbles and that the shape appears to be virtually flawless. I've even impressed myself!
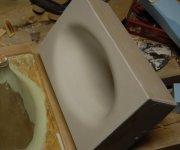
Kinda looks like a bathtub.
I don't want it to crack so I put it in a sealed up plastic bag for tonight.
Ok, I couldn't wait either - I took it out:
Those look great. So that's what else you can do with vaseline eh?
I don't want it to crack so I put it in a sealed up plastic bag for tonight.
Excellent idea. Maybe put them in the fridge too.
Thanks men!
Mission for tomorrow is to immaculately smooth out the new casting with fine sandpaper and get a form ready for the new positive casting. Depending on how dry the new casting is and if I can properly seal it, I may cast the new positive also.
Casting the positive would require heating it right?
I'd guess you'd want all the moisture out of the mould if it's to get quite hot. Could that potentially crack the thing, if the water turns to steam? I suppose it wasn't that hard to make in the first place, so you can always make another if it breaks.
I know thick plaster can take weeks, sometimes months till all the moisture is out.
It seems the water combines with the powder in a chemical reaction that causes the plaster to set. A reverse of the process that made the powder in the first place. So any spare water, not integrated into the structure could indeed perhaps crack it. That is if it were to build up any significant pressure somewhere inside.
Maybe gently heating the thing to speed up the drying process would be a good idea. It will obviously be fully cured, but you need to get the water out somehow.
Excellent idea. Maybe put them in the fridge too.
No room - too much beer in there.
Casting the positive would require heating it right?
My main concern is to have it dry enough to effectively seal the surface in order to ensure it will release the positive casting. On the plug I used solvent based polyurethane over the cardboard because I wanted superior protection for the water in the plaster casting (I didn't want the cardboard to get soggy).
With the plaster negative, I'll use water based polyurethane to seal it so it should be ok if the plaster is still a bit damp.
Casting the positive will make it slightly warm so no real amount of heat involved.
- Status
- This old topic is closed. If you want to reopen this topic, contact a moderator using the "Report Post" button.
- Home
- Design & Build
- Construction Tips
- Casting Experiment: Elliptical Horn Flare