No room - too much beer in there.
Oh darn.
Thank you Jarrett,

You are wrong, it means a lot to me - I see some of your own work and I know your skill level is high.
At this moment the negative is in my oven where I'm trying to dry it out a bit faster. Sitting in the plastic bag all night was probably a good move - the inside of the bag was dripping wet. If plaster is anything like cement (it is) it helps if the initial drying after casting is slowed.
The oven is set for 200 degrees F, 3 minutes at a time every 30 minutes. It keeps it summer day hot inside the oven.
I'll give it a couple of hours in there (it's already had 1) while I work on the form for the new positive casting. I'm on the fence about the mounting flange shape: rectangular (as shown in my render) or elliptical, following the shape of the horn itself. The rectangular shape is easier to route into the baffle when I mount it but I haven't let things like that bother me before. The elliptical shape may resemble an eye too much - I can't abide anyone staring at me, even my own speakers.
A pair of Cyclops?
 Ok, this might look stupid and offtopic but I'll give it a try
 This waveguide molding makes me wanna try it but first I'd like to try some sketchups. Now, do you think you can upload the sketchup files, I'd like to figure out how did you drawn the horn. If you used a tutorial or something form the web, a link would be great.
Thank you!
Neat sub-project.
What are you going to use for the horn/waveguide when you construct it?
Thanks,
I will try the high density foam I have coming to start, just to see how it turns out. If everything looks good, I will order some black casting resin - 2 part polyurethane for the final pieces.
Ok, this might look stupid and offtopic but I'll give it a try
.
This waveguide molding makes me wanna try it but first I'd like to try some sketchups. Now, do you think you can upload the sketchup files, I'd like to figure out how did you drawn the horn. If you used a tutorial or something form the web, a link would be great.
It's good if someone can be inspired by this.
I can do a mini-tutorial here on how I did it. I'm no expert in Sketchup by any means. Give me an hour or so and I'll post it.
Thank you for your help, don't wanna take much of your time though...
No problem. The time I needed wasn't to get do the tutorial but to go out to my shop and let the reality of -12 hit me
I'll show specifically how to do a round 3-D shape, assuming you know how to do the basics.
First, make your design in 2D (use the Top view to lay it out) and create a centre point (the intersection of the 2 dotted lines):
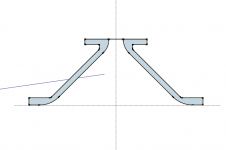
Add as much detail as you want here - see it as a thin slide through the object but erase all internal lines so you have one flat shape.
Create a circle vertically (on the blue axis) with it's centre point on the intersection of the dotted lines and make the radius half the total width of the object:
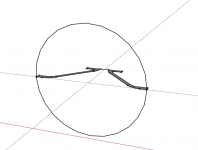
Erase half of the pattern and use the "follow me" tool (arrow in pic) to build the pattern around the circle:
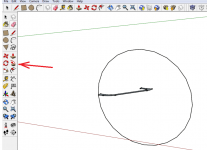
You get something like this:
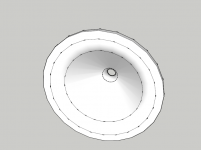
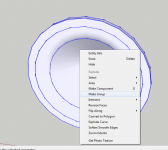
Use the select tool and select the entire object, Right click and click "make group". This makes an object:
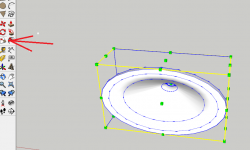
Then you can use the "scale" tool to resize the object:
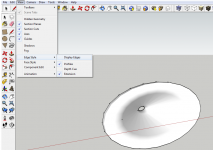
To improve the appearance, change the view, edge style to "display edges" uncheck that box:
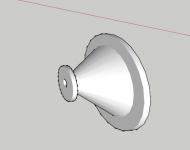
Rotate and study your new baby!:
Have fun but for Gods sake build something! - don't lose yourself in the virtual world of Sketchup!
Thanks for the info John,
I am now looking for plaster and the other materials needed on our market. I am willing to give it a try, even if for a smaller model, just to gain experience working with this stuff.
Regarding the shape of the flange, I guess that if the horn and the baffle will have the same color/clear coating, this pretty much negates the need for a specific shape (especially if you glue the waveguide or clip in a manner not to show of the screws on the front).
Plaster should be easy to find. I used ordinary building type in a 10kg bag, less than $10 here. It's interesting to do.
I've settled on a rectangular flange with round corners:
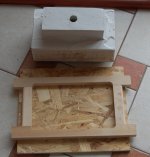
That's the negative sitting on a heat register drying out.
The casting is really easy to cut on the tablesaw:
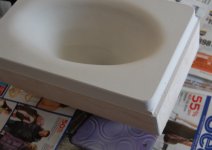
an old dull carbide blade zipped thru it like a hot knife through butter It has to be cut and the corners rounded to fit part way down in the form shown above.
I've settled on a rectangular flange with round corners:

That's the negative sitting on a heat register drying out.
The casting is really easy to cut on the tablesaw:

an old dull carbide blade zipped thru it like a hot knife through butter
Very neat indeed 
Depending on how this turns out i wouldn't be surprised to see some members possibly utilising this method to make larger exponential or hyperbolic horns (or relatives like tractrix) for their own uses. Sounds crazy but a paper mache & chicken wire mold springs to mind instead of your initial cardboard job
Top thread, i hope others are enjoying it as much as me I may not comment much but that could be because my fridge is being emptied of beer
Depending on how this turns out i wouldn't be surprised to see some members possibly utilising this method to make larger exponential or hyperbolic horns (or relatives like tractrix) for their own uses. Sounds crazy but a paper mache & chicken wire mold springs to mind instead of your initial cardboard job

No kidding, you don't hang about once you decide where things are going!Man Of Action!
Top thread, i hope others are enjoying it as much as me

Absolutely.Top thread, i hope others are enjoying it as much as me
I may not comment much but that could be because my fridge is being emptied of beer

The nice thing is, if something goes south, John can always add a drain and some taps and be able to wash up while he's still in the shop.
Cheers.
The nice thing is, if something goes south, John can always add a drain and some taps and be able to wash up while he's still in the shop.
Cheers.

I have the foam but I haven't had the time to play with it yet. I need to experiment first. The instructions say 25 seconds to mix it, 45 seconds to pour before it starts to foam. Not much time.
I managed to get the new positive cast:
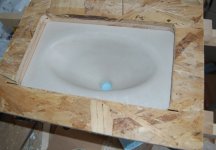
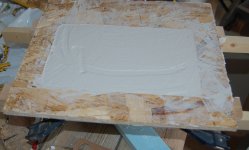
Did that last night now I need to let it dry a few days before I try to unmold it. Wish me luck.
I managed to get the new positive cast:


Did that last night now I need to let it dry a few days before I try to unmold it. Wish me luck.
The plaster is much cheaper than the foam and more accessible. It takes a bit of getting used to and doesn't dry quickly but does provide an extremely smooth non-yielding surface.
I'm going to these lengths for the fun of it as a new DIY experience plus I plan on making at least 3 pairs of these horn flares for various projects. I want this mold to be reusable and easily repairable if damaged.
Filling the voids in the panels will most likely be happening on the weekend when I have some free time and I can ingest some liquid bravery for this nerve-racking event.
The plaster is much cheaper than the foam and more accessible. I plan on making at least 3 pairs of these horn flares for various projects. I want this mold to be reusable and easily repairable if damaged.
I don't want to be contrary, but fiberglass is also cheaper and more accessible for producing your horn flares.
Filling the voids in the panels will most likely be happening on the weekend when I have some free time and I can ingest some liquid bravery for this nerve-racking event.
This I'd like pictures of....( not the drinking, the filling ).
This had been a fun to follow project, YGM
John
This I'd like pictures of....( not the drinking, the filling ).
I'll give you both!
I mixed up some of the high density foam this evening. It is hard but a bit brittle so I won't try to cast a horn flare with it. I'll wait till I get some casting resin.
I unmolded the new positive:
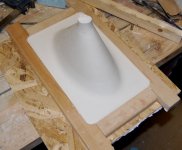
ready for sanding, patching and sealing. I also split the negative down the middle and glued on some hardboard to space it off the new positive - this gives the wall thickness of the horn flare. I'll need to cut a rebate in the negative to form the mounting flange in the horn for the compression driver. The idea is to have a complete, finished horn flare once it is cast, ready for action.
More pics soon.
Nice work indeed
I dont know if its a special plaster, but it looks exceptionally smooth
Im a glassfiber guy, so personally I would consider a thin layer of fiberglass on the mold, to make it stronger
Might also sand the throath part into slightly conical shape, making it "slip" better
Would make it possible to do a ferpect fit fore driver exit by cutting down length
Waveguide shape
Im not sure which shape you have calculated, but looks OS Gedlee inspired
If so, how do you calculate this oval variant
I suppose you know all about that, but just fore the record, if a round OS shape is "pushed" to oval, its been mathematically changed to someting different
But interesting to follow your project
- Status
- This old topic is closed. If you want to reopen this topic, contact a moderator using the "Report Post" button.
- Home
- Design & Build
- Construction Tips
- Casting Experiment: Elliptical Horn Flare

