This thread is for people interested in building their own nice looking case for their project. I know quite a bit has been written on this subject, but this is an attempt to consolidate enough information and links in one place to be a useful resource. I am not trying to take credit for anyone else's ideas, but it would take forever to locate all the previous information out there and give due credit. Feel free to post who you are and what your idea was if you think I am repeating your work. If you have experience with this, please contribute. As long as you work safely, there are several ways to do each step.
I will start with a link to an on line seller. This company sells metals and plastics at reasonable prices, and they will cut to size for a small fee. Look around on line to find someone that can ship to your location. I din't know if this company exports or not.
I am not affiliated with this company or other companies I link to, in any way.
Online Metal Store | Small Quantity Metal Orders | Metal Cutting, Sales & Shipping | Buy Steel, Aluminum, Copper, Brass, Stainless | Metal Product Guides at OnlineMetals.com
The idea here is to provide a procedure to make your own case with a minimum of relatively inexpensive hand tools. If you have a drill press, thats great. If you have a machine shop, thats even better. This is for the DIYers that don't. Hopefully most here will have access to a drill press, but a hand drill will work.
Some basic tools:
Combination square. A must for a clean layout and accuracy.
Enco - Guaranteed Lowest Prices on Machinery, Measuring Tools, Cutting Tools and Shop Supplies
Tap extractors. This could be handy to have.
Enco - Guaranteed Lowest Prices on Machinery, Measuring Tools, Cutting Tools and Shop Supplies
Tapping fluids. Scroll down to the bottom for one made for Al.
Enco - Guaranteed Lowest Prices on Machinery, Measuring Tools, Cutting Tools and Shop Supplies
Also, C clamps are essential. I will add others as I think of them.
I received the December issue of Audioxpress today and I see there is an article by Bruce Brown on building your own cases. I don't think what I'm doing here will repeat his work.
I need to say up front that I will not be building a case myself, so there will be no pictures from me. I will provide a few sketches as I go along. Hopefully, some will build something and post pictures.
The backbone of a good case is the frame that holds the large flats and heat sinks together. I like (back when I could still do this) to use 0.5" X 0.5" X 0.125" Al angel extrusion. The two readily available profiles are 6061-T6 and 6063-T52. The 6061 has rounded edges and I have not seen it smaller than 0.75" X 0.75" X 0.125". The 6063 has square edges. Another extrusion you might want to consider is square rod. It can be found in many sizes, but for our purposes here I will only show the 0.5" and the 0.25" sizes.
The 0.125" thickness can be drilled and tapped and makes very strong connection. The square rod can be drilled and tapped also giving much more thread for even more strength. I recommend using the 6061-T6 alloy of the square bare because the 6000 series of Al is much easier to drill, tap and machine in general than the softer alloys such as the 5000 series and below.
For reference, a 48" length of the 6063 angel described above is $3.69. The price per foot goes down for longer pieces (they have up to 8' lengths) but UPS charges extra for shipping the long pieces, so you come out ahead by buying the 4' pieces if you plan to cut your own. If you order that precut into, for example, 4 - 10"pieces and 4 - 2" pieces the price goes up to $8.16, before shipping. You will save money by cutting your own, but only if you already own the tools. The advantage to cutting your own is that you can miter cut the ends for cleaner looking results.
I have attached a drawing to illustrate the extrusion profiles I discussed. Ask questions or add comments. I'm sure many of you have experience with this.
Attachments
I just noticed I misspelled your in the thread title. Hopefully most of you will know what I intended.
The first attachment shows what the angel could look like after drilling. You can drill the holes large enough to use bolts and nuts for the sides and bottom if you prefer, but for the top I recommend the tapped holes.
The next two attachments show the two angel profiles as they would be used. The holes shown are sized for 6-32 clear hole and tap hole. Remember, these are just suggestions, use whatever you want.
Attachments
Hi Steve,
Great idea. I've been on to making such a guide myself, as I help a lot of newbees around here. It's always the same problems they have, and mostly the same questions they ask.
To add my 2 cents:
Cutting fluid for aluminum is waste of money, simply use alcohol. In some cases it will even surpass the "real" aluminum cutting fluids.
Taps and drills should be of the plain HSS type, not plated, as the plating actually makes the tool less suitable for aluminum, due to lower sharpness. The benefits of plating, are less tool wear and lower friction. None of those are issues when cutting aluminum.
Also worth a note, is that HM (carbide) tools are also less suitable for aluminum.
When working on an aluminum sheet, to avoid scratches, simply cover it with adhesive tape. This can then be removed once all the work is done, and you will have a nice surface quality, with almost no effort.
Also a standard issue I see almost always, is that people don't calculate the cutting speed for their tooling. This often makes the difference between perfect and a mess.
When using hand tools, and a simple manual drill press, a rule of thumb is to not go past 25 meters per minute. Actually this is very low for cutting aluminum, but as the cooling and lubrication is usually pretty bad under such circumstances, 25 M/min. is a good figure to go by.
To calculate the cutting speed the formula looks like this:
Desired cutting speed, in meters per minute / tool diameter in millimeters * 1000 / Pi
Magura")
Great idea. I've been on to making such a guide myself, as I help a lot of newbees around here. It's always the same problems they have, and mostly the same questions they ask.
To add my 2 cents:
Cutting fluid for aluminum is waste of money, simply use alcohol. In some cases it will even surpass the "real" aluminum cutting fluids.
Taps and drills should be of the plain HSS type, not plated, as the plating actually makes the tool less suitable for aluminum, due to lower sharpness. The benefits of plating, are less tool wear and lower friction. None of those are issues when cutting aluminum.
Also worth a note, is that HM (carbide) tools are also less suitable for aluminum.
When working on an aluminum sheet, to avoid scratches, simply cover it with adhesive tape. This can then be removed once all the work is done, and you will have a nice surface quality, with almost no effort.
Also a standard issue I see almost always, is that people don't calculate the cutting speed for their tooling. This often makes the difference between perfect and a mess.
When using hand tools, and a simple manual drill press, a rule of thumb is to not go past 25 meters per minute. Actually this is very low for cutting aluminum, but as the cooling and lubrication is usually pretty bad under such circumstances, 25 M/min. is a good figure to go by.
To calculate the cutting speed the formula looks like this:
Desired cutting speed, in meters per minute / tool diameter in millimeters * 1000 / Pi
Magura
Last edited:
Hi Magura,
Thanks for contributing that info. I am a trained machinist, so I sometimes forget to give enough information to beginners when it seems so obvious to me.
Rob Southgate (RobS) sent me this link. It should be helpful also.
Untitled Document
Thanks for contributing that info. I am a trained machinist, so I sometimes forget to give enough information to beginners when it seems so obvious to me.
Rob Southgate (RobS) sent me this link. It should be helpful also.
Untitled Document
Here is an example of what a side panel could look like. I have shone an example of mounting the angel flush to the edges in one, and inset the thickness of the top or bottom panel in the other. For these examples, and the previous, I am showing 0.125 thick panels. You can select the thickness that suites you. I will leave out dimensions and other unimportant details in some of the drawings because these are suggestions, not blueprints. You can use either flush, inset or mix them up to generate a construction to appeal to your own taste.
I Zipped these two together as they were each too large as PDF.
I Zipped these two together as they were each too large as PDF.
Attachments
I prefer to use PC cases as they come with cut outs for mains sockets and fans mountings. For what they are the yare usually very cheap.
I use the desktop cases so I can sit a mixer on top.
Attempts at my own cases always ended up needing expensive punches etc. so I gave up.
I use the desktop cases so I can sit a mixer on top.
Attempts at my own cases always ended up needing expensive punches etc. so I gave up.
I see you're making this in Autocad, could you post those images in perspective?
The images you just posted, are not beginner friendly.
Magura
If you use AutoCad I can post my files. You can probably redraw them much faster than I could. I'm pretty slow these days since I can't use my hands.
I prefer to use PC cases as they come with cut outs for mains sockets and fans mountings. For what they are the yare usually very cheap.
I use the desktop cases so I can sit a mixer on top.
Attempts at my own cases always ended up needing expensive punches etc. so I gave up.
I am hoping to detail how a careful and patient person can make cases without the expensive tools. It can be done.
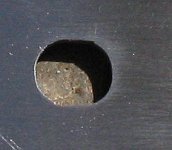
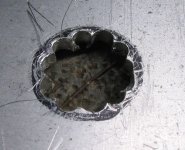
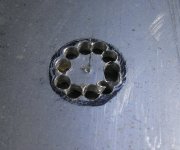
Chain Drilling
Hi nigel, I too had problems with making the cutouts that is until I tried the method of chain drilling and filing. Basically you mark the hole you want to cut out. then with a small diameter drill drill many holes close together, then using a needle file (or fine wire cutters) remove the material between the holes giving a bigger hole. Finally file out using appropriate small files until the hole is the size you need.
Attached are a few images. Not the best choice as what I thought I needed wasn't (ie I thought I needed a simple round hole) and the ending hole doesn't look like what it started out as, but it will give you the general idea
Tony.
Attempts at my own cases always ended up needing expensive punches etc. so I gave up.
Hi nigel, I too had problems with making the cutouts that is until I tried the method of chain drilling and filing. Basically you mark the hole you want to cut out. then with a small diameter drill drill many holes close together, then using a needle file (or fine wire cutters) remove the material between the holes giving a bigger hole. Finally file out using appropriate small files until the hole is the size you need.
Attached are a few images. Not the best choice as what I thought I needed wasn't (ie I thought I needed a simple round hole) and the ending hole doesn't look like what it started out as, but it will give you the general idea
Tony.
Attachments
If you use AutoCad I can post my files. You can probably redraw them much faster than I could. I'm pretty slow these days since I can't use my hands.
Sorry, can't help you out. I have Solid Works and Qcad. Neither of those, are all that happy communicating with Autocad.
Magura
That's OK. I will work on it.
I would like to link to this thread also. Some good points are made here.
http://www.diyaudio.com/forums/construction-tips/154708-square-holes-aluminium.html#post1975329
I would like to link to this thread also. Some good points are made here.
http://www.diyaudio.com/forums/construction-tips/154708-square-holes-aluminium.html#post1975329
You need to get yourself a young apprentice, then you will be reminded of what's not obvious
Good idea, but I no longer work.
If already mentionned, just pass...
The simplest way to make a case is to directly screw plates on the heatsinks.
No more parts are needed.
If already mentioned? There are only 16 post to read through so far. That hasn't been mentioned yet. I had to start somewhere, and I wanted to present as many options as possible. That can work if you already have two heat sinks and they are the length you need to provide the case depth you want. What if you wanted to put the heat sink on the back?
At least! Steve, bravo for your initiative!
This is an extremely useful thread, which was a serious lack in diyAudio forum. Some of you, you are members of M.O.A.N. society like me. The vast majority of threads in this forum is consumed in theoretical approximations and discussions, which in the best case end-ups in PCB implementations. I have a different option. There are hundreds of ready offered circuits. The only that we have to do, it is to select one of them as is or to make combinations-modifications of different of our liking, to enclose in a case. IMHO, the external appearance of a project it is equivalent with the circuit used inside. A nice-looking case it is a must for this.
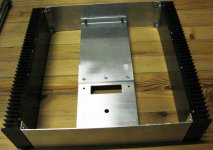
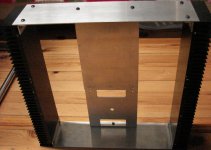
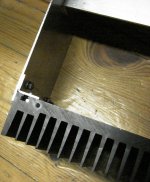
Probably, you have seen some of my projects in "Post your solid state pics thread" in which i have posted as well pics of my tools. I spent around 1200 euro to buy ready tools, or to make some by myself. This time i am in the process of building one power amplifier and one preamplifier from the scratch, and i have started from the construction of cases which is the dirty work. From luck i looked in this thread started from Steve, and i thought that it is a good chance to contribute as i have the cases of projects in the process stage... you know: sketch on the paper, measuring of dimensions, cutting and drilling, some corrections etc.
I attach some pictures of the chassis of amplifier assembled off-hand for confirmation of precision of cutting, bending and drilling; i will attach separate pictures of each part during disassembling. I hope to will be consistent in my promise, because i must to deliver the two projects in my customer in one month to get some money for celebrating Christmas like all the Christians; and above all to fill the oil-tank of my central heating, because the strong cold starts in December at Greece, and my mother is 78 years old! I have spent already my customer's advance of 400 euro in my dentist. I ask your comprehension in the case of delayed replies because the above. You should know that this is the only job which i have for living. OTOH, i will take shots of each stage of construction to post later with explanations.
Fotios
This is an extremely useful thread, which was a serious lack in diyAudio forum. Some of you, you are members of M.O.A.N. society like me. The vast majority of threads in this forum is consumed in theoretical approximations and discussions, which in the best case end-ups in PCB implementations. I have a different option. There are hundreds of ready offered circuits. The only that we have to do, it is to select one of them as is or to make combinations-modifications of different of our liking, to enclose in a case. IMHO, the external appearance of a project it is equivalent with the circuit used inside. A nice-looking case it is a must for this.
Probably, you have seen some of my projects in "Post your solid state pics thread" in which i have posted as well pics of my tools. I spent around 1200 euro to buy ready tools, or to make some by myself. This time i am in the process of building one power amplifier and one preamplifier from the scratch, and i have started from the construction of cases which is the dirty work. From luck i looked in this thread started from Steve, and i thought that it is a good chance to contribute as i have the cases of projects in the process stage... you know: sketch on the paper, measuring of dimensions, cutting and drilling, some corrections etc.
I attach some pictures of the chassis of amplifier assembled off-hand for confirmation of precision of cutting, bending and drilling; i will attach separate pictures of each part during disassembling. I hope to will be consistent in my promise, because i must to deliver the two projects in my customer in one month to get some money for celebrating Christmas like all the Christians; and above all to fill the oil-tank of my central heating, because the strong cold starts in December at Greece, and my mother is 78 years old! I have spent already my customer's advance of 400 euro in my dentist. I ask your comprehension in the case of delayed replies because the above. You should know that this is the only job which i have for living. OTOH, i will take shots of each stage of construction to post later with explanations.
Fotios
Attachments

- Status
- This old topic is closed. If you want to reopen this topic, contact a moderator using the "Report Post" button.
- Home
- Design & Build
- Construction Tips
- Build your own case