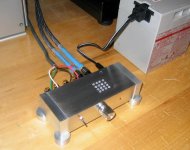
Well I moved this from the Digital section since this one didnt exist then. I finally upgraded the Sonic Impact and I must say Im shocked at the quality of sound. I replaced the plastic chassis with Al, used Cardas RCAs, decent binding posts, and hooked it up to a 9.5AH 12V battery. The original input was a mini-jack that routed the signal around the board until it got to some cheesy wires that attach to the pot. I removed the jack and ran the inputs directly to an RS pot (100k alps). I also removed the entire wiring mess that ran between the board and the pot/switch. And while I was at it, I replaced all the original wiring, except for the light.
All in all I must say this is a great sounding amp. Ive listened to it on my Stax headphones for hours at a time and never got fatigue that is often the case with SS amps. The sound is somewhat dry BUT extremely articulate. Crisp with zero sizzle. Metallic sounds are superb. Cymbels, cow bells, and percussion in general are great.
Im going to hook up the high efficiency speakers next and see how it fairs on them.
amt
Attachments
Great mod!
I just picked up one on clearance at my local Super Target ($24.98 - with SI's pyramid cardboard speakers and backpack included!) and want to do a project similar to yours. Would you mind letting me know what potentiometer you used (make/model) and where it can be procured?
Thanks and great job!
Robert
The pot is an Alps dual 100k sold at Radio Shack. They are $3 and work okay but are not exactly precision devices. I used it because I had it laying around but unless you have very sensitive speakers, a 50k will work better. Im going to replace mine when I get the time.
Good luck.
amt
Good luck.
amt
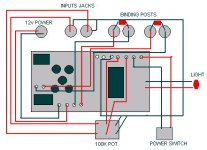
RS Alps dual stereo pot wiring
I finally have taken my Sonic Impact apart in an attempt to create a beautiful amplifier like amt has executed so well above. (This is my very first DIY project.)
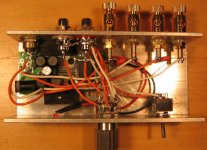
I can hook up almost everything from the excellent internal photo amt supplied above, however:
I see that the Sonic Impact board has connections for the potentiometer/power on cable labled:
" V + R L G L R "
I'm guessing this is how the connections are made (in the order they appear):
"V" = (I don't know on this one.)
"+" = to one side (positive side) of the power switch
"R" = from the right input's positive connection thru the pot and into this R
"L" = from the left input's positive connection thru the pot and into this L
"G" = to the other side (ground side) of the power switch
"L" = from the left input's ground connection thru the pot and into this L
"R" = from the right input's ground connection thru the pot and into this R
Is this correct as I don't know how to hook these to the Radio Shack potentiometer? These connections are my only remaining obstacles.
Can someone tell a newbie like me how to wire the potentiometer and on/off power switch to these terminals?
Thanks,
Robert
I finally have taken my Sonic Impact apart in an attempt to create a beautiful amplifier like amt has executed so well above. (This is my very first DIY project.)
I can hook up almost everything from the excellent internal photo amt supplied above, however:
I see that the Sonic Impact board has connections for the potentiometer/power on cable labled:
" V + R L G L R "
I'm guessing this is how the connections are made (in the order they appear):
"V" = (I don't know on this one.)
"+" = to one side (positive side) of the power switch
"R" = from the right input's positive connection thru the pot and into this R
"L" = from the left input's positive connection thru the pot and into this L
"G" = to the other side (ground side) of the power switch
"L" = from the left input's ground connection thru the pot and into this L
"R" = from the right input's ground connection thru the pot and into this R
Is this correct as I don't know how to hook these to the Radio Shack potentiometer? These connections are my only remaining obstacles.
Can someone tell a newbie like me how to wire the potentiometer and on/off power switch to these terminals?
Thanks,
Robert
Hi Robert
Heres what the wires are: ( V + R L G L R)
V and + = power into and out of the power switch
R = right signal input from pot
L = left signal input from pot
G = common ground to both channels
L = left signal input to pot ( abandoned)
R = right signal input to pot ( abandoned)
Heres a diagram that should help. One word of caution though: be very careful de-soldering and soldering around all those SMDs. Too much heat or stray solder will raise heck with the board and components.
Thanks for the complement on the chassis. Ive built three of these for friends and may produce some for sale. They are fabricated of architectual aluminum channel 6063 and 6061 bar and round stock. Ive put this on temporary hold since Im working on a CD-ROM transport chassis at the moment. I will probably offer it with or without inexpensive components and pre-drilled holes.
Send me an email if interested at ampbox@comcast.net
amt
Attachments

amt said:Well I moved this from the Digital section since this one didnt exist then. I finally upgraded the Sonic Impact and I must say Im shocked at the quality of sound. I replaced the plastic chassis with Al, used Cardas RCAs, decent binding posts, and hooked it up to a 9.5AH 12V battery. The original input was a mini-jack that routed the signal around the board until it got to some cheesy wires that attach to the pot. I removed the jack and ran the inputs directly to an RS pot (100k alps). I also removed the entire wiring mess that ran between the board and the pot/switch. And while I was at it, I replaced all the original wiring, except for the light.
All in all I must say this is a great sounding amp. Ive listened to it on my Stax headphones for hours at a time and never got fatigue that is often the case with SS amps. The sound is somewhat dry BUT extremely articulate. Crisp with zero sizzle. Metallic sounds are superb. Cymbels, cow bells, and percussion in general are great.
Im going to hook up the high efficiency speakers next and see how it fairs on them.
amt
nice chassis notwithstanding , .. how(if) did your mods change the sound?
")
I think that the sound was improved in that it was "cleaned" up . I have another SI on the way so I can do a side by side comparison but for now, memory has to suffice. I feel that the soundstage widened and that the bass response is deeper. These may be due solely to the big battery and "clean" 12v. The overall clarity was increased as well and that I attribute to being able to use good quality interconnects/jacks rather than a crappy mini plug to rca adapter cable and a slight pot upgrade. The mini plug ran the signal around the board, to the pot via micro wire and then back to the board, along side the power wires that also ran to the pot. And shielding by metal vs. plastic must have some effect. Once I listen to both together, I can give a more accurate and concise answer.
amt
amt
amt said:I think that the sound was improved in that it was "cleaned" up . I have another SI on the way so I can do a side by side comparison but for now, memory has to suffice. I feel that the soundstage widened and that the bass response is deeper. These may be due solely to the big battery and "clean" 12v.
amt
thanks, ... my SI amp improved as you describe just by using a big battery power supply. let us know once you have a chance to compare the 2 units side by side.
Excellent, excellent, excellent!
This thread was just was I was looking for!
Very nice job amt!
I have not done much modding myself -but after I read the review on this little sucker on 6moons -and noticed that some modding and a new cabinet would do wonders -I'm now looking forward to recieve this little amp so I can get started....
Thanks for the inspiration!
Don't know about a Canadian source, but I just ordered a sixpack from AMR Mart. Cheapest price I've found, And each aditional amp is just another buck to ship. Shipping to Canada ain't much extra.
For some reason, they dropped an extra $1.60 from the price--something to do with "Group Purchase Discount" (??)
Total price /ea including shipping:$22.37
For some reason, they dropped an extra $1.60 from the price--something to do with "Group Purchase Discount" (??)
Total price /ea including shipping:$22.37
Bill F. said:Since I've got a balanced source, I plan to put an XLR on each of my units and run them as bridged 30W monoblocks. No futher mods necessary to do this, right?
I doubt this will work. The Tripath works off a single-ended supply, and I'm pretty sure it probably already uses a full-H-bridge output topology. In other words, each channel is effectively already bridged. Check the data sheet to be sure, though.
- Status
- This old topic is closed. If you want to reopen this topic, contact a moderator using the "Report Post" button.
- Home
- Amplifiers
- Class D
- $30 amp upgraded