I'm hoping to write down my thoughts and decisions I'm making and hopefully receive some feedback on specific questions I might have. As I'm very new to this, I'll be happy to receive any feedback, concerns, or suggestions any of you might have.
I'll start with some background on the project, but then list out some of my current questions and concerns and hopefully some of you might be able to help me out.
So, I'm a mech engineer by schooling (you will see cad models in this thread) and while we did have to take a circuits class, let's just say that was 10 years ago and I'm basically having to learn basic electronics all over again. What seems to be pretty great from my perspective, is the great availability of pre-assembled modules that take the majority of the difficult stuff out of this.
I said I was an engineer, so let's start out with some "user needs"
I'm building the LX521 speakers, and would like to build my own amplifier. I want this to fit into a single box. I have a piece of furniture that this must fit in, with W X H X D dimensions of 500mm x 140mm X 390mm. I would like the box itself to be ~460x120x ~330.
For WAF I'm going to make the front panel out of wood. My wife and I both like the idea of a darker stained piece with some lichtenberg figures burned into it. If I go this direction, I would like to keep it very plain, without buttons, switches or lights on the front panel, but I'd be okay with a small IR receiver.
I have some freedom with regards to the back of the piece of furniture, and would be able to keep it open, or even mount a very quiet fan to pull air across/through the amp, but I would like to design the enclosure itself to have sufficient heat sink mass and conduction abilities to make this as unnecessary as possible. If I do have to add a fan, I would like to be able to plug it into the amp for power.
I'm using a minidsp for signal processing, and since it has the capability to do balanced output, I feel like that is at least slightly preferred. For the amp to be more "generally" useful, I'd like to include unbalanced RCA inputs as well. On the output side, I would like to use decent banana plug sockets, and possibly also 8 pin speakon connectors.
I was originally pretty set on doing an all UCD180 amplifier (8 channels) with a single SMPS1200, however after reading about most people building higher power circuits for the subwoofers and doing a bit of math, it seems like this would definitely power limit the subs. I've also heard that while the UCD180s are stable to 2ohm, they aren't all that happy about it. I'm curious if anyone has this setup, and if so, whether they run out of steam with it. My use case isn't requiring 110+dB of bass mechanik all day every day, but I will listen to some very bass heavy music loudly and would like to it not to fall on it's face.
I am still considering this option to start with, as I could always pull the 2x ucd180s out and create a simple 2 channel amp for other uses.
The next logical iteration would be:
UCD180 x 6 fed by SMPS1200 x1
UCD400 x 2 fed by SMPS400 x 1
With the Hypex soft start module.
This is the direction I'm currently leaning, but it has a lot of additional cost with the separate SMPS, and 2x cost of the modules, and I am still not entirely clear whether I am providing sufficient headroom or not.
I've recently been reading a lot of positive things about the Sure Wondom TAMP2500 MkII, which is a 2 channel with 500 watts at 3 ohm, and also 2 ohm stable. It also appears to be able to take the same voltage (25-50) as the SMPS1200 (46V) would put out, which means that it's possibly I would only require the one PS. Additionally, I would have to set the gain on this module independently to line up with the hypex amps. Is there a concern that it would not scale linearly?
It's also surprisingly cheap, which is helpful. and again, I could always pull it out for a different project if it doesn't work.
Open questions:
How to link system turn on with the DSP, and ideally via a remote control I already have? Unfortunately, the 4x10HD doesn't have actually power on, but I think the board has remote trigger options using a 12 v signal wire. Still trying to figure out how I would do this.
The chassis size I need seems to not be typical. The height is fine, but I have more width than the standard enclosures typically allow. I'm not sure it would ever make sense to create a custom sheetmetal body (sides, top and bottom, with the wood front and a machined rear panel, but I'm going to reach out the bizshop and see what is possible.
Any problems with using the TAMP with the Hypex SMPS? Does this lead to insufficient overhead on the power supply?
Last edited:
So I went ahead and purchased the 6xUCD180s, and the TAMP 2500. I figure I can try it and see how it works. I don't like the built in fan on the sure amp module. , which I plan on eliminating with use of a real heat sink, but I actually already have a much quieter fan that I could directly drop in place of the existing one in a worst case.
I think I have plenty of overhead with the hypex power source. I'm assuming the worst case "over draw" is just clipping, without the SMPS protecting itself in case of overdraw.
Obviously, although efficient modules, there will still be a significant need for thermal management, especially in a closed "cabinet". My current thought process is to find reasonable cost "modular" aluminum heat sinks that are at least the 165mm in length the SMPS is, that I could directly drill and tap to attach the modules to, and then lay them out in 3 or 4 rows, with the power source on one, the 6 UCDs on another one or two, and the TAMP on the last.
Regarding the "usability" I'm looking for with the system, and my desire to have the DSP and amplifier power on together, I still don't know if my minidsp board has the remote trigger function available, I guess I just need to crack the case and find out.
I am hoping I can include a small IR receiver that could trigger power on for both units, ideally that I could link to some function of an existing remote I have. Something perhaps like TinyIR2 Learning IR remote control receiver
The issue is figuring out how to power this circuit all the time, but I think I might be able to use the LED outs on the soft start module to do that, and then use the switch or pushbutton in to power on the amp, running a 5-12v trigger cable back to the minidsp (assuming it has the remote trigger section).
Hell Drivemusicnow
I am preparing for a very similar build, but three way.
I have gone for minidsp miniSHARC and miniDAC8 for simplicity and smaller form factor. Unfortunately the combo does not do balanced out.
I have 6x UCD180. I contacted Hypex, and they said that the SMPS400A180 would be fine supplying all six units, due to the low current demands of the tweeters and mids.
Notwithstanding that, a cheap SMPS1200A180 came up, so I bought it and sold the SMPS400A180.
Good call on the 8 way Speakons. I will be using these. No chance of mis-wiring in the future (once soldered correctly during the build).
If real estate in your chassis is getting tight, consider putting the subwoofer amps with the subwoofer, though this would make your wish for a single power-on harder to achieve. It would be good for avoiding heat build up also.
Wow. Those LX521 look a bit fugly these days. Sorry. I have not looked at them in years. You could build an acoustically invisible shroud to go over them, akin to those on KEF reference 105, and 107. Needn't be boring black.
So, this has been a while... My daughter was born and delayed this project a bit, but I've made good progress.. I'll have to go back and throw the cad models that I ended up completely ignoring in here...
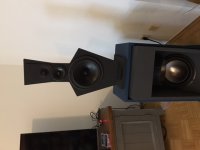
The speakers are complete. I'm not totally convinced with the 3 color scheme I used, but I can always repaint. My wife and I think they look pretty good and somewhat "match" the TV and TV cabinet we have them sitting next to and are not "loud" in a visual sense within our space. I ended up trying several different styles and types of paint, and this extreme matte finish looks by far the best in person. The picture does not show it in a final position.
I wanted to build them exactly per spec the first time around so that my "reference" point is exactly how linkwitz intended. Additionally, I purchased some of the wood as I don't have workshop space currently, and there is a local manufacturer who i was able to visit who has included some slick improvements in hiding the wiring, so essentially, there is no visible wiring anywhere, and only the single 8pin Neutrik connector to attach. The final result is very clean, and with some feet, relatively easy to slide on our hardwood floors. This is ideal as I will probably be pushing them back and pulling them out regularly. My personal preference for a design aesthetic would be to eliminate the bridge in it's current form and instead use something more similar the the kyron Kronos "metal spine" design, or, if I ever find myself in a "permanent" living situation, perhaps suspended via cables.
I'm very close to wrapping things up with the amp, but still a little way to go. On the one side, my original plan of using the Sure TAmp did not pan out, it requires a single sided powersupply, whereas the Hypex stuff is all both + and - 46V. I now have the spare 2x500 tamp to play with another project. My current thought is that if I feel the need to add a deep sub to boost the 20-30hz range.
That said, I picked up another 2 UCD180s and I'm pretty sure that will be sufficient. I'm planning on building the amp functionally in a first step, and then in a second step adding a customized front and back panel to "finish" it appearance wise once I'm happy with the function.
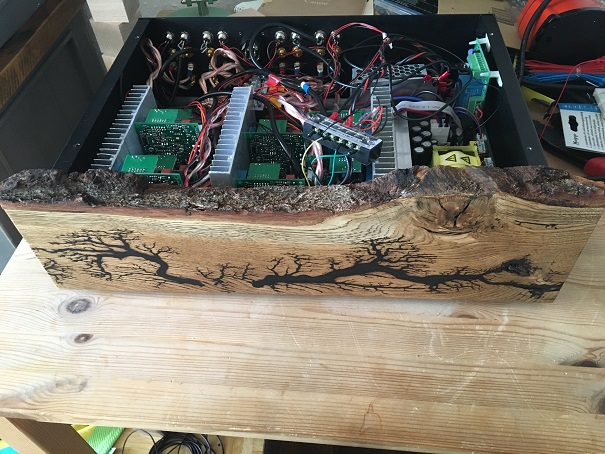
I played around with a number of ideas regarding how to do the heat sinks and settled on creating this 100 x 120 vertical heatsinks. I've placed the lower energy drivers with 4 modules on the single heatsink, while the higher power channels are 2 per heatsink. I have an additional heat sink that I can utilize if I find the temperatures get too warm, but I doubt that will be the case.
The picture is a bit out of date as I've wired up the modules with speaker and signal cables, as well as the power/mains fuse/switch and softstart (probably unnecessary based on what I've learned, but there are a few specific use cases where it makes sense. I'm just using a 4mm sealed foam panel for the front and back to close it and mount the connectors. I have fitted the Speakon connectors, however in this first test phase, I'm just passing the signal cables through some holes in the panel and physically connecting and taping the cables. In the finished version, I will use the rean "tiny" connectors I have mounted to a custom sheet metal back plate.
I think my takeaways so far have been A) wood finishing is my least favorite part of any speaker project, but has such a huge impact on the visual result. I'm glad I found paint that worked well and seems to be visually what I was looking for. B) the amplifier is much simpler than I was expecting, but there was a lot of checking and rechecking of the documentation to figure out exactly what the ideal way to do this would be. Hypex has built their modules to be relatively simple, but also very mutlifunctional with their OEM and older modules, so there are many pins on the power supply that you don't need, and one that you do that's a bit awkward to actually access.
Also, it was a huge pain in the *** to find 8mm wide female spade connectors that fit the subwoofers terminals.
The speakers are complete. I'm not totally convinced with the 3 color scheme I used, but I can always repaint. My wife and I think they look pretty good and somewhat "match" the TV and TV cabinet we have them sitting next to and are not "loud" in a visual sense within our space. I ended up trying several different styles and types of paint, and this extreme matte finish looks by far the best in person. The picture does not show it in a final position.
I wanted to build them exactly per spec the first time around so that my "reference" point is exactly how linkwitz intended. Additionally, I purchased some of the wood as I don't have workshop space currently, and there is a local manufacturer who i was able to visit who has included some slick improvements in hiding the wiring, so essentially, there is no visible wiring anywhere, and only the single 8pin Neutrik connector to attach. The final result is very clean, and with some feet, relatively easy to slide on our hardwood floors. This is ideal as I will probably be pushing them back and pulling them out regularly. My personal preference for a design aesthetic would be to eliminate the bridge in it's current form and instead use something more similar the the kyron Kronos "metal spine" design, or, if I ever find myself in a "permanent" living situation, perhaps suspended via cables.
I'm very close to wrapping things up with the amp, but still a little way to go. On the one side, my original plan of using the Sure TAmp did not pan out, it requires a single sided powersupply, whereas the Hypex stuff is all both + and - 46V. I now have the spare 2x500 tamp to play with another project. My current thought is that if I feel the need to add a deep sub to boost the 20-30hz range.
That said, I picked up another 2 UCD180s and I'm pretty sure that will be sufficient. I'm planning on building the amp functionally in a first step, and then in a second step adding a customized front and back panel to "finish" it appearance wise once I'm happy with the function.
I played around with a number of ideas regarding how to do the heat sinks and settled on creating this 100 x 120 vertical heatsinks. I've placed the lower energy drivers with 4 modules on the single heatsink, while the higher power channels are 2 per heatsink. I have an additional heat sink that I can utilize if I find the temperatures get too warm, but I doubt that will be the case.
The picture is a bit out of date as I've wired up the modules with speaker and signal cables, as well as the power/mains fuse/switch and softstart (probably unnecessary based on what I've learned, but there are a few specific use cases where it makes sense. I'm just using a 4mm sealed foam panel for the front and back to close it and mount the connectors. I have fitted the Speakon connectors, however in this first test phase, I'm just passing the signal cables through some holes in the panel and physically connecting and taping the cables. In the finished version, I will use the rean "tiny" connectors I have mounted to a custom sheet metal back plate.
I think my takeaways so far have been A) wood finishing is my least favorite part of any speaker project, but has such a huge impact on the visual result. I'm glad I found paint that worked well and seems to be visually what I was looking for. B) the amplifier is much simpler than I was expecting, but there was a lot of checking and rechecking of the documentation to figure out exactly what the ideal way to do this would be. Hypex has built their modules to be relatively simple, but also very mutlifunctional with their OEM and older modules, so there are many pins on the power supply that you don't need, and one that you do that's a bit awkward to actually access.
Also, it was a huge pain in the *** to find 8mm wide female spade connectors that fit the subwoofers terminals.
Attachments
So I finally actually "FINISHED" everything...
I finished the speakers close to a year ago and ran the system with the amplifier assembled, but not "finished". On the MiniDSP side, I've set up several equalizer profiles in addition to the "stock" recommendation by the late Sigfreid Linkwitz. I have a bass cut like i mentioned, but also have two versions of more V shaped curves.
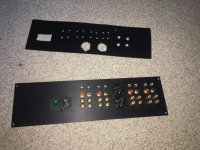
Since that point, I designed and had a custom back panel machined. I designed it leaving enough space to add a fan if I want. I was running into some heat soak issues before, but now that I've opened up the back panel of the cabinet it's sitting in, I don't think this will be an issue.
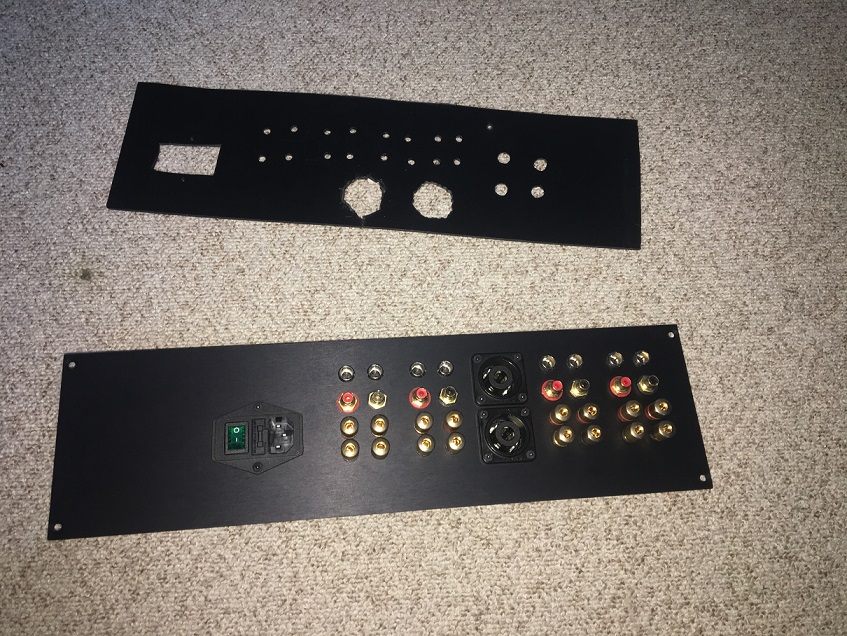
I created some redundancy in the inputs/outputs connections to "future" proof the system. I have the Neutrik 8pin connectors as well as banana plugs for outputs and I also included both RCA and XLR connectors for inputs. I would have to rewire internally to change from what I'm currently using, but they're available if I need them. I used the REAN tiny XLR for my signal cables, which I think is a really nice little connector. True XLR's are gigantic and make no sense in my opinion. I think it's just one of those "been that way since the 50s" type of things that has too much existing equipment to move away from the standard.

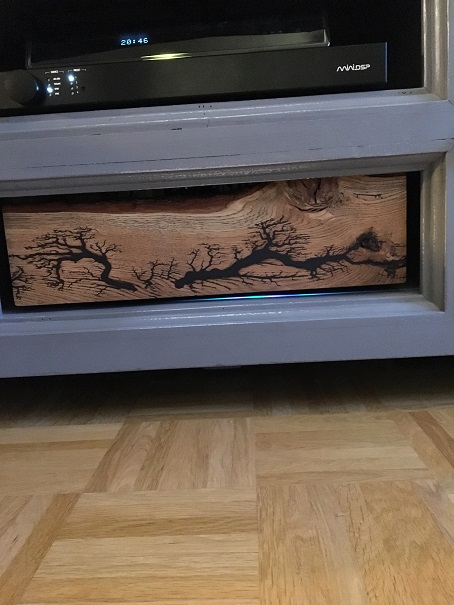
The part I'm most proud about is the front panel though. I'm really bad about leaving projects in functional but in a shitty aesthetic. This project sat with a foam core board front for a while, but since the beginning I've had a relatively clear picture of what I wanted to create for the front panel. It took me forever to actually find the right piece of wood that fit what I had in my head. It's electrically burned in a lichtenberg pattern.
My other "vision" was that the front would be entirely clean, with no buttons/knobs, lights etc. I used a capacitive touch sensor that works through the 1 inch thick wood, with the help of a 3 inch diameter copper touch plate attached to the back, so you touch the "center" of the lichtenberg pattern and it turns on an off. In order so that you can recognize this, there are two LED's that are pointed down from behind the front panel. These tell me that it has power, and if it's on or off.
I purchased, but have not yet installed a IR "learning" switch as well. It arrived yesterday and I had already buttoned everything up so it might be installed later if I decide I'm too lazy to stand up to turn the amp on, or it may never be installed.
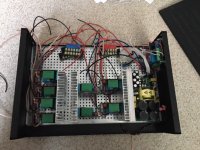
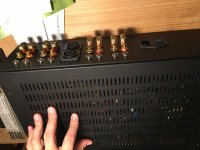
Lessons learned: Everything that I started "just to see if it would work" and then left because "it's good enough" came back to bite me in the ***. I need to either not test things, or just 100% commit to redoing them even after I test it and it works. I can't tell you the number of things that I decided "eh, it's not perfect, but it will work" that I ended up redoing at a later date anyway. as an FYI, I ended up cleaning up the wiring internally from the picture below, but I really like the little distribution blocks. I was able to modify them so that I could stack them all vertically , which minimizes the rats nest of the wiring.
I finished the speakers close to a year ago and ran the system with the amplifier assembled, but not "finished". On the MiniDSP side, I've set up several equalizer profiles in addition to the "stock" recommendation by the late Sigfreid Linkwitz. I have a bass cut like i mentioned, but also have two versions of more V shaped curves.
Since that point, I designed and had a custom back panel machined. I designed it leaving enough space to add a fan if I want. I was running into some heat soak issues before, but now that I've opened up the back panel of the cabinet it's sitting in, I don't think this will be an issue.
I created some redundancy in the inputs/outputs connections to "future" proof the system. I have the Neutrik 8pin connectors as well as banana plugs for outputs and I also included both RCA and XLR connectors for inputs. I would have to rewire internally to change from what I'm currently using, but they're available if I need them. I used the REAN tiny XLR for my signal cables, which I think is a really nice little connector. True XLR's are gigantic and make no sense in my opinion. I think it's just one of those "been that way since the 50s" type of things that has too much existing equipment to move away from the standard.
The part I'm most proud about is the front panel though. I'm really bad about leaving projects in functional but in a shitty aesthetic. This project sat with a foam core board front for a while, but since the beginning I've had a relatively clear picture of what I wanted to create for the front panel. It took me forever to actually find the right piece of wood that fit what I had in my head. It's electrically burned in a lichtenberg pattern.
My other "vision" was that the front would be entirely clean, with no buttons/knobs, lights etc. I used a capacitive touch sensor that works through the 1 inch thick wood, with the help of a 3 inch diameter copper touch plate attached to the back, so you touch the "center" of the lichtenberg pattern and it turns on an off. In order so that you can recognize this, there are two LED's that are pointed down from behind the front panel. These tell me that it has power, and if it's on or off.
I purchased, but have not yet installed a IR "learning" switch as well. It arrived yesterday and I had already buttoned everything up so it might be installed later if I decide I'm too lazy to stand up to turn the amp on, or it may never be installed.
Lessons learned: Everything that I started "just to see if it would work" and then left because "it's good enough" came back to bite me in the ***. I need to either not test things, or just 100% commit to redoing them even after I test it and it works. I can't tell you the number of things that I decided "eh, it's not perfect, but it will work" that I ended up redoing at a later date anyway. as an FYI, I ended up cleaning up the wiring internally from the picture below, but I really like the little distribution blocks. I was able to modify them so that I could stack them all vertically , which minimizes the rats nest of the wiring.
Attachments


- Status
- This old topic is closed. If you want to reopen this topic, contact a moderator using the "Report Post" button.
- Home
- Amplifiers
- Class D
- 4 way active amplifier build thread and questions