Sorry for the noob question. But I have the Dayton DTA-1 and want to do the "Version 2 -- Just the Caps" mod.
The C3/C4 caps are 0.33uF according to this diagram:
So does this mod involve replacing the stock caps with film/foil caps of the same value (0.33uF) or a different value?
Thanks!
The C3/C4 caps are 0.33uF according to this diagram:
An externally hosted image should be here but it was not working when we last tested it.
So does this mod involve replacing the stock caps with film/foil caps of the same value (0.33uF) or a different value?
Thanks!
Sorry for the noob question. But I have the Dayton DTA-1 and want to do the "Version 2 -- Just the Caps" mod.
[stuff deleted]
So does this mod involve replacing the stock caps with film/foil caps of the same value (0.33uF) or a different value?
Different value: 2.2uf is typically recommended, but I had some 4.7uf Black Gate capacitors in my parts box, so I just used those instead. The reason you are upping the value is because the stock 0.33uf rolls off the bass, which is fine if you are using tiny speakers, but not so good if you want to use this as a hifi amp.

just to bump this thing up a bit, inputs is very much appreciated. ")
i'm planning on the cap mods and re-casing the dta-1, but was also contemplating on using it as a power amp in conjunction with a car head unit as the source. the head unit puts out 4 volts (according to the manufacturer) at full volume and worried that the t-amp might not be able to handle it. though i'm sure the output won't reach that high. questions are:
1. how do i bypass the volume pot? is it as simple as connecting the +/- leads per channel?
2. what sort of resistor and at which part should i mount them?
3. if i were to use the volume pot as a "gain" control, is the stock value enough or should i use a higher value (i.e. 100k or higher)?
really appreciate your inputs.
cheers!
myke
This thread looks pretty old but I wanted to thank everyone for the great inputs. I decided to try the 'Caps' mod, but in an ultra cheap fashion.
Since the caps are addressing issues on the input side, I figure the signal power is line level, very low, and perhaps special caps are not as important as on the power side of things (ie a crossover).
I therefore bought two 2.2uF non-polarized electrolytic capacitors at an electronics store for $0.50 each. I soldered wires to the ends of existing SMT caps rather than remove them. This is much easier than removing them. Capacitance is additive in parallel anyhow so total theoretical value is now 2.53uF.
The caps are small enough that everything fit back into the original case and looks stock.
Wow, what a difference! Sounds awesome and, no lack of bass at all now. All for a 1/2 hour, $1.00, mod! Maybe i'll buy the good caps and try those at some point, but i'm guessing i got about 90%+ from this alone. funny, now it pops twice when you turn it on. I th[special=]%[/special]ink the two caps charge and saturate at different points.
Speakers: Speakerlab K's with Crites C125 tweeters and A-4500 crossovers.
Last edited:
I started this thread way back when and forgot about it.
I always like to hear people say 'big improvement' but I am incompetent reading schematics. And if you say it takes a half hour, I'm assuming that it includes the warm up time for soldering iron. ;-)
Also interested to hear you say you have Speakerlab speakers. I built their kits back in the 70's but didn't know squat about it besides assembling the parts with completed crossover.
If it's a matter of de-soldering four leads and replacing the parts I could prob'ly handle it. But I've seen other how to mod threads and they talk about snapping off this and that and -- well-- I depend on the little amp to hear my news and music through the computer. For this reason I am reluctant to make recyclables out of my electronic gear.
Perhaps you could do a photo how to?
My regular forum to read is the single driver one at DIY audio. I have various Fostex and have experimented with others.
@Dangus:
Good point, I see some dayton audio caps for $2.64 on amazon, maybe I'll pick those up. easy to swap in.
@loninappleton:
I will try to make some 'how to' photos. The key is to have a good soldering iron with a very thin tip so you can pinpoint the capacitors. You only need to add wires to the ends of the existing capacitors; no need to de-solder anything.
My father built the Speakerlab's in 76' or so; they are Klipshorn clones. I recently moved them to my house after many years of almost no use. I added the upgraded tweeters and the crossovers which really helped the upper end. The T-amp seemed well matched to what some were doing with high sensitivity speakers. Sounded good stock, very clean, but was missing something. The bass roll off is noticeable with such large speakers. Now the whole range sounds much more full.
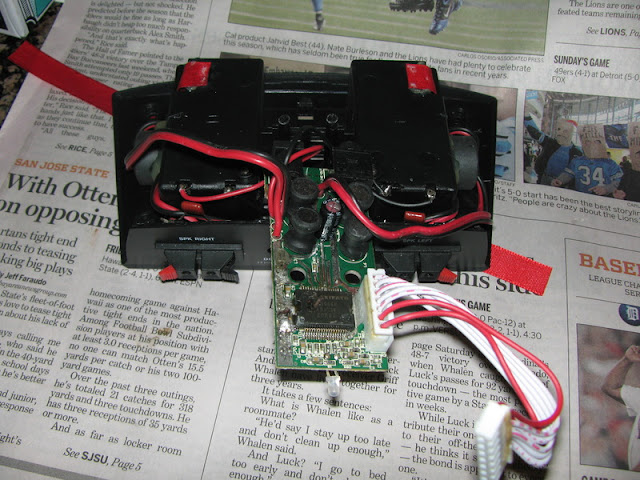
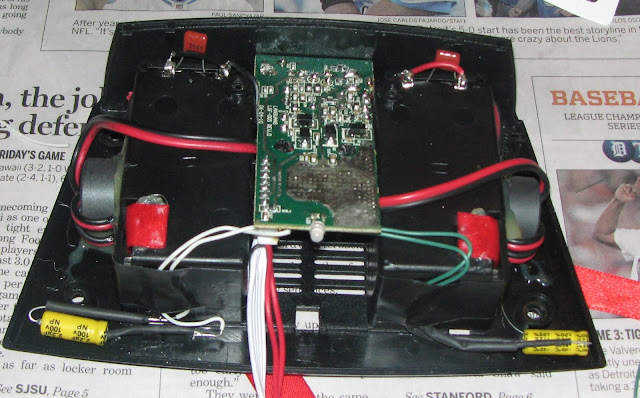
here's a few cropped pics of the PCB showing how i attached the wires.
Amp opened up with PCB flipped upside down:
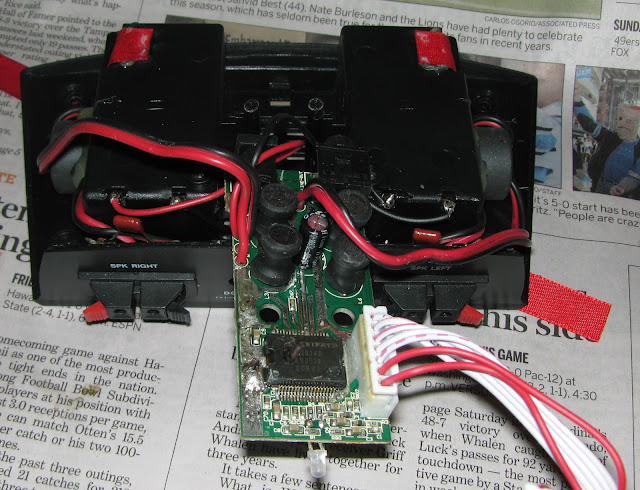
PCB before modification:
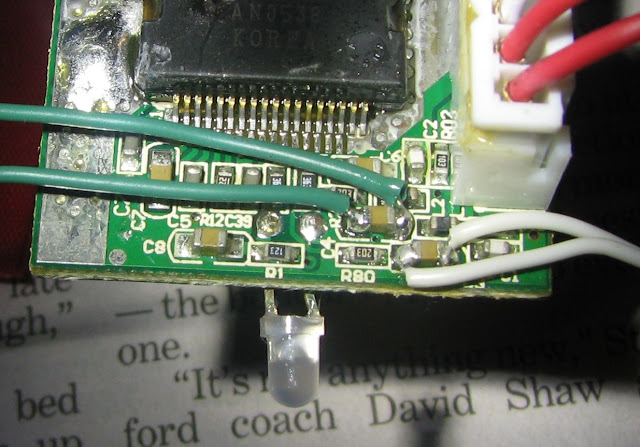
PCB with wires on ends of capacitors:
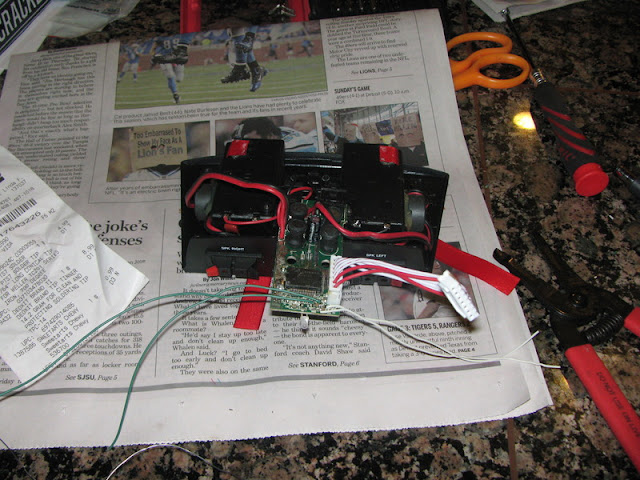
PCB put back in place, ready for cover. see new yellow caps on left and right:
Good point, I see some dayton audio caps for $2.64 on amazon, maybe I'll pick those up. easy to swap in.
@loninappleton:
I will try to make some 'how to' photos. The key is to have a good soldering iron with a very thin tip so you can pinpoint the capacitors. You only need to add wires to the ends of the existing capacitors; no need to de-solder anything.
My father built the Speakerlab's in 76' or so; they are Klipshorn clones. I recently moved them to my house after many years of almost no use. I added the upgraded tweeters and the crossovers which really helped the upper end. The T-amp seemed well matched to what some were doing with high sensitivity speakers. Sounded good stock, very clean, but was missing something. The bass roll off is noticeable with such large speakers. Now the whole range sounds much more full.
here's a few cropped pics of the PCB showing how i attached the wires.
Amp opened up with PCB flipped upside down:
PCB before modification:
PCB with wires on ends of capacitors:
PCB put back in place, ready for cover. see new yellow caps on left and right:
- Status
- This old topic is closed. If you want to reopen this topic, contact a moderator using the "Report Post" button.
- Home
- Amplifiers
- Class D
- Dayton introduces a Sonic Impact lookalike