I am not sure I would trust a heat-generating device to stay in place with self adhesive anything.
I use little blocks of plastic cut from larger panels of high-density polyethylene or nylon, then drilled and tapped. Metal screws can secure it to the chassis, and you can use metal or nylon on the board. Someone on another thread mentioned a type of plastic board used for marine construction, but big slabs and chunks of plastic are commonly used in industry and therefore sometimes show up as surplus. Plastic suppliers also sometimes sell small pieces of scrap for cheap. It's easy to work with woodworking tools.
I also like ABS or styrene sold in hobby shops and used by scale modelers. It comes in a number of thicknesses up to maybe 3mm thick sheet. It is easily cut, sanded, glued (superglue) and painted. It's great for building up complex subchassis elements, so, for example, you can screw your Class D board to it and also use it to mount larger items like big input caps, for example. Then you can glue on little standoff pads and attach the subchassis to the metal box with metal screws. With a little effort, you can make up something that would otherwise have to be an injection molded part.
--Buckapound
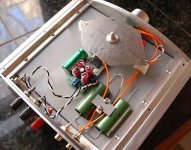
Well, here's an example with its sheet metal removed.
This is a heavily modded SI board. The gray sheet across the whole bottom is an ABS sheet. You can see one of the nylon screws holding the board down to the plastic chassis, and it's screwed into glued-on raised pads. The board is cut away behind the chip to allow some airflow. You can see little blocks used to hold up the screen that serves as ventilation. The round button in the middle of that is the on-off switch, which is set into the plastic chassis as well. The input caps are actually sunk halfway into the board.
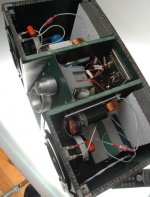
I built a boombox that has a pair of SI boards, plus the pot and all the signal caps and power distribution block built into a fairly complex glued-up subchassis. I built the thing to come apart into several pieces to allow access to various levels. It actually surrounds the tuning port on the front of the box. I'll see if I have a decent picture of that.
As an engineering aesthetic, think of the guts of a cheap consumer boombox or clock radio, and how everything kind of hangs on that one molded part. Very efficient use of space that way.
--Buckapound
This is a heavily modded SI board. The gray sheet across the whole bottom is an ABS sheet. You can see one of the nylon screws holding the board down to the plastic chassis, and it's screwed into glued-on raised pads. The board is cut away behind the chip to allow some airflow. You can see little blocks used to hold up the screen that serves as ventilation. The round button in the middle of that is the on-off switch, which is set into the plastic chassis as well. The input caps are actually sunk halfway into the board.
I built a boombox that has a pair of SI boards, plus the pot and all the signal caps and power distribution block built into a fairly complex glued-up subchassis. I built the thing to come apart into several pieces to allow access to various levels. It actually surrounds the tuning port on the front of the box. I'll see if I have a decent picture of that.
As an engineering aesthetic, think of the guts of a cheap consumer boombox or clock radio, and how everything kind of hangs on that one molded part. Very efficient use of space that way.
--Buckapound
Attachments
- Status
- This old topic is closed. If you want to reopen this topic, contact a moderator using the "Report Post" button.