Explanation? Are you running any compressor/loudness on the DSP? Otherwise i wont agree.
That's just my rig and my experience....unfortunately you're a little too far away for a listen
")
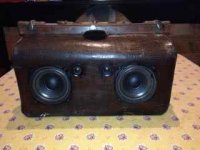
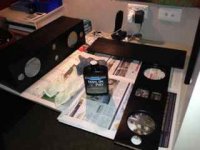
Started my Boominator Micro yesterday:
Laser cut enclosure
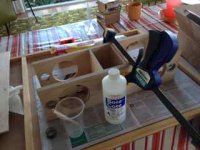
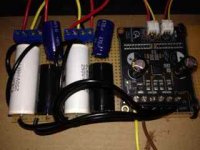
Electronics compartiment. Very thight fit indeed!
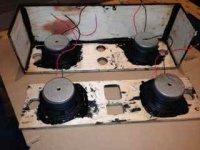
Glued the woofers to the baffle
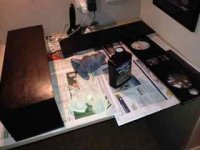
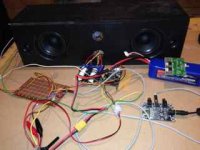
Testrun
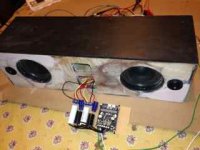
Bass is completely lacking at the moment but that should be fixed when the enclosure is airthight (I hope... ;p).
Laser cut enclosure
An externally hosted image should be here but it was not working when we last tested it.
Electronics compartiment. Very thight fit indeed!
An externally hosted image should be here but it was not working when we last tested it.
Glued the woofers to the baffle
An externally hosted image should be here but it was not working when we last tested it.
Testrun
An externally hosted image should be here but it was not working when we last tested it.
Bass is completely lacking at the moment but that should be fixed when the enclosure is airthight (I hope... ;p).
Started my Boominator Micro yesterday:
Bass is completely lacking at the moment but that should be fixed when the enclosure is airthight (I hope... ;p).
Looks nice. Did you add any stuffing to the enclosure? Saturnus said stuff fairly hard.
Looks nice. Did you add any stuffing to the enclosure? Saturnus said stuff fairly hard.
Yeah, pretty vital.
That's just my rig and my experience....unfortunately you're a little too far away for a listen
Well, then.
(What setup to you use in your DSP. just X-Over? Params?)
That's awesome. Where'd you get the wood laser cut, a local shop or online?
Thanks! I got it cut at a Fablab, it's a place with 3D printers, CNC mills, lasercutters etc. I prepped my files in Inkscape, opening and printing went without any hassle. Costs: €2,5 startup, €2,50 filter, €10 material. The tabs fit perfectly but it's not airthight without glue. The laser cutter also allows for engraving, so you can label your inputs for example.
Got it all up and running, only having some problems with the deepcharge protection. It sounds really nice considering its size.
Speaking of stuffing.. I never stuffed my full size boominator.. Was that dumb?
Oh no, the Boominator should absolutely not be stuffed!
Rattle from HP10-W
I have a problem with the HP10W which maybe is not a problem but i thougt i'll share it here. At low frequency the speaker makes some weird rattle. I am guess the "problem" is just that the speaker is not made for such low frequencies so it will rattle.
Have a look at the video below and let me know if i am right ?
https://drive.google.com/file/d/0B-Awyixw7TFnQXNCbjBWMnBzS0U/edit?usp=sharing
boomintaor
I've got two amp6 amps laying around and figured I would make a boominator. Can it be wired with two amps? Would I be able to put one woofer/tweeter on its own channel, basically having 4 channels.Would i still use a 33 or 47 ohm resistor? The speakers will be the Motorola KSN 1001a and Goldwood 1058s. Can I just wire one woofer and one tweeter in parallel for a 4 ohm load per channel?
Thanks
I have two amp 6 basic amps laying around and was thinking about making a boominator. I would be using the Motorola KSN 1001a and Goldwood 1058 speakers. Can I use both amps in the build by wiring one woofer and one tweeter in parallel for a 4 ohm load for each of the 4 channels? How would this change the resistor that is in the standard wiring diagram, which calls for a 33 or 47 ohm resistor? I'm not worried about the additional power consumption of two amps.
Can I use both amps in the build by wiring one woofer and one tweeter in parallel for a 4 ohm load for each of the 4 channels?
The boominator is 2 channels (left and right) and I think if you look at the wiring diagram you will find the speakers are in parallel already. There is no reason you couldn't run one amp for left & right base and a second for left/right tweeter. For simplicity I would just build it as designed and then do some experimenting to see if you can improve on the baseline. I have not paid much attention to the Goldwood builds but you might want to do some searching to confirm that a proper tweeter is not required.
Well, in the very case of a piezo driver you shall consider it as a capacitative load, though at a very high impedence, that's why of the "strange" crossover net, as there's not highpass capacitors but an L-pad. In any other case, you don't sum the DC resistance or impedence because very often a proper crossover is applied before each speaker, with the purpose of mantaining
an easy load for the amplifier -the ideal is a flat Z line in the audio band.
With a normal tweeter - voice coil+ membrane/suspension+magnet -
you need to put at least a capacitor for HP ( high pass )
Then you can work for flat impedance by trying to tame the impedance peak at Fs, notches etc.
A "normal tweeter" means that you know how sound is generated by these devices and what you can "expect" on the project stage. Usually at this stage
there is a number of User Requirements to be fullfilled.
Hi I bought the AMP6 basic kit, because it was out of stock, does anyone have photos of what rev.1.20 should look like in the front and back?
I am having trouble getting my AMP 6 to work.
D2 - Which way do you solder it to the board?
D1 - Which way do you solder this to the board? There is no D1 labelled on the circuit board.
Thanks,
I am having trouble getting my AMP 6 to work.
D2 - Which way do you solder it to the board?
D1 - Which way do you solder this to the board? There is no D1 labelled on the circuit board.
Thanks,
Mini v2 4 ohm build
Am building a mini v2 with 4 ohm sp60's because this is what I'd ordered on spec after misreading an earlier post. duh.
Only previous experience was also with sp60s in a ported enclosure.
Cutting out was a challenge, very difficult getting the cuts exactly right, but I did end up with perfectly square right sized pieces - major changes were to allow for a 73 mm centre compartment and an additional 1mm in the depth.
Thought it would be easier to build a half shell with boat building epoxy - more or less worked, but you really really need clamps that span the whole length. Ended up in a bit of a mess with epoxy everywhere, so cleaned it up and thought it might be better to stain it first. Bad move, because the stain need to be so dense I might just have well painted it.
Next was assembling the speakers. First layer was fine. Used Chemical metal and man that stuff dries hard. Second set was with chemical metal and fast setting epoxy gel, good idea but honestly there is not enough time, You would have hear my yells of panic km away. Stuck fine, but much work with bog and belt sander needed to fix alignments. And ruined the stain.
It needs to be bi-amped, and as I really don't know what I'm doing, so I've put the amp and cross over on a card. This fits well into the wider centre space and I can fix any mistakes.
Tonite I ran a test run. Inside of course, and not fully sealed without stuffing, but I'm blown away with how good this sounds. No idea yet how all this electronics will fit into the available space!
So for aspiring builders:
- this is quite tricky, take your time
- don't use 5 min epoxy - or if you do, do one bit at a time
- use lots of clamps and work out first where they will be used
Attachments
- Home
- Amplifiers
- Class D
- The Boominator - another stab at the ultimate party machine