Hi guys ")
My own little Boominator-project is now beginning to come together, with all the crucial parts suchs as amp6-basic and 4xHP10W gathered.
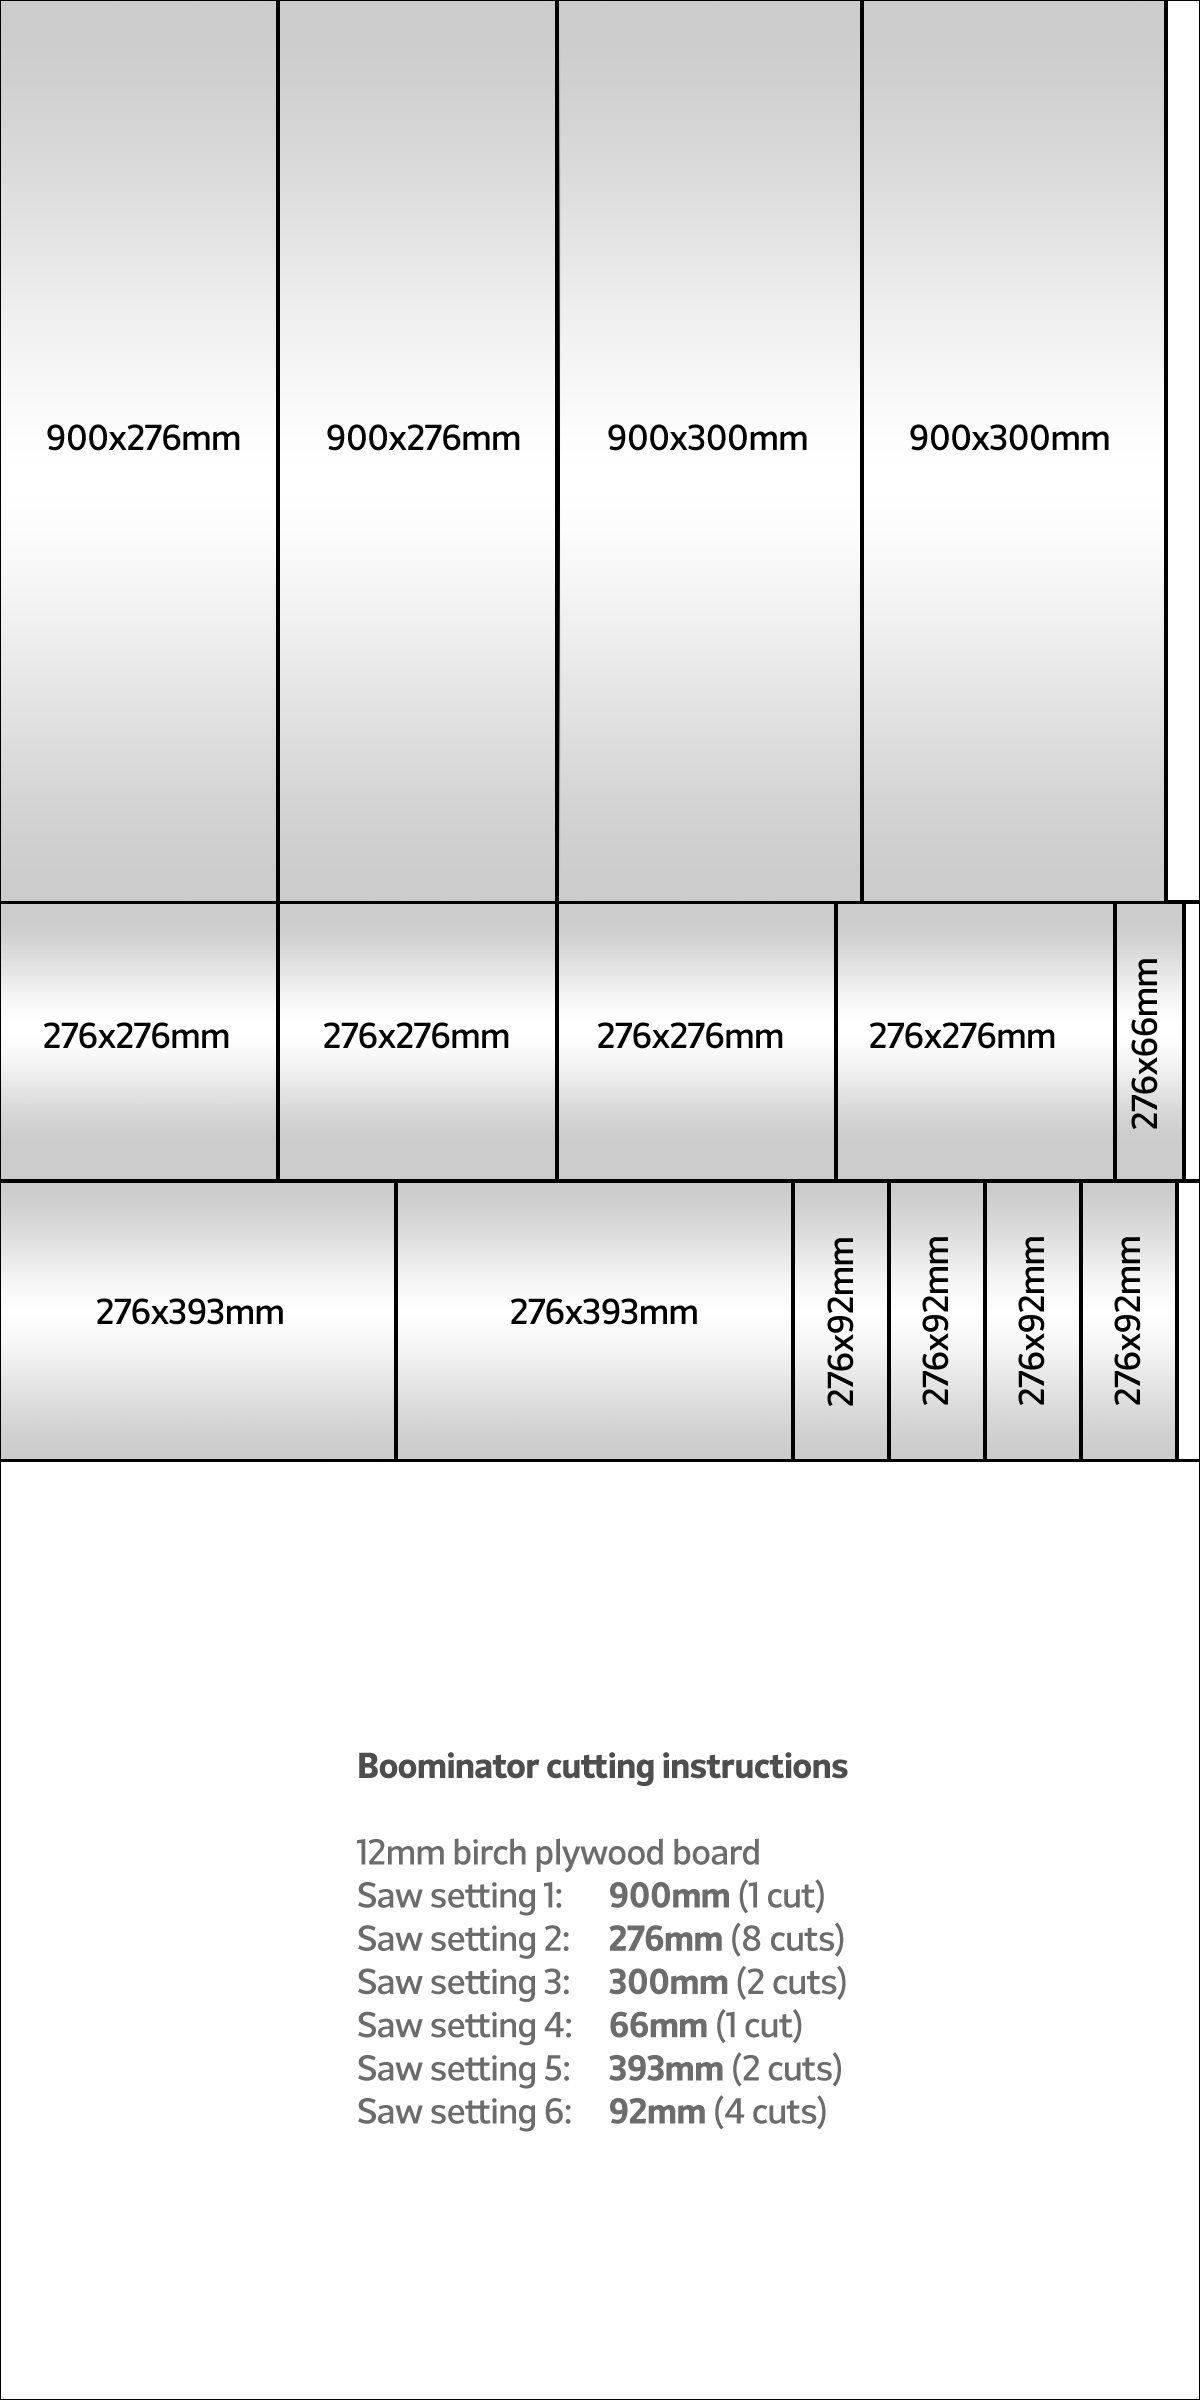
I have a question regarding these cutting instructions:
http://www.diyaudio.com/forums/attachments/class-d/218626d1302873924-boominator-another-stab-ultimate-party-machine-boominator_cuts2.png
The length of the center brace according to these instructions is 393 mm, but when i measure on the SketchUp model, the length seems to be 396 mm?
And a huge "thank you" to everybody who has contributed to this thread, without i definitely wouldn't have the knowledges to build this.
My own little Boominator-project is now beginning to come together, with all the crucial parts suchs as amp6-basic and 4xHP10W gathered.
I have a question regarding these cutting instructions:
http://www.diyaudio.com/forums/attachments/class-d/218626d1302873924-boominator-another-stab-ultimate-party-machine-boominator_cuts2.png
The length of the center brace according to these instructions is 393 mm, but when i measure on the SketchUp model, the length seems to be 396 mm?
And a huge "thank you" to everybody who has contributed to this thread, without i definitely wouldn't have the knowledges to build this.
There's that saying about closing barn door after horse got out, so I'm saying that after you find out how long is your playtime, then you could share the information by entering it into the Boominator Wiki Since you're using half as many of the same speakers for Halfinator, an efficient class D amplifier at twice the output into half the load and if you're playing just as loud as the Boominator, then the batteries should last a similar amount of time, simply because the output is so similar, but the only way to know is to find out.Ok. What would you estimate the playing time on 24V with 2x 12V/12ah SLA? Thanks alot for your help!
Other answer: You could contact the amplifier manufacturer for an answer. I'm sure they'd be fascinated about the Halfinator, but they probably won't know unless they built one.
P.S.
If your version of Halfinator has both woofers on front, then you need to set it against a wall during playback.
Last edited:
hi.
i've had a half boominator for some time now. it is using the hp-10w of course and the lepai lp-2020A+ (20w) and i was wondering if it damages the speakers when you turn the amp all the way up to 10. i mean it sounds horrible and i would never do it myself, but i think it's just the amp acting up?
And i'm mostly using my ipod for playback
Hi guys
My own little Boominator-project is now beginning to come together, with all the crucial parts suchs as amp6-basic and 4xHP10W gathered.
I have a question regarding these cutting instructions:
http://www.diyaudio.com/forums/attachments/class-d/218626d1302873924-boominator-another-stab-ultimate-party-machine-boominator_cuts2.png
The length of the center brace according to these instructions is 393 mm, but when i measure on the SketchUp model, the length seems to be 396 mm?
And a huge "thank you" to everybody who has contributed to this thread, without i definitely wouldn't have the knowledges to build this.
Aha it seems that Saturnus uses 9 mm plywood for all internal structures. By my calculations, using 12 mm changes the internal volume of the cabinet, without speakers, by approximately -0.5 L. Wouldn't a volume change of this size have an impact on the tuning of the cabinet?
If it does then i guess the proper solution would be to make the ventilation holes in the center brace bigger.
Yes it is, there are preamps that make everything incredible noisy.but i think it's just the amp acting up?
Here are some guides on how to make the lepai amps sound better.
Yes. The 90% efficiency, the wide voltage range and the selectable gain are good features.
And you do recommend the TDA7492 2x50W over the TK2050 2x100W@4ohm?
If yes, then I will test the TDA7492 out and come back with battery times etc.
All the best!
A 2x100W@4ohm amplifier will play 2x50W with the 8 ohm speakers in your halfinator. The output power is very similar in both of the amplifiers that you mention.And you do recommend the TDA7492 2x50W over the TK2050 2x100W@4ohm? If yes, then I will test the TDA7492 out and come back with battery times etc. All the best!
However the efficiency is different.
I think that you should read and see which amplifier is more efficient. Efficiency does affect battery weight/playtime/expense factors.
Conveniently, you have quoted my only answer. For a second opinion, why don't you send a message to Sure Electronics and ask them which amplifier is more efficient?
A 2x100W@4ohm amplifier will play 2x50W with the 8 ohm speakers in your halfinator. The output power is very similar in both of the amplifiers that you mention.
However the efficiency is different.
I think that you should read and see which amplifier is more efficient. Efficiency does affect battery weight/playtime/expense factors.
Conveniently, you have quoted my only answer. For a second opinion, why don't you send a message to Sure Electronics and ask them which amplifier is more efficient?
Yea okay. Just read somewhere that the TDA7492 chip distorts on higher outputs. I even think Saturnus mentioned in another forum that it was badly made etc.
More exactly this thread: mosfet Vs class D etc. - Speakerplans.com Forums - Page 1
So what I'm wondering about is more personal experience than specifications. Maybe you've used the TDA7492? Or someone else maybe? Otherwise the specifications is, as you mentions, more suited for my purpose with the TDA7492.
Thanks alot for your time and answer. Think I will go with the TDA7492 if someone else doesn't have anything to say.
I do not doubt his experience; however, note that it is efficient and it has the tolerances to use a real dynamic horn tweeter (like the foster) or a ti tweeter if you like, along with easily enough power to push a real crossover. It is my belief that the ability to run a better HF speaker section AND the ability to custom tune the speaker to suit the amplifier can dramatically obliterate the amplifier quality difference, if you choose to do so.Just read somewhere that the TDA7492 chip distorts on higher outputs. I even think Saturnus mentioned in another forum that it was badly made etc.
Again, ask Sure directly about their amplifiers. And, be sure to reference this thread. They are diyaudio.com members and may have some useful comments. That works best if you invite their help. One thing is absolutely certain--they have both 50w (@8R) amplifiers available for comparison.
P.S.
It is beyond my comprehension why people didn't select the HP-10T almost full range, roll that off with a crossover inductor, add cable to BOTH terminals of the crossover inductor for HF feed and add a cap (and maybe a resistor) series to a tweeter, forming a standard 1st order series crossover suitable for running ANY tweeter you like as long as efficiency matches reasonably. There are many tweeters made for prosound and all of that category outperforms modern production piezo (the ceramic disc on modern production piezo is too large and identical to a piezo buzzer). I'm a bit mystified on the HF selection and I'm also mystified on the absence of bi-amp.
It is beyond my comprehension why people didn't select the HP-10T almost full range, roll that off with a crossover inductor, add cable to BOTH terminals of the crossover inductor for HF feed and add a cap (and maybe a resistor) series to a tweeter, forming a standard 1st order series crossover suitable for running ANY tweeter you like as long as efficiency matches reasonably. There are many tweeters made for prosound and all of that category outperforms modern production piezo (the ceramic disc on modern production piezo is too large and identical to a piezo buzzer). I'm a bit mystified on the HF selection and I'm also mystified on the absence of bi-amp.
Which is why the Motorola/KSN originals are recommended. They are actually very good and outperform all the low cost piezoes. They also outperform many, if not most, low cost pro tweeters while costing less, weighing less, and have at least 20 times the efficiency of a low cost pro tweeter.
It's obvious you have not tested and measured the HP10T but only run calcs when you can even suggest it for this design. I am however working on another design which will use a pair of HP10Ts but that's for an ultra low cost alternative to the Boominator that still beats any commercially available boombox in sound quality.
Regarding amp. I have yet to hear a TDA7492 amp that comes even close to any (well designed) Tripath amp in sound quality. If anyone wants me to test their amps for the use, they can send me one.
Well, I didn't run calcs. Anyway, I am looking forward to your lower cost solution and especially your solution to the amplifier to use instead of the 2024's 12w to 8 ohms.It's obvious you have not tested and measured the HP10T but only run calcs when you can even suggest it for this design. I am however working on another design which will use a pair of HP10Ts but that's for an ultra low cost alternative to the Boominator that still beats any commercially available boombox in sound quality.
I *finally* found a local dealer for suitable plywood. 1/2" baltic birch, 9 ply, kept indoors, and only $40 CAD for a 5'x5' sheet. Construction starts soon!
Sent you a PM.If anyone wants me to test their amps for the use, they can send me one.
I suppose that TA2021's 13 watts to 8 ohms looks good for this? You make an excellent point about the area to be covered. Venue size is an interesting thing to mention. Boominator's interesting forwards rearwards covers a large venue if placed in the middle since the distance to the edge of the venue is as short as possible in any direction. I do not know why Boominators sometimes cover greater area when set sideways.For use on a festival I've actually had good experiences with the 12w peak output in 8 ohms. With high sensistivity speakers it will still be very loud just next to you.
Now how can we get a vendor to include iPhone/Digiplayer suitably higher input sensitivity? It looks like we need to bother some amp manufacturers to let them know that the 90's have passed and nobody is carrying around big black box CD players. I see almost no amplifiers available with useful input sensitivity, unless one cares to solder SMD for a modification. Perhaps we can come up with preamp instead? A preamp seems an easier answer if some were available. Unfortunately, the same power amp manufacturers who cut off the input sensitivity don't have a preamp offering. So, you get very low noise at the cost of insufficient output. lolz!!! And if we could get an amp manufacturer held down long enough for a useful input, then maybe we could also get DC trimmers too?
I would like to mention 4 things about soldering integrity.
http://i1142.photobucket.com/albums/n603/rulleboi/Roskilde Festival boombox 2010/16062010327.jpg
http://i1142.photobucket.com/albums/n603/rulleboi/Roskilde Festival boombox 2010/16062010328.jpg
http://i1142.photobucket.com/albums/n603/rulleboi/Roskilde Festival boombox 2010/16062010329.jpg
1). 30W Iron: When you have a connection that sticks to the iron, you need a hotter iron. I have a 15W/30W switchable, but I wish it was 5W more.
2). 63/37 Solder: When you have a connection that is exposed to vibration, that connection needs 63/37 solder.
3). GEL FLUX: It will flow your solder to a beautiful perfect mirror shine, like a polished chrome Buick bumper.
When you have a connection that won't cooperate, that connection needs fluxed and Gel Flux (petroleum jelly+rosin flux) is easiest to work, the lid is beyond impossible, and the circuit board needs cleaned with Simple Green (or Dawn) + 90% (or better) Alcohol to remove excess flux. 4). Tinning: If a connection is especially stubborn, sometimes it is necessary to Flux parts, apply solder (tinning) to the individual parts, and Flux them again before putting them together. It is easier to solder a tinned part to a tinned wire, but it is harder to solder a non-tinned part to a bare copper wire. This can also repair old connections to remove cut-outs and remove intermittent fault static.
P.S.
I really like your cabinetry. They are all so symmetrical and fit. I have not such skill with a saw. Got any tips for me?
Last edited:
My opinions might be different from his, but I've built a fair number of similar things (cabinetry, whatnot) and here's my set of suggestions:P.S.
I really like your cabinetry. They are all so symmetrical and fit. I have not such skill with a saw. Got any tips for me?
Plan everything first. Grab some graph paper, draw the sheet of plywood and start drawing all the cuts you plan to make to get all the pieces that you need. There's one posted already for a 4x8 sheet, I just did one for a 5x5 sheet.
Cut out the main square/rectangular pieces first using a table saw, such that you end up with perfect 90 degree cuts. You won't get that on any other type of saw, and for a speaker enclosure you want perfect 90s so you don't end up with any air leaks.
Before you use the saw, first put a new, finer-tooth blade in it that's suitable for plywood. Plywood tends to flake a bit, using a finer blade and pushing the wood through at a slower speed will minimize this. And before cutting your Boominator pieces, run a scrap of plywood through the saw, measure it and use it to calibrate the guide on the saw to the blade you're using.
Set the cutting width on the saw as few times as you can. If you go 276mm to 300mm back to 276mm, the two 276s probably won't match. Make all your 900mm cuts, then all your 300mm's, then all your 276's, etc...
I'd cut pieces that extend to the outside of the box a bit long (in the case of the Boominator, any 300mm cut) so they overhang the box a bit, and use a flush trim router bit to trim them perfectly flush.
Mark pieces after you cut them, as scrap pieces sometimes have similar dimensions as pieces you're hoping to make and getting them mixed up can lead to plenty of frustration.
Remaining work...
For the detail work on the fronts, ends, center braces, etc... I'm planning to print off paper templates on an 11x17 capable printer at work, tape these to the cut pieces and use them for the speaker/tweeter holes, handles, etc. Do this, or use a straight edge ruler and draw your 'template' directly onto the piece.
For square cuts (handle ports, etc) drill holes first so you can get a jigsaw in, and use a jigsaw to cut them. For square features, holes, I like to clamp a heavy metal bar to the piece and use it to guide the edge of the saw - gives straighter cuts.
For the speaker holes, a router and a circle cutting jig will give the best results. If you don't, use a jigsaw and take your time. For smaller round holes (tweeters) I have a collection of hole saws, which are probably the best tool for the job - it's hard to make sharp curves with a jigsaw unless you have a thin blade, and thin blades aren't really the best thing for cutting plywood, but it's still possible to do.
After that... make a plan for how everything fits together, and the order it goes together in. And test fit everything together first.
Oh my gosh. Thank you!. . .Set the cutting width on the saw as few times as you can. If you go 276mm to 300mm back to 276mm, the two 276s probably won't match. Make all your 900mm cuts, then all your 300mm's, then all your 276's. . .
Hi folks,
I just finished to build me first half boominator (more or less finished). Attached some pics:
I used:
Will have to test outdoor after finishing all the "outer" parts (battery holder, user panel with input plug, switches and so on...)
Will report afterwards.
Thanks all for all the helpfull thoughts and ideas.
I just finished to build me first half boominator (more or less finished). Attached some pics:
An externally hosted image should be here but it was not working when we last tested it.
An externally hosted image should be here but it was not working when we last tested it.
An externally hosted image should be here but it was not working when we last tested it.
I used:
- 2x HP-10W
- 2x MPT-001 Piezo
- 12mm birch plywood (but only the 7 layer type)
- 1x AMP6basic
- 1x bass reflex tube (66mm i.d., length approx. 80mm, has to be tuned)
- 1x SHORAI LFX 12V battery, 7Ah, 483g (Type LFX07L2-BS12)
- some paint (does not adhere very well, used primer first...)
Will have to test outdoor after finishing all the "outer" parts (battery holder, user panel with input plug, switches and so on...)Will report afterwards.
Thanks all for all the helpfull thoughts and ideas.
Member
Joined 2009
Paid Member
There's that saying about closing barn door after horse got out...
Attachments
- Home
- Amplifiers
- Class D
- The Boominator - another stab at the ultimate party machine