turning off one side sometimes
I'd like to be able to switch either side off periodically in order to direct sound somewhat for mobile and stationary applications of the boominator.
I was thinking of getting 2 single pole double throw center-on toggle switches and fixing them to where an amp channel splits into the 2 speaker sides. I could then flip them for one side on, other side off, vice versa, or both sides on -all in stereo.
I also thought of putting a dual balance potentiometer at the same point so I could only have 1 knob instead of 2 switches.. But I don't really know how to do this..
Anyone think its a good idea or would know how to do to the dual pot idea?
input
If my amp6b clips quite easily with my stock 82kohm feedback resistors and 22kohm input resistors, theres really no reason to change them for gain, right?
And also is the reason for changing input caps to cut sounds under 60hz? What if the box will be used inside, wont the output benefit from a fuller spectrum?
Ain't that biting a little too much?.... the name is now almost synonymous with any large portable speaker above and beyond the standard ghettoblaster .....

I mean, beyond this thread or maybe DIY Audio.
Not so sure about that famous Danish open air Festival and definitely not in other Countries.
Not speaking about the name, of which I have nothing to say, besides finding it cool, but the concept of having "relatively" light , highly portable , battery powered integrated amplifiers carries a long tradition behind.
Ain't that biting a little too much?
I think you understand things backwards.
Perhaps he has gathered his facts from the RC world. In that high C application the lifecycle is considerable shorter. Even as little as 500 cycles. In the low 1 to 2 C application, certainly 2000 cycles should be bare minimum.
Lifepo4 40155 cells with high power and large capacity _LiFePO4 Batteries_E-Bike Batteries_A123 RC Battery|High Quality Battery|Wholesale Ebike Battery
You are exactly right. The cells are designed for high current applications like e-bikes, where it can exceed 160A of current for small bursts. In that case as I said 85% capacity would be around 1200-2000 cycles.
EDIT: Some quick searching and I found a better deal.
http://www.aliexpress.com/item/Head...V-15Ah-battery-cell-for-e-bike/711710277.html
UPS Express shipped to your door for $108 american. Thats like 3 business days.
Last edited:
Lifepo4 40155 cells with high power and large capacity _LiFePO4 Batteries_E-Bike Batteries_A123 RC Battery|High Quality Battery|Wholesale Ebike Battery
You are exactly right. The cells are designed for high current applications like e-bikes, where it can exceed 160A of current for small bursts. In that case as I said 85% capacity would be around 1200-2000 cycles.
EDIT: Some quick searching and I found a better deal.
Free shipping!!! Headway lifepo4 40152S 3.2V 15Ah battery cell for e bike-in Rechargeable Batteries from Electrical Equipment & Supplies on Aliexpress.com
UPS Express shipped to your door for $108 american. Thats like 3 business days.
Those are 3.2V batteries, so you would need around 6 of them. VERY EXPENSIVE!
Ooooo
$107.89 free shipping to australia too!
yes it's 3.2v 15ah, but it's 4 pieces per lot ie $26.97 each piece
wonder how much they weigh compared to 2 x 12v 7ah sla's?
I really want to make my boominator a tad lighter.
S.
Each cell is ~480g.
Besides this you probably also will want a battery management system and an expensive charger.
Each cell is ~480g.
Besides this you probably also will want a battery management system and an expensive charger.
I think that an old laptop charger would do the job, we have boxes full of them at work........
BJ
LiFePO4 weigh 40% of SLAs for the same nominal capacity.
Nominal capacity in LiFePO4s is actual capacity. You do not need to retain 10-15% capacity in the cells to avoid battery death as in SLAs. Usually capacity LiFePO4 are also rated at a much higher discharge rate than SLAs. Typically for our use LiFePO4s will have 110% of nominal capacity.
In total a LiFePO4 will have an actual capacity for our use that is 30% more than an SLA if both have the same nominal capacity.
LiFePO4 cells needs battery management or specialized charger.
With battery management (as for example the LiFePO4s in SLA standard sized I posted previously have battery management built in, as do all other finished packs) you don't need a special charger. You can use an SLA charger but capacity will drop to about 85% of nominal (which will still be equal to an SLA since LiFePO4s don't not need to retain 10-15% capacity in the cells).
You can get dirt cheap LiFePO4 specific chargers that work with any pack which includes battery management. Without battery management as in clamped cells, you need an expensive specialized charger for that exact purpose.
Please note that you cannot under circumstances use a li-ion battery charger!
Last edited:
gluing drivers to baffles
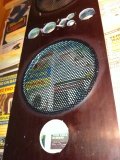
I've had a productive evening, drivers and grills are now glued to the baffles...
It went more smoothly than I thought.......
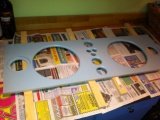
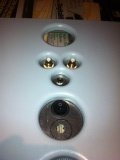
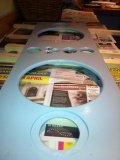
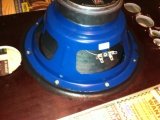
Here are a few photos of the prep.... baffles primed with boat primer.... started work on the control panel, inputs and throughput.....
prepping the baffle ready for gluing and they type of sealant I have used.... (The small screw to the right of the sealant is what I have used to secure the driver whilst the sealant sets.......
I've had a productive evening, drivers and grills are now glued to the baffles...
It went more smoothly than I thought.......
Here are a few photos of the prep.... baffles primed with boat primer.... started work on the control panel, inputs and throughput.....
prepping the baffle ready for gluing and they type of sealant I have used.... (The small screw to the right of the sealant is what I have used to secure the driver whilst the sealant sets.......
Attachments


more photos of tonights build
OK
JOB DONE
(tweeters next and finish off switches, controls and the voltmeter)
BJ
ps ..... How can I upload the photos in better quality?
OK
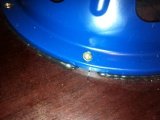
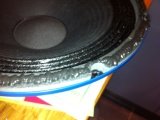
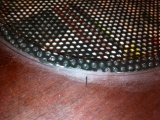
- apply sealant around the edge of hole in baffle
- place grill so that sealant squishes through the holes
- apply sealant around the driver seal
- carefully position driver over the grill
- screw the driver to the baffle through holes, working diagonally and screwing down a little at a time (the screws do not have to go in straight so it is easy to find a suitable hole in the grill to screw through)
- you can see the sealant squish out at the sides
- apply more sealant to increase the surface area so that the sealant glues the driver to the baffle better
JOB DONE
(tweeters next and finish off switches, controls and the voltmeter)
BJ
ps ..... How can I upload the photos in better quality?
Attachments


dry build
Damn
The woodyard cut my panels slightly inaccurately, the internal baffles are slightly too long and it makes my electronics compartment only 60mm wide instead of 67mm. The batteries won't fit if I don't fix it. I think I'm going to route an 12mm wide by 3.5mm deep slot in the electronics compartments walls to slot the baffle in, it'll be a stronger joint for it anyway.
Also, my magnets are about 2mm short of the center baffle, I think that I tightened the woofers down too much last night when gluing and compressed the front gasket too much, I just wanted to be sure that the woofer was holding the grill tightly enough..... I don't think that chemical metal will successfully bridge such a large gap....... any suggestions for shim material would be most welcome......
BJ
Attachments

You could just use more although that'd be a fairly expensive solution. And you'd have to do it in 2 runs, letting one thick layer harden up first.
You can host pictures on another site and link them here.
And yeah, the screws are only really guides while the sealant sets.
You can host pictures on another site and link them here.
And yeah, the screws are only really guides while the sealant sets.
Last edited:
You could just use more although that'd be a fairly expensive solution. And you'd have to do it in 2 runs, letting one thick layer harden up first.
You can host pictures on another site and link them here.
And yeah, the screws are only really guides while the sealant sets.
Thanks, I've just been trawling through the forum, I'm not the first person to screw the drivers in too tight, I'm going to try to loosen the screws but I am a bit concerned that to do that now may put the silicone sealer under tension and reduce its strength.. Still, once it is all glued up together some of that tension should be releived anyway........
Its a bit of a drag having to get the router out again, still, gotta get the middle compartment right, otherwise I'm screwed and will have no choice but to go down the LiFePo4 route which I have already decided not to.......
On that note, something has been playing on my mind. I want to be able to charge the SLA batteries by solar or 12v outboard charger, if I just wire in a charger socket in parallel with the solar panels, will the shottky diode stop the current from the charger damaging the solar panels or do I need to put in something more fancy to do that?
Anyhow
I'm really enjoying this build and can't wait to hear it, I'm going completely on trust here because everything has been so well thought out and there wouldn't be so many boominators built if they weren't really that good.......
BJ
- Home
- Amplifiers
- Class D
- The Boominator - another stab at the ultimate party machine