Hi guys!
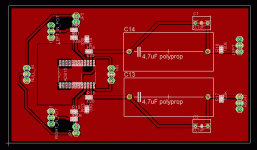
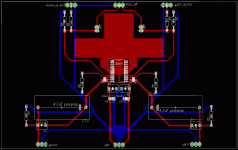
I´m playing around a little in eagle and I´m almost finished with the AD815 preamp by CarlosFM.
But I just want to get some thoughts about the layout. Should I have a groungplance as I have now?
There are some things I know about, such as mounting holes and that it´ll be a bit tricky to solder some hole mounted components on the smd side. But that´s ok for me.
So..what´s good and bad?")
/Christopher
I´m playing around a little in eagle and I´m almost finished with the AD815 preamp by CarlosFM.
But I just want to get some thoughts about the layout. Should I have a groungplance as I have now?
There are some things I know about, such as mounting holes and that it´ll be a bit tricky to solder some hole mounted components on the smd side. But that´s ok for me.
So..what´s good and bad?
/Christopher
Attachments
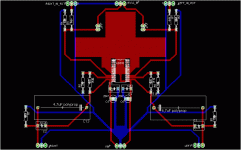
My first impressions of the PCB are #1 make the heatsink area larger.
#2 definately scrap the groundplane (or make it as small as possible). And #3 put some decoupling caps on the supply lines close to the pins. I believe that they advise against using a groundplane somewhere in the datasheet, I could be wrong it's been a while since I looked at it.
As far as soldering hole mounted components on the SMD side...why dont you just put them on the other side of the board????
Best of luck with the design.
I think it will be just fine but I'll advise you to have groundplane on both sides. Reconsider also how high supply voltage you will need, higher = hotter IC.
You haven't thought of TPA6120 which consumes a lot less and is faster? Both IC's are current feedback.
A small thing about your pcb: Why don't you adjust the input a bit so you won't get holes in the groundplane?
You have forgot decoupling of the supply voltage, extremly important!
Notice also (as Jocko Homo pointed out) that the amps aren't identical. One more reason to look at TPA6120
Notice also the inout bias current of 10-90 uA!!!! This will/can can create heavy offset which might not create any trouble since you have an output coupling cap.
You could take a peek at my TPA6120 project.
Check how I have done the double groundplane.
An externally hosted image should be here but it was not working when we last tested it.
An externally hosted image should be here but it was not working when we last tested it.
Thanks for your help, I Will apply these adn see what I come up with. And I´ll also have a look on your project Per-Anders, looks interesting!
I have one little question, what are the pros and cons with a groundplane and a star ground? I understand it´s different wheter you´re designing a HF circuit like a switching supply or RF circuits than audio electronics. Is there any general rule for how you should design audio circuits?
I have one little question, what are the pros and cons with a groundplane and a star ground? I understand it´s different wheter you´re designing a HF circuit like a switching supply or RF circuits than audio electronics. Is there any general rule for how you should design audio circuits?
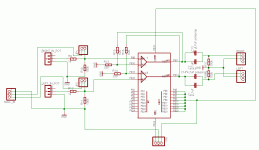
knabsol said:schematic
Very nice...now just shorten up the feedback loop and you're done!
I would keep the traces as short as reasonably possible for this, especially since this is a high speed device....feel free to correct me if I am wrong about this.
Also what are you planing to do about nulling the ofset? Are you using the regulator as Carlos did, or a servo of some kind?
G.
Thank you very much Gcollier!
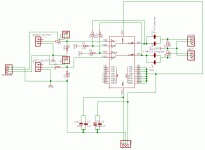
So is this somewhat what you mean by shorting the feedback? I used smd resistors there instead. Better?
I have planned to try carlos nulling circuit or maybe with none at all. that´s why I got the jumper there so i can take it away without resoldering anything.
So is this somewhat what you mean by shorting the feedback? I used smd resistors there instead. Better?
I have planned to try carlos nulling circuit or maybe with none at all. that´s why I got the jumper there so i can take it away without resoldering anything.
Attachments
knabsol said:Thank you very much Gcollier!
So is this somewhat what you mean by shorting the feedback? I used smd resistors there instead. Better?
I have planned to try carlos nulling circuit or maybe with none at all. that´s why I got the jumper there so i can take it away without resoldering anything.
That's pretty much it. I don't know that I would bother with SMD for that part, just give youself enough clearance for the pads. Some times I put the pads for an SMD part right under the through hole version, just to give myself a few options. Also, you might as well move R5 and R6, right next to the feedback resistors.
I don't have a PSU or nulling circut myself, but Tobias has a very nice design that uses the servo, I'm sure he will share the eagle files with you. If you wan't to try the "Carlos" nulling circut you could likely fit it at the top of the board near where you have the jumper. You could still leave yourself the option of switching it out of the circut. The big problem with the nulling circut is that it does not work across the entire range of your pot.
I am not actually using this preamp myself...to be honest I prefered my OPA627/Buff 634 combo better...the AD815 sounded grainy to me...as usual everyone will have their own preferance. I am looking to give this or something similar another try.
G.
Hello G and knabsol
Well, it's the Carlos nulling circuit I'm trying to do a layout for. But for a servo it would look the same just the servo OPamp would go right under the AD815 and the nulling circuit would be omitted from the PSU-board.
http://www.ettnet.se/~tobias/diy/ad815/smd/
Stacking the two boards on top of eachother with the PSU on top.
And I would connect the two boards with the pins from the output el. caps from the regs.
Also some vias connecting heatsink areas in both layers.
Haven't done the boards yet so I don't know how it would work.
Did a "DIP" version long ago to, but it isn't finished. The groundplane has to be redone.
http://www.ettnet.se/~tobias/diy/ad815/dip/
Cheers
Hey Tobias you sent me the eagle files for that desing a while back. I was tinkering with it to make it possible to use for us self etchers. I didn't look too closely at the PSU design, at the time I was more interested in your implementation of the opamp. I still think that this chip holds some promise as it is highly regarded by most who build it (then again what isn't around here). In anycase I am planning to use a WM8816 to control the gain. Because the microcontroller will know exactly what the gain is I should be able to reliably predict the offset and use the microcontroller to null the offset, maybe with a smoothed PWM signal, or even a really simple DAC. I suspect this will be a complicated project, so it may take a while.tobias_svensk said:Hello G and knabsol
Well, it's the Carlos nulling circuit I'm trying to do a layout for. But for a servo it would look the same just the servo OPamp would go right under the AD815 and the nulling circuit would be omitted from the PSU-board.
http://www.ettnet.se/~tobias/diy/ad815/smd/
Stacking the two boards on top of eachother with the PSU on top.
And I would connect the two boards with the pins from the output el. caps from the regs.
Also some vias connecting heatsink areas in both layers.
Haven't done the boards yet so I don't know how it would work.
Did a "DIP" version long ago to, but it isn't finished. The groundplane has to be redone.
http://www.ettnet.se/~tobias/diy/ad815/dip/
Cheers
G.
This sounds like a really interesting project, and I'd love to know how the boards turn out. I'd like to build an intergrated GC and on one hand, don't want a passive linestage, but on the other hand, don't want a complex (expensive) preamp section.
I'm particulary interested if anyone makes a run of these boards. I'll certainly sign up for a set.
I'm particulary interested if anyone makes a run of these boards. I'll certainly sign up for a set.
 Hardly any rocket science.
Holger
I like your intervention!
Peranders: maybe, you are right.
But: could you explain me, why this project / thread is sailing under the name Carlos? And why a group buy including his name is planned?
Is this fairplay?
Franz
I like your intervention!
Permission of using a non-inverting configuration, model 1A Hardly any rocket science.
Peranders: maybe, you are right.
But: could you explain me, why this project / thread is sailing under the name Carlos? And why a group buy including his name is planned?
Is this fairplay?
Franz
- Status
- This old topic is closed. If you want to reopen this topic, contact a moderator using the "Report Post" button.
- Home
- Amplifiers
- Chip Amps
- Carlos AD815 preamp PCB