Marsvolta,
Your clean and minimal wiring really appeals to to me. Nice. Did you ever listen to the amps without a tube pre and if so what differences did you hear. Which one is that? Might be my next project - curiosity is getting the best of me.
Thanks, this was the testing phase so it was still messy.
")
I have not done much listening without the tube pre. Its purely phono for now. It is the ebay VTL 12ax7 phono pre board and 4 lm3886 boards.
I plan to add a switch for a direct line-in, possibly remove the regulator boards from the PS and add a lot of capacitance. I've been running it unregulated (37v) lately. I need to do more testing on reg vs unreg.
I recently hooked up the scope and freq gen to get some spice model verification. Its pretty much right on the money.
My first diy amp (LM3886)
Hello together,
this is my first diy amplifier project and I hope that I will not make a fool of myself by posting it.
Front:
Rear:
Insides:
Some more details can be found here:
ems
Greetings
Erik
Hello together,
this is my first diy amplifier project and I hope that I will not make a fool of myself by posting it
.Front:
An externally hosted image should be here but it was not working when we last tested it.
Rear:
An externally hosted image should be here but it was not working when we last tested it.
Insides:
An externally hosted image should be here but it was not working when we last tested it.
Some more details can be found here:
ems
Greetings
Erik
post2162, last pic is 1215 by 1080pixels & <200kB.Very nice photos BUT Please size then properly so tat I can vue them properly........
What stops you viewing it?
What stops you viewing it? __________________
regards Andrew T.
Well the photo is 3 screen widths wide and at least an equal amount high.(I have a 16" screen)
In attempting to view I' looking at a small portion of the photo. With luck I'm maybe looking at
4 components Would like to see the whole photo at once.
OT, but I've found that if there are large pictures in a thread here, I can refresh the url after it has completely loaded, and the pictures are automatically re-sized, with the expanding option available with a click. It's a nice forum feature!
I'm sorry but I must have missed that maneuver. Could you please explain how this is accomplished. Thanks..
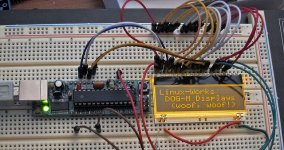
Rangefinder,
how can I help you?
It is a 3x16 character display which provides a parallel and a SPI interface. Price ~13eur + white backlight for ~10eur. It is quite easy to interface if you ignore the datasheet concerning the reset circuit. Drive the reset with an i/o port of the micro at each start up for a defined period of time.
Link to the display supplier: ELECTRONIC ASSEMBLY : LCD DOG series, flexibe, flat and colorful
The schematic to the front end is available on my site: ems
Regards
......... pic is 1215 by 1080pixels.......
I don't understand.What stops you viewing it?
Well the photo is 3 screen widths wide and at least an equal amount high.(I have a 16" screen)..............
A 800 by 600 resolution screen (of any size) will show 2/3thirds of the pic width.
A 1200 by 900 screen (4:3) will show almost the whole pic in one view.
Have you tried a 1920 by 1080 screen (16:9) yet? They are coming down in price. I think you can get a 24" for under $200.
Soda, Thanks for your response. I have worked on controllers with such a display. Have thought to make some use of the several that I have in the treasure file. After having moved several times in recent years the data sheets as well as the chips aren't accessible at this time. It makes me long for a work area w/ open storage available. A small apartment doesn't hack it.
Andrew, I have taken note of your response. This problem only occurs randomly but it is an irritant if anything more than scrolling is required to view the photos. Have yet to find a satisfactory solution. Inpatients of age. I do have a new LCD 24" monitor but with the movings an such it hasn't yet been hooked up.
Andrew, I have taken note of your response. This problem only occurs randomly but it is an irritant if anything more than scrolling is required to view the photos. Have yet to find a satisfactory solution. Inpatients of age. I do have a new LCD 24" monitor but with the movings an such it hasn't yet been hooked up.
I recently started playing with the dog-m displays, too. lots of color choices, and 1, 2 or 3 lines of text on the same glass display (not changeable, but buyable that way).
there's an arduino driving it on protoboard.
not hd44780 but very close. and don't let all those wires scare you; most are just going to Vcc (top bus line).
btw, dog == 'display on glass' (at least I think that's what dog is; and the -m is 'module')
there's an arduino driving it on protoboard.
not hd44780 but very close. and don't let all those wires scare you; most are just going to Vcc (top bus line).
btw, dog == 'display on glass' (at least I think that's what dog is; and the -m is 'module')
Attachments
Last edited:
I'm sorry but I must have missed that maneuver. Could you please explain how this is accomplished. Thanks..
After the thread page has finished loading in your browser, just click the refresh button, or press the F5 key. I don't know if it's just my browser settings, but I *think* it's part of the forum's operations.

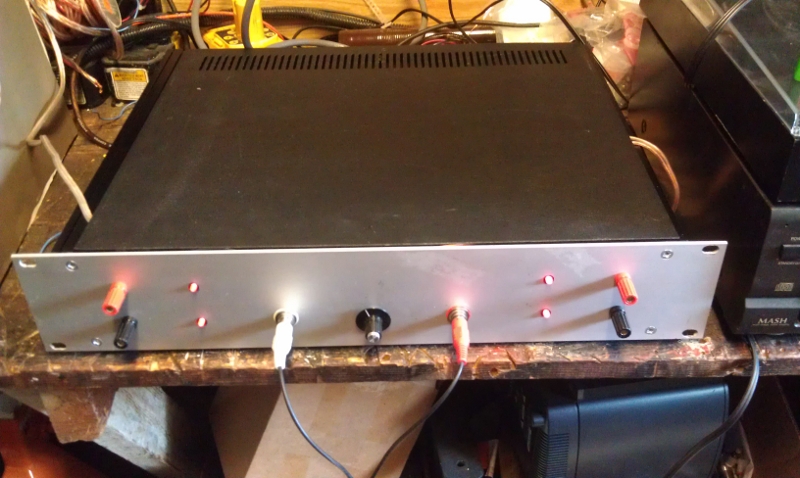
Latest project:
Op amp buffer>10k volume>DRV134>2 - LM3886 BR100 with optional P06 phono preamp. Powered by two condor power supplies cranked to 31 volts. Additional 15,000 caps each rail.
Everything except the lm3886s was found for free. I didn't even have to drill extra holes.
Sounds awesome powering a pair of minimus 7 speakers in the garage.
Last edited:
How does that P06 sound on top of the gainclone...? I have been interested in the project for a while. I would also like to hear comments on the Boozehound Labs phone pre.
thanks,
Wayne-o
The P06 sounds good! A little light on the low end but I just threw it together from spare parts. I used a TL084. I plan on another with high quality parts. It still is very close to my 12ax7 tube preamp. Open and airy. Smooth mids.
The P06 needs to be driven into a buffer. I have a TL084 buffer before the 10k pot in the amp. I have found it also helps the CD players sound greatly. I think a buffer is mandatory for a gainclone. I've got to order some other opamps and compare.
for soda74!
Hi soda74! I was looking your first amp and it looks very nice. is that on bottom aluminum foil or just the aluminum chassis reflection? I was only concerned if it was aluminum foil inside, I would be very worry about those things if they peel off or get loose inside chassis. you can get some smoke if it touches boards and remember you have some wood there too. Better to be safe than to be sorry!
Hi soda74! I was looking your first amp and it looks very nice. is that on bottom aluminum foil or just the aluminum chassis reflection? I was only concerned if it was aluminum foil inside, I would be very worry about those things if they peel off or get loose inside chassis. you can get some smoke if it touches boards and remember you have some wood there too. Better to be safe than to be sorry!
Last edited:
- Home
- Amplifiers
- Chip Amps
- Chip Amp Photo Gallery