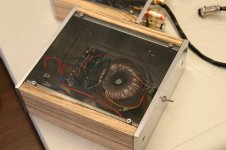
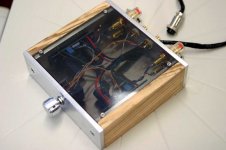
I had posted some images of my recent gainclones before, but thought I would share my recent revisions. You can also see the internals on these. They are based on peter's kits. I used quarter inch aluminum stock and quarter inch polycarbonate for the case construction.
Attachments
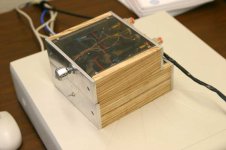
I got my aluminum from onlinemetals.com I don't know how much it would cost to do one case only, but I spent about three hundred dollars ordereing from then for 13 amps or enough to do 26 cases. The finish when I received it was more of a brushed finish. But, there were a lot of scratches in it. I would say the pictures I posted here are about halfway through the finishing process. I started with 220 grit paper and wet sanded all the way to 2000 grit. It probably took four hours or so of sanding per case, but once I got it sanded and polished it was worth it. I think my next one I may just sand to 800, then scotchbrite and anodize it though. that one, unfortunately wasn't actually mine.
Thanks. I was actually looking at this same place. Was shipping expensive?
I have two ATX computer PSU cases (one for the amp itself and the other for the power supply) that I'm planning on using as basic shells and adding some nice 1/4 inch aluminum front panels and wood side panels as you did.
What did you use for polishing?
I have two ATX computer PSU cases (one for the amp itself and the other for the power supply) that I'm planning on using as basic shells and adding some nice 1/4 inch aluminum front panels and wood side panels as you did.
What did you use for polishing?
cadbike said:The finish when I received it was more of a brushed finish. But, there were a lot of scratches in it. I would say the pictures I posted here are about halfway through the finishing process. I started with 220 grit paper and wet sanded all the way to 2000 grit. It probably took four hours or so of sanding per case, but once I got it sanded and polished it was worth it. I think my next one I may just sand to 800, then scotchbrite and anodize it though. that one, unfortunately wasn't actually mine.
cadbike, congrats and it does look good. I am about to start on something similar and have a couple of questions. You did the sanding by hand or with one of those polishing machines? I was thinking of starting off with 350 and finishing with 1500 grit, coz that's the finest I could get my hands on. Do you think it's good enough?
Yeah, and how did you polish it? Appreciate if you could comment.
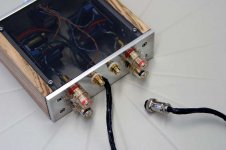
For the power supply connector I used a cb microphone connector that I ordered from parts express. I have used xlr connectors as well. Either type works great. I did do all of the sanding by hand and then polished it by hand as well using mothers billet polish because I had some sitting around. I think the polish would have been better if I had used a machine but everyone that has seen the amp in person has been very complimentary of the finish. I would trust mick_f's comments on the sanding though. I can tell you that if you polish out 1500 grit you will still have lines from sanding in it.
As far as the aluminum goes. I thought the shipping was very reasonable. I think it was maybe 40 dollars for shipping. Plus you get a discount if you order over a hundred dollars worth from onlinemetals. Very reasonable. I couldn't find anywhere else that was as cheap.
As far as the aluminum goes. I thought the shipping was very reasonable. I think it was maybe 40 dollars for shipping. Plus you get a discount if you order over a hundred dollars worth from onlinemetals. Very reasonable. I couldn't find anywhere else that was as cheap.
Thanks Mick_F and cadbike for the advise. I'll guess I'll have to go round and try to get the finer grit sandpaper. Darn, this country just ain't DIY friendly. It's so damn hard to get parts or to find someone to do it. 
BTW, cadbike, you sure those are 0.25" aluminum? They look rather thick. I thought they were more like 0.5".
BTW, cadbike, you sure those are 0.25" aluminum? They look rather thick. I thought they were more like 0.5".
I've never tried self tapping screws, but I highly doubt it would work. I'm using 8-32 thread machine screws to hold the front and back on, 6-32 thread machine screws for the top and bottom and some 1/2 inch stainless wood screws to hold the sides on. I'm countersinking all of them. I'm tapping all of the holes using a cordless drill with the clutch set very low. Saves a ton of time.
Michael
Michael
cadbike said:Safetyman,
It is only .25 inch aluminum. The case for the amp is only 2 inches high by 6" wide. I was going for the bulky look, but 1/4 al is a lot easier to work with.
Michael,
Thanks for all the help, I feel more confident to take on the task now. I guessed I was fooled by the size of the pics as I thought your amp was larger than that.
 It really looks nice and professional. I hope I can come up with something nice too, as creativity and handiwork just isn't my forte. It's a first attempt with minimum tools and I will probably be happy with whatever that comes out functional and decent looking.
cadbike said:I I'm countersinking all of them. I'm tapping all of the holes using a cordless drill with the clutch set very low. Saves a ton of time.
Michael
Michael, can you please guide me on the tools needed and the procedure to drill the holes for countersinking?
Thanks.
Safetyman,
I used a drill press to drill all the holes for the case. I just drilled a hole all the way through that was slightly larger than my bolt shaft. Then I used a bit slightly larger than the bold head to do my countersink. This has the advantage of making the holes self centering since the bit was tapered. But, your holes will need to be very precise. I've seen other people use some pilot point bits made by Dewalt that will give you a flat bottomed hole. I think you can get them at home depot here. if you need anymore advice, let me know. Oh, and on your holes in the side that you will be tapping, it helps if you make them quite a bit deeper than your bolt will need.
I used a drill press to drill all the holes for the case. I just drilled a hole all the way through that was slightly larger than my bolt shaft. Then I used a bit slightly larger than the bold head to do my countersink. This has the advantage of making the holes self centering since the bit was tapered. But, your holes will need to be very precise. I've seen other people use some pilot point bits made by Dewalt that will give you a flat bottomed hole. I think you can get them at home depot here. if you need anymore advice, let me know. Oh, and on your holes in the side that you will be tapping, it helps if you make them quite a bit deeper than your bolt will need.
- Status
- This old topic is closed. If you want to reopen this topic, contact a moderator using the "Report Post" button.
- Home
- Amplifiers
- Chip Amps
- recent case revisions