Well here it is, it’s taken a year and this is the second case that I’ve put it into. But as you can see it’s nearly finished. Apart from one rear cover and a power cord to and from the power supply, plus some speaker connections.
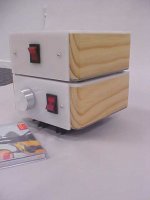
The first case was just the run of the mill Perspex box, which after building didn’t look so hot. So I decided to completely strip the thing down and start again. The base was gathered from a scrap metal yard, its 3mm stainless steel which is nice and heavy, but a right prick to work with. The sides are pine sanded and coated with a clear varnish. The tops, sides and rears are all Perspex which I salvaged from a plastics factory in Albany.
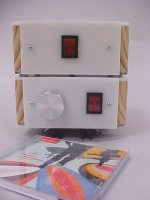
If you look at the second picture in, you can see the heat sink at the bottom of the amp case. This was attached to the base as I wanted to keep the case as small as possible without getting crazy. The CD was used as a reference to the size. It is possible to go quite a bit smaller but without some really good and accurate tooling, this was about my limit. And spending money on more tools was just not an option. As this was already not high on the DAF (Domestic Approval Factor) list in the first place, spending even more money was out of the question.
Was it all worth it?
That’s a question that I keep asking myself. I have learnt a lot building this amp and the knowledge gain has been invaluable.
What does it sound like?
Not bad, not bad at all. I have class A Technics SU650 amp and it does sound good compared to this. Does it sound better? Hard to say as it was not run in long enough, as I ripped it out and started on the second case. But it doesn’t sound any worse than my Technics, at $1000 in 1989. That was an expensive buy back then. This amp has cost about $200 NZ to build, of course there has been other miscellaneous items which I felt could not be directly linked to the amp, which I had purchased to get this finished.
Would I do this again?
Well I would, but the next one had better sound really good for all the time and effort I’ve put into it. But it was very enjoyable to work on.
The first case was just the run of the mill Perspex box, which after building didn’t look so hot. So I decided to completely strip the thing down and start again. The base was gathered from a scrap metal yard, its 3mm stainless steel which is nice and heavy, but a right prick to work with. The sides are pine sanded and coated with a clear varnish. The tops, sides and rears are all Perspex which I salvaged from a plastics factory in Albany.
If you look at the second picture in, you can see the heat sink at the bottom of the amp case. This was attached to the base as I wanted to keep the case as small as possible without getting crazy. The CD was used as a reference to the size. It is possible to go quite a bit smaller but without some really good and accurate tooling, this was about my limit. And spending money on more tools was just not an option. As this was already not high on the DAF (Domestic Approval Factor) list in the first place, spending even more money was out of the question.
Was it all worth it?
That’s a question that I keep asking myself. I have learnt a lot building this amp and the knowledge gain has been invaluable.
What does it sound like?
Not bad, not bad at all. I have class A Technics SU650 amp and it does sound good compared to this. Does it sound better? Hard to say as it was not run in long enough, as I ripped it out and started on the second case. But it doesn’t sound any worse than my Technics, at $1000 in 1989. That was an expensive buy back then. This amp has cost about $200 NZ to build, of course there has been other miscellaneous items which I felt could not be directly linked to the amp, which I had purchased to get this finished.
Would I do this again?
Well I would, but the next one had better sound really good for all the time and effort I’ve put into it. But it was very enjoyable to work on.
Attachments
Lm3875
The chips were ordered from Brian, it's the older one with the simple supply setup. Actually I was worried about that as I had read so much about the inportance of power supplies. But my speakers have incredilbe base on them, so when it was first hooked up I was surprised at the sound. It seemed quite nice, even with the very lack luster power supply. I am using a set of Image 416's, these are made in New Zealand, you can check them out here,
imageloudspeakers.co.nz. So maybe the balance was right. It will be interesting to get this finished and then let it run for a while and do another comparison with the Technics.
Something else I've learnt while doing this project; New Zealand is an extremely expensive place to buy parts in, and also a very small market. So it's very difficult to get supplies. So if your living in New Zealand check out all the second hand shops and scrap yards to get some really cheap stuff. And think carefully before rushing out to buy parts, because it all starts adding up very quickly, a few connectors here and there, some wire, before you know it you've spent $100.
Re: LM3875
cute & smart. very nice.
which one? single tx with dual secondaries to two bridges? what tx brand and VA?
is 'technics su650' a typo by any chance? i'm not finding that one on google. perhaps similar to something on vintagetechnics.com ?
cute & smart. very nice.
simple supply setup
which one? single tx with dual secondaries to two bridges? what tx brand and VA?
is 'technics su650' a typo by any chance? i'm not finding that one on google. perhaps similar to something on vintagetechnics.com ?
Technics SUV650
Sorry it's probably my one fingered typing.......
I am using a single 160va 25-0-25v Transformer. Single rectifier board.
Dual supply.
The Technics Amp is old..88,89. But very nice as it was instorage for about 7,8 years while I was overseas travelling, so it's still resonably new in hours of use.
Sorry it's probably my one fingered typing.......
I am using a single 160va 25-0-25v Transformer. Single rectifier board.
Dual supply.
The Technics Amp is old..88,89. But very nice as it was instorage for about 7,8 years while I was overseas travelling, so it's still resonably new in hours of use.
Cheers
You know this could be seen as stirring, but I have noticed over the last twelve months that there seems to be a lot of people theorising about this or that design or layout.....talk, talk talk.
O.k, I'm no electronic wiz but at some stage you going to have to get something made and let your ears do the judging.
Finished
Finished and running
Finished about two weeks ago, and has been running ever since. There was 10mv on one side and and 20mv on the other. Which was good compared to the first case. I think it had something to do with the length of wires from the board to the interconnects?
And I tried to keep them the same length. I am using a pair of image loudspeakers which have amazing base so it seems to be well balanced, but i still think it lacks a bit in that department. the next one i make will definately have a bit more punch in the power supply area.
- Status
- This old topic is closed. If you want to reopen this topic, contact a moderator using the "Report Post" button.
- Home
- Amplifiers
- Chip Amps
- Semi finished gainclone LM3875