Beginner project - advice sought on cheap kits to screw up while I learn
Hi guys
I am very much a beginner and am looking to build experience by assembling some low cost kits and experimenting. I have been a bit inspired by people like JohnAudioTech on Youtube.
There is so much "advanced" info on here its a bit overwhelming for the new guy, tbh, so I thought I would be brave and whack out a post of my own.
I have a soldering iron, am pretty bad at it so far, and want to start with something relatively simple and am fully expecting to make some mistakes. Once I build up my competence and understanding maybe I will be more ambitious.
I have no particular aversion to buying stuff from China, however if I can get a relatively low cost PCB from a UK supplier and then buy components from RS or similar would I would be just as happy?
Here is a UK supplied board I am considering, has anyone used it, does it look OK?
Quality LM3886 based mono amplifier Chipamp Gainclone PCB only DIY Audiophile | eBay
There is also an LM4780 stereo board but the LM4780 appears to have been discontinued and they £50 each which seems a bit steep for an experiment!
There are also kits from China like this one, which look pretty cool, obviously at this stage maybe looks a bit more complicated ....
I imagine I will need 2 boards,one for each stereo channel. The parts list on RS components for the LM3886 kit add up to around £30 for 2 sets, so the UK build cost for 2 boards and all the bits would be around £50.
I will need to source a PSU and heat sinks separately, probably rob the HS from some junk (maybe a PC CPU heat sink might do the job) and might well buy a PSU as I am not that confident in my construction skills to mess with 240V.
Couple of requests for advice :
Do I need a pre-amp or can I just use the output of a mp3 player / streaming device?
I would like a volume control, according to the data sheet this should be 10k audio type (non-linear)
If anyone has had any positive experiences with / or can recommend a cheap kit build from ebay, functional but largely for learning then would love to get the advice, LM3886 kits can be bought very cheaply on ebay
How am I doing so far?
Cheers big ears!
Chunks
Last edited:
I'd suggest getting a spool of solid core wire, say 20-22 AWG (0.6-0.8 mm), and some prototype board. The boards should have either round pads or traces with holes in them. Spends some time practicing soldering the wire into the board. It's not the most inspiring work, but it'll greatly improve your soldering skills.
Then move onto one of the many kits ... or if you're a little more adventurous, one of my circuits.
This is the kind of board I'm talking about:

Tom
Then move onto one of the many kits ... or if you're a little more adventurous, one of my circuits.
This is the kind of board I'm talking about:
Tom
Personally, I would have gone straight to a kit as chip amps are fussy about decoupling and pcb layout.
Even then with ebay chip amp kits there are no guarantees.
There are a lot of choices and some are poor.
Its a bit of a lucky dip unless someone advises on a good experience with one.
Even then with ebay chip amp kits there are no guarantees.
There are a lot of choices and some are poor.
Its a bit of a lucky dip unless someone advises on a good experience with one.
Thanks Tom, good advice. I have doing exactly that. I have two prototype boards and I have been trying to assemble 2 Cmoy headphone amps.
I am about 70% through one and 30% the other, my soldering is improving but not by much!
Practice makes better. There are other things that can get in the way of a good solder job, though. The soldering iron and the solder are the biggest culprits. I recommend regular 60/40 (Sn/Pb) leaded solder or the eutectic alloy 63/37 (Sn/Pb) if you want to get fancy. You can read my thesis on selecting solder here: Selecting Solder (Neurochrome).
Alternatively, show some pictures of your work if you'd like some feedback.
Tom
I haven't ever had a problem soldering.
1/ Tin soldering iron tip with a little solder.
2/ Heat component and pcb pad junction.
3/ Wait half a second.
4/ Dab in just enough solder to make a tapered joint.
Too much solder will make a bad job and sometimes short out the next pad along.
1/ Tin soldering iron tip with a little solder.
2/ Heat component and pcb pad junction.
3/ Wait half a second.
4/ Dab in just enough solder to make a tapered joint.
Too much solder will make a bad job and sometimes short out the next pad along.
The kits are so cheap on ebay I decided to dive in and buy a few and use them as soldering practice.
I bought :
This TDA7273 based kit
An NE5532 based Pre-amp
2 mono LM1875T kits
Plan is to whack them together and see if they work mainly for the learning, next stage while I wait for them to arrive is to find some old Acoustic Research speakers I have in the garage and see if they still work.
I also need to source a suitable power supply just to test my stuff with and play around with - I am a bit lost on this, at this stage i don't want to spend a huge amount of money but it needs to be SAFE- could you guys give me any advice?
Maybe something like this? I would prefer something with plugs though.
Do you need to put any smoothing on the PSU outlet, I know switching power supplies can be a bit lumpy, does this matter?
Regarding my soldering - its pretty bad, the prototype board is tiny-weeny
and the holes are close together so with my eyesight its quite hard (for me), lol :


I actually think (hope) a proper PCB will be easier in some ways.
Cheers big ears!
Chunks
I bought :
This TDA7273 based kit
An NE5532 based Pre-amp
2 mono LM1875T kits
Plan is to whack them together and see if they work mainly for the learning, next stage while I wait for them to arrive is to find some old Acoustic Research speakers I have in the garage and see if they still work.
I also need to source a suitable power supply just to test my stuff with and play around with - I am a bit lost on this, at this stage i don't want to spend a huge amount of money but it needs to be SAFE- could you guys give me any advice?
Maybe something like this? I would prefer something with plugs though.
Do you need to put any smoothing on the PSU outlet, I know switching power supplies can be a bit lumpy, does this matter?
Regarding my soldering - its pretty bad, the prototype board is tiny-weeny
and the holes are close together so with my eyesight its quite hard (for me), lol :
I actually think (hope) a proper PCB will be easier in some ways.
Cheers big ears!
Chunks
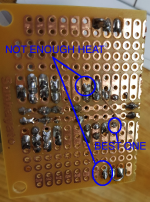
Not bad for a first timer.
In general you're using too much solder. That's a common problem. I do too... One way to control that better is to use thinner solder. 0.5 mm diameter is pretty nice to work with. I sometimes use 0.7-0.8 mm for leaded components (what you have) but it takes a little more practice to work with.
Some of the joints haven't flowed properly. That's a sign of not enough heat.
The three in the bottom right look grainy. That can be because the tip of the soldering iron wasn't clean, due to too much heat, or due to vibration.
I've circled the best one. That one has too much solder, but otherwise looks good. Be careful if the solder balls up like that, though. It looks like that joint just has too much solder, but sometimes if the pad is a little dirty or not warm enough the solder balls on the lead and doesn't make contact with the pad.
You want a smooth and shiny cone of solder surrounding the lead. With the board you have, that'll be hard on the traces where you have three holes on one strip of copper. You'll nearly always get a little elongation of the cone. That's, in part, why my boards have solder mask as that exposes a circular pad for you to solder to.
Tom
Attachments
Not bad for a first timer.
In general you're using too much solder. That's a common problem. I do too... One way to control that better is to use thinner solder. 0.5 mm diameter is pretty nice to work with. I sometimes use 0.7-0.8 mm for leaded components (what you have) but it takes a little more practice to work with.
Some of the joints haven't flowed properly. That's a sign of not enough heat.
The three in the bottom right look grainy. That can be because the tip of the soldering iron wasn't clean, due to too much heat, or due to vibration.
I've circled the best one. That one has too much solder, but otherwise looks good. Be careful if the solder balls up like that, though. It looks like that joint just has too much solder, but sometimes if the pad is a little dirty or not warm enough the solder balls on the lead and doesn't make contact with the pad.
You want a smooth and shiny cone of solder surrounding the lead. With the board you have, that'll be hard on the traces where you have three holes on one strip of copper. You'll nearly always get a little elongation of the cone. That's, in part, why my boards have solder mask as that exposes a circular pad for you to solder to.
Tom
Tom, that is super helpful, thank you so much for your advice. I am using 0.8 mm solder. I think I'll get some 0.5 mm and see if it helps improve things.
Chunks
Add a PCB cleaning eraser to your shopping list to clean the muck off the stripboard before soldering.
They are similar to the ink rubber on the double ended pencil / ink rubbers you can get.
Done, thanks!
The way I`m thinking tells me to buy first a finished kit, listen to it and IF I find it OK then buy the PCB and quality components and then build it myself.
You can always sell it if you don`t like it. You may not, someone else may like.
I have a good soldering iron tip, relatively a thin one and I believe it is an ERSA, with a special plating. It makes soldering so much easier. And a good quality -quite expensive- soldering flux core wire with a good flux that needs no cleaning afterwards. It was bought some years ago and it is not a lead free one.
The quality of the flux will affect soldering result and the heating time needed. More heating time is not good at all, so you get the idea.
Add a PCB cleaning eraser to your shopping list to clean the muck off the stripboard before soldering.
Good point. A Scotch-Brite scouring pad, fine steel wool (get the finest grade possible), or even fine sandpaper (1000-2000 grit) works too. Just make sure that the scouring pad does not contain any soap. Clean the PCB with acetone on a rag to remove any grease.
Tom
post7 soldering.
Tomchr has already mentioned lack of heat.
I second that.
Are you using a lead based solder. Eutectic 63/37 is better than all the others for electronics work at a very reasonable price.
Is it flux cored? 1% & 2% are common, use 2% while you are learning.
Is your iron hot enough?
How big is the tip?
Have you tinned the tip?
Have you added a tiny blob of solder to the tip to widen the thermal contact patch?
How long are you pre-heating the trace/pad before you heat the component lead?
As a fellow beginner i can recommend Pete Milletts "Butte" headphone amp as a learning project. It is very simple to assemble, has excellent instructions and Pete sells boards and a chassis via his Ebay store, which saves you the chassis work. I personally found that a lot easier than having to start out designing and building/drilling a chassis from scratch. And it sounds great too!
It is AC wallwart powered so you also don't have to worry about wiring transformers and mains AC the first time.
There are a couple of optional regulators on the PCB that are SMD soldering, but you can skip them or do them when you are more confident in your soldering skills.
Now, i wont go against the advice here saying start by practicing your soldering, but i still built this without having every held a soldering iron in my hand before, so it really is beginner friendly!
Best,
Silas
As a fellow beginner i can recommend Pete Milletts "Butte" headphone amp as a learning project. It is very simple to assemble, has excellent instructions and Pete sells boards and a chassis via his Ebay store, which saves you the chassis work. I personally found that a lot easier than having to start out designing and building/drilling a chassis from scratch. And it sounds great too!
It is AC wallwart powered so you also don't have to worry about wiring transformers and mains AC the first time.
There are a couple of optional regulators on the PCB that are SMD soldering, but you can skip them or do them when you are more confident in your soldering skills.
Now, i wont go against the advice here saying start by practicing your soldering, but i still built this without having every held a soldering iron in my hand before, so it really is beginner friendly!
Best,
Silas
Thanks, that looks like a cool project, I might put it on my Xmas list
post7 soldering.
Tomchr has already mentioned lack of heat.
I second that.
Are you using a lead based solder. Eutectic 63/37 is better than all the others for electronics work at a very reasonable price.
Is it flux cored? 1% & 2% are common, use 2% while you are learning.
Is your iron hot enough?
How big is the tip?
Have you tinned the tip?
Have you added a tiny blob of solder to the tip to widen the thermal contact patch?
How long are you pre-heating the trace/pad before you heat the component lead?
Hi Andrew,
Thanks for the advice, here is the stuff I am using :

I bought lead based solder as I was advised it is better to learn with.
I usually have the iron set at 300C, with the size of the pads on the prototype board I am using I have been having trouble getting the iron onto the pads well, I even tried a pointed tip for a bit but found that there wasn't much heat being transferred.
Based on the feedback here I will try and get the pads hotter and I will also use thinner gauge solder which might help.
Really appreciate all the advice, its great!
Chunks
That angled tip should do instead of a chisel tip.
Tin the flat face so that it has a shiny solder finish.
Wipe the tip on a damp natural sponge to clean off flux.
If it lies unused for many minutes then give it another wipe immediately before use.
Then add a tiny blob of solder to the end of the flat face. This solder will spread out across the gap where the tip touches the pad. This wider area conducts heat into the pad.
Then slide the tip to contact the component lead and at the same time poke the end of the flux cored solder into the "V" formed between the curved side of the tip and the component lead. That solder should flow behind the flux towards the hottest part and then start to spread out around the whole pad.
The advancing flux changes from liquid to gas as it boils and it's the aggressive action of the boiling flux that cleans off the oxides contaminating the copper surfaces.
I slide the hot tip up the component leg, since that seems to form a neater fillet around the lead. This also pulls excess solder away from the pad. That gets cropped off later.
From first tip to pad contact to sliding off the completed joint should take no longer than about 3 seconds for 0.5mm diameter legs.
If it takes longer then your tip is not hot enough.
Big fat connection need a lot more heat so start with a very hot tip to flood the pad/joint with heat at the fastest speed to minimise the time that you are heating the joint.
1mm legs might need 320degC, 2mm legs maybe 350degC.
Worth checking the calibration of the temperature scale.
63/37 melts/freezes @ 183degC
Cut a 4mm length of solder and form it into a circle around the end of your tip.
Starting at <180degC start increasing the temp and leave long enough for the solder to heat up to tip temp.
Slowly nudge the temp up and find what reading on the temp scale melts the solder. It should be around 183 to 185degC.
If it's out by 10 or 20Cdegrees, then make that adjustment to all the other readings.
290 to 300degC is good for 63/37
60/40 is slightly pasty while melting, since it's not eutectic.
Last edited:
I think we've identified two issues:
- Dirty board
- "Cold" tip
I usually use 600-700 ºF tip temperature. 600 ºF when soldering SMD parts. 700 ºF for everything else. Since your soldering station has markings in Fahrenheit, that should be easy for you to replicate.
As Andrew pointed out, you'll need a solder sponge. You might be able to find a cellulose sponge at a kitchen supply store. The easiest, is usually to swing by an electronics parts place and pick up a solder sponge. Alternatively, a folded up sheet of paper towel that's soaked in water will work in a pinch. There are also "sponges" made from a ball of brass ribbons. They're pretty effective as well. Finally, you might want to pick up a tip tinner. It's a little can of solder, flux, and cleaning agents. I don't personally use them as I keep my soldering tips pretty well tinned, but I've used them in the past to rejuvenate tips that have been "cooked" (i.e. that have sat for long periods of time without use when someone forgot to turn the soldering iron off).
Speaking of... Turn off the iron when you're not using it. I'd say don't leave the iron on for more than 15-30 minutes without either turning the temperature all the way down or turning the iron off. The tip will oxidize and turn useless if you leave the iron on all the time.
In the electrical section of your local hardware store, you can find timers intended for turning off lights and fans after a set period of time. Making a little turn-off timer for your soldering station would be pretty simple with one of those.
Tom
I bought lead based solder as I was advised it is better to learn with.
I did not had success with made in China cored solder wire.
I use an Alpha-Fry Fluitin (1535 I believe) that must be out of production now, and it is made in EU.
Fast cleaning and wetting, flows very well, leaves bright silver joint without cracks or any discoloring (sign of problem with the alloy), can be melted again without compromising joint quality, leaves almost no residue that even if it leaves any, if you use too much, it is supposed to be no clean (does not oxidize or short).
Leaded quality 60/40 cored wire will make your job done a lot better - or easier. Of course it is the alloy quality and the flux quality, both.
63/37 is good and makes a faster joint but is more difficult to work with as it is in liquid state and rapidly gets solid once heat is removed.
I only use it for SMT components, especially for smaller than 0805 ones. So I use a 0.5mm one.
Tip: Do not mix different types of cored wire solder in the same joint, the result is bad. So if you started soldering a component but decided to go with the other type instead do not do this. Only in a fresh joint use whatever you like. If it has solder on it then use the same.
- Status
- This old topic is closed. If you want to reopen this topic, contact a moderator using the "Report Post" button.
- Home
- Amplifiers
- Chip Amps
- Beginner project - advice sought on cheap kits to crew up while I learn