Hi
I'm currently building active speaker modules for my open baffle dipoles (which have been computer eq/xover'ed until now). I plan to make one pcb for each channel (high, mid, sub, input) with the active components and an amp. Those four pcbs will be in the same box with the speaker. The xover/eq stage follows the same form as Linkwitz's Phoenix asp.
I'm not shure how to connect the groundpoint though, should I connect all the star points on the board to one and then draw it to the main point for the whole module or should I have the amp separated as long as possible?
All suggestions are welcome
Anders
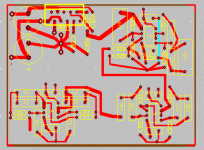
(here's the in progress layout for the midchannel at the moment, with all the grounds separated and no connectors added)
I'm currently building active speaker modules for my open baffle dipoles (which have been computer eq/xover'ed until now). I plan to make one pcb for each channel (high, mid, sub, input) with the active components and an amp. Those four pcbs will be in the same box with the speaker. The xover/eq stage follows the same form as Linkwitz's Phoenix asp.
I'm not shure how to connect the groundpoint though, should I connect all the star points on the board to one and then draw it to the main point for the whole module or should I have the amp separated as long as possible?
All suggestions are welcome
Anders
(here's the in progress layout for the midchannel at the moment, with all the grounds separated and no connectors added)
Attachments
Some suggestions (long)
Are you going to make it a double sided PCB? You can use one layer entirely for ground plane, and then separate it as you desire.
I guess your PCB should have at least three grounds that would be connected to the outside. The audio input ground, the speaker output ground and the power supply ground. I suggest these three ground cables to be twisted with its' corresponding signal cable, i.e. audio input twisted with input gnd, spk out twisted with spk gnd, and pwr gnd twisted with V+ & V-.
About splitting the gnd plane on the PCB, my suggestion would be making three local gnd planes first. And then joint the three plane in single point. Connect those twisted cables close to its' destinated device, eg. input cable to Opamp input, spk cable to power amp output pin.
The chasis earth connection would be something tricky. Some say connecting it to input sockets, some say power supply. Better compare it for your own case.
Of course, it's my opinion only.
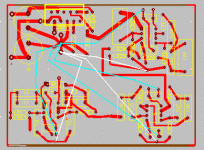
some more pic
Are you going to make it a double sided PCB? You can use one layer entirely for ground plane, and then separate it as you desire.
I guess your PCB should have at least three grounds that would be connected to the outside. The audio input ground, the speaker output ground and the power supply ground. I suggest these three ground cables to be twisted with its' corresponding signal cable, i.e. audio input twisted with input gnd, spk out twisted with spk gnd, and pwr gnd twisted with V+ & V-.
About splitting the gnd plane on the PCB, my suggestion would be making three local gnd planes first. And then joint the three plane in single point. Connect those twisted cables close to its' destinated device, eg. input cable to Opamp input, spk cable to power amp output pin.
The chasis earth connection would be something tricky. Some say connecting it to input sockets, some say power supply. Better compare it for your own case.
Of course, it's my opinion only.
An externally hosted image should be here but it was not working when we last tested it.
some more pic
The plan is to use a single sided pcb with solid core wire where I have to cross copper on the pcb althpugh I guess I could make a double sided if I see the need.
Three ground planes connected seems like a good idea. I'll try that right after the weekend when I come home.
A question though: Do I have to earth the chassis? I haven't done so with my first try at a GC and it behaved very well.
I use Traxmaker in the Circuitmaker 2001. I don't use the auto placement features, instead I print the schematic (or show it on my second screen) and try to make the pcb design mimic the schematic. I belive I get a much more compact layout this way. When I think I'm finished I print it on regular paper for inspection and then it's time to print it on transpearancy, use the 150w halogene (?, don't know the word...) , process it, wash it, etch it and drill.
/Anders
Three ground planes connected seems like a good idea. I'll try that right after the weekend when I come home.
A question though: Do I have to earth the chassis? I haven't done so with my first try at a GC and it behaved very well.
what PCB layout program are you using? Do you have some absolute-beginners-tips for someone who is about to try to learn to make PCBs?
I use Traxmaker in the Circuitmaker 2001. I don't use the auto placement features, instead I print the schematic (or show it on my second screen) and try to make the pcb design mimic the schematic. I belive I get a much more compact layout this way. When I think I'm finished I print it on regular paper for inspection and then it's time to print it on transpearancy, use the 150w halogene (?, don't know the word...) , process it, wash it, etch it and drill.
/Anders
For safety reason, metal chasis must be earthed. For good shielding, chasis should be connected to circuit ground. But when more than one of your component is earthed, you get ground loop, or possibly hum. That's the contradiction, safety vs humming. I'm not confindent enough to leave my diy component un-earthed.A question though: Do I have to earth the chassis? I haven't done so with my first try at a GC and it behaved very well.
below is a good reading about grounding and hum.
grounding article
Hi Anderz,
I decide to play a little with TRAXMAKER and I think I like it.
Thanks for the tips again. I made two small PCB for the a active-XO (I think very similar to Nelson Pass DIY active-XO). Could you tell me how I can get a graphic-file (jpeg, giff, bmp etc) from a traxmaker PCB file?
Kind regards,
Thijs
Could you tell me how I can get a graphic-file (jpeg, giff, bmp etc) from a traxmaker PCB file?
By using a virtual printer program to capture the print.
Oh, and don't forget to mirror the copper layers when you're printing them.
Good luck
Anders
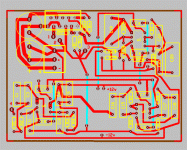
I've done a little work based on the input I've got and this is how it looks for the moment.
As for the chassis grounding, can't I take the mains earth to the chassis without connecting it to the amp-cricuit? That way I'm grounding it without introducing the loops.
/Anders
As for the chassis grounding, can't I take the mains earth to the chassis without connecting it to the amp-cricuit? That way I'm grounding it without introducing the loops.
/Anders
Attachments
About grounds......
Books have been written on this subject, so to be brief:
Probably the most important thing that you can do is use a "quiet ground" for critical signal connections. Make it separate from the bypass ground. Then connect them to the star ground. Pay very close attention as to where the ground for the main filters caps are. Do so in a way that there is no ripple current on that ground trace.
I can't remember which IC it was..........probably one not made any more.....but National Semiconductor had a good explanation of this.
One more thing:
Ground planes make good antennas. May not be a good idea for audio.
Jocko
Ok AndersZ, a copper rails on PCB must be from 1.5mm = 1A max current, better if more wide. In our case, we have min 5A current (look in IC datasheet) - in fact, it can easy drain up to 20-30A in a moment when a peak signal arrive and honestly processing by IC's + power capacitors began charge cycle (increase its own power resourse drinked by previously peaks). Of course, rails cannot be in fire (but in some case U can get acid scent in env fresh air & nice dark contour around PCB lines). ;-))
Right now (in this case) we get rezistor in ground line... Quality of sound is loss...
Banana's answer about "Three ground planes" is right (my respect to him).
Right now (in this case) we get rezistor in ground line... Quality of sound is loss...
Banana's answer about "Three ground planes" is right (my respect to him).
copper rails on PCB must be from 1.5mm = 1A max current
Well, according to my reference a 2mm wide track with a thickness of 35µm can take 6 amps at +10 degrees celsius so that's what I thought of when I drew those tracks, but I'm not the one who doesn't take advice (that's why I started this thread in the first place
") ).
).Should all tracks be as wide as possible?
Is the current arrangement with a small signal starground going to the big star (right under the 86) a bad design?
Thanks for all feedback
Anders
- Status
- This old topic is closed. If you want to reopen this topic, contact a moderator using the "Report Post" button.
- Home
- Amplifiers
- Chip Amps
- LM3886 and active xover - how to draw groundplane?