"Originally Posted by AndrewT
I hope my Email mentioned how important this is.
Low voltage to fans and pumps risks non starting and the consequences that follow. Inserting a resistance to control speed from a higher voltage is just as bad at non starting. Actually the resistor method is slightly worse for non starting."
Your information was thorough and accurate - thanks. There are many pumps to choose from and that will be my focus over the next period. I do have one with the necessary circuits built in, but it is non-submersible and larger than I wanted for a compact chassis. May have to go in that direction eventually. The pump I used yesterday was an $8 eBay special. Now that I know the cooler works I'm willing to make a bigger investment. Might need a small IC circuit for start-up control.
Attachments
Last edited:
I wonder how high bias can be by using liquid nitrogen to cool it
http://i54.photobucket.com/albums/g94/V2-V3/AMD Phenom II 940/HoursofBenching.jpg
http://i54.photobucket.com/albums/g94/V2-V3/AMD Phenom II 940/HoursofBenching.jpg
REG, that technique has been mentioned often and I'm sure it could be applied effectively. However, my primary project guidelines include:
1. Reduce the bulk of the heat dissipation elements.
2. Use readily available components.
3. Maximize simplicity by using as few components as possible.
4. Insure any potential leaks are isolated from all active circuits.
5. Allow easy dis-assembly of three discrete modules -cooler, PS and amp.
6. Have some fun doing it.
I have seen enough interest/response in these projects to convince me that implementing liquid cooling for audio equipment, if the process is practical, simple and safe, could be a realistic alternative for heat management.
Thanks for you comments and for participating on the thread, but I doubt LN would pass the WAF approval test in many households.
In keeping with the list above, I have made several mods to the F5 project.
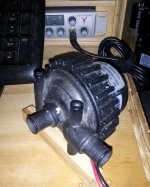
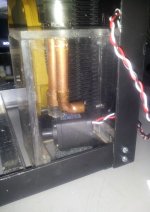
Disconnecting the pump/reservoir was a real pain. Adding flexible links allows better access. It required shortening the tank but also eliminated several components in that section.
Added a back facing elbow to eliminate pump cavitation caused by air entering the pump during initial fill process.
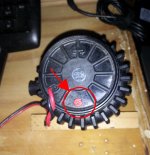
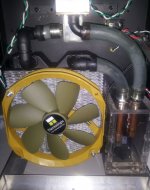
Use of threaded rod that passes through the fan, radiator fin plates and chassis. That eliminated the wood mounting plate with blind screws, and the acrylic adhesive on both sides of the radiator that was applied in the earlier construction.
Also reversed the fan to push air through the radiator. The original orientation had the potential to reduce fan noise, but the amount of heat pushed through the chassis was excessive.
I'm in the process of adding the AC mains switch and thermistor system.
1. Reduce the bulk of the heat dissipation elements.
2. Use readily available components.
3. Maximize simplicity by using as few components as possible.
4. Insure any potential leaks are isolated from all active circuits.
5. Allow easy dis-assembly of three discrete modules -cooler, PS and amp.
6. Have some fun doing it.
I have seen enough interest/response in these projects to convince me that implementing liquid cooling for audio equipment, if the process is practical, simple and safe, could be a realistic alternative for heat management.
Thanks for you comments and for participating on the thread, but I doubt LN would pass the WAF approval test in many households.
In keeping with the list above, I have made several mods to the F5 project.
Disconnecting the pump/reservoir was a real pain. Adding flexible links allows better access. It required shortening the tank but also eliminated several components in that section.
Added a back facing elbow to eliminate pump cavitation caused by air entering the pump during initial fill process.
Use of threaded rod that passes through the fan, radiator fin plates and chassis. That eliminated the wood mounting plate with blind screws, and the acrylic adhesive on both sides of the radiator that was applied in the earlier construction.
Also reversed the fan to push air through the radiator. The original orientation had the potential to reduce fan noise, but the amount of heat pushed through the chassis was excessive.
I'm in the process of adding the AC mains switch and thermistor system.
Attachments

Last edited:
"Originally Posted by AndrewT
I hope my Email mentioned how important this is.
Low voltage to fans and pumps risks non starting and the consequences that follow. Inserting a resistance to control speed from a higher voltage is just as bad at non starting. Actually the resistor method is slightly worse for non starting."
Your information was thorough and accurate - thanks. There are many pumps to choose from and that will be my focus over the next period. I do have one with the necessary circuits built in, but it is non-submersible and larger than I wanted for a compact chassis. May have to go in that direction eventually. The pump I used yesterday was an $8 eBay special. Now that I know the cooler works I'm willing to make a bigger investment. Might need a small IC circuit for start-up control.
If starting becomes a problem you can add a time delay relay which will short the resistance to allow full power start then it will drop out and pump and fan will run at reduced power.
That's why I was wondering, phase cooled or LN2'd, how much power can be taken out from a single silicon... For the sake of experimentation, not a real practical implementation. But phase cooling can be permanent, though....Lovely work, reminds me of my AMD Thurnderbird rig, had that baby clocked to around 2ghz... Until i phase-cooled it. After the phase cooling my cpu temp read almost the same as it did with the h2o system, only with a minus at the front.
Maybe that could work for amps?
I did some investigation on phase cooling this morning. It looks interesting and very effective. I do have some concerns about both the complexity of that approach as compared to the simplicity of standard air convection heat sinks. The liquid system adds more elements than I would prefer, but appears to be a more broadly acceptable application. I surely will seek better understanding of phase cooling for a future project, but for now I'll stick with what I have some actual experience with. I think even the condensation problem could be solved by careful placement of "cold Spot" along the cooling path/loop. I would encourage you to try to develop something similar to your PC system for audio. I'll have to catch up with you later. 
AVWERK,
Just looked that up on Google. Looks like a similar approach. I'll just note that I'm in the $65 neighborhood for all the components in the cooling module.
Maybe the extra $29,935 - $40,000 does something miraculous to the water - maybe a tap for a glass of Domaine de la Romanee-Conti Romanee-Conti Grand Cru, Cote de Nuits, Francer
And how about placing the circuitry inside some kind of sealed small box full of oil? One side of that box would be a metal plate attached to the phase cooling exchange element.Phase cooling would be relatively easy. The part I'd worry about is condensation. On my PC I had to use an heating element around the core of the chip as to warm it back up to avoid condensation to happen, and subsequently a short.
What about a pair of small freezers painted black or with wood grain vinyl? They could house your speaker units and keep the voice coils cool, plus they could contain your amplifiers.And how about placing the circuitry inside some kind of sealed small box full of oil? One side of that box would be a metal plate attached to the phase cooling exchange element.

Putting the entire amp inside a sealed mini fridge with a bucket of silica desiccant is the easiest way out, cheap and effective. I used to do it with 4 1u blade servers running a raid array of 15k SCSI drives. They where designed for air conditioned racks, but I couldn't afford those in my house....
But the problem is that estandar home refrigerators aren't prepared for that duty cycle, they assume that constant heat load would be near to zero. In fact some freezers have a turbo mode in case you put a load of warm food on it at a time.Putting the entire amp inside a sealed mini fridge with a bucket of silica desiccant is the easiest way out, cheap and effective. I used to do it with 4 1u blade servers running a raid array of 15k SCSI drives. They where designed for air conditioned racks, but I couldn't afford those in my house....
But the problem is that estandar home refrigerators aren't prepared for that duty cycle, they assume that constant heat load would be near to zero. In fact some freezers have a turbo mode in case you put a load of warm food on it at a time.
That's good to know, I was 15 when I did it and I used an old top loaded freezer that had been previously used in a restaurant. It might have been a little beefier than a regular fridge...
- Status
- This old topic is closed. If you want to reopen this topic, contact a moderator using the "Report Post" button.
- Home
- Amplifiers
- Chip Amps
- Liquid Cooling Build