Here I'm going to share some modifications I have done to a set of Audio Engine A5+'s to bring the best out of the amplifier and speakers.
Part 1, the story:
I decided to get a pair of these Audio Engine A5+'s for a friend to enrich his listening experience, and inadvertently came across a very cheaply listed set of A5+'s from NCIX for ~ 300 dollars CND. So I decided to snatch them up. Now the price has gone back up to close to 400 dollars, so I think I got lucky. For some reason, the white ones are cheaper than the black ones...
After some listening and breaking in, I decided that these speakers were decent in frequency response, but imaging and details were very much lacking, especially for near-field use; their intended usage scenario. The enclosures they came in were also a little underdamped for my tastes...
ADDENDUM (Correction for image labeling error):
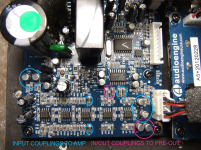
Capacitors that are responsible for the input signal coupling are labelled "C3" and "C4", the output capacitors are labelled "C21" and "C22".
My images have these marked incorrectly with "C3" and "C21" exchanged in function.
SO, to reiterate:
Input coupling caps are "C3"+"C4", output coupling caps are "C21"+"C22".
This was brought to my attention while I was corresponding with someone replicating the modifications.
Part 1, the story:
I decided to get a pair of these Audio Engine A5+'s for a friend to enrich his listening experience, and inadvertently came across a very cheaply listed set of A5+'s from NCIX for ~ 300 dollars CND. So I decided to snatch them up. Now the price has gone back up to close to 400 dollars, so I think I got lucky. For some reason, the white ones are cheaper than the black ones...
After some listening and breaking in, I decided that these speakers were decent in frequency response, but imaging and details were very much lacking, especially for near-field use; their intended usage scenario. The enclosures they came in were also a little underdamped for my tastes...
ADDENDUM (Correction for image labeling error):
Capacitors that are responsible for the input signal coupling are labelled "C3" and "C4", the output capacitors are labelled "C21" and "C22".
My images have these marked incorrectly with "C3" and "C21" exchanged in function.
SO, to reiterate:
Input coupling caps are "C3"+"C4", output coupling caps are "C21"+"C22".
This was brought to my attention while I was corresponding with someone replicating the modifications.
Last edited:
Part 2, the problem, electrically
So I decided to take a look at the electrical side of the amplifier.
The two inputs are internally connected (tied together), then AC coupled to a 5532 opamp, then AC coupled to a NJW1159 volume control chip, then AC coupled to another set of 5532s for pre-out and power stage with the power stage chip amp TDA7294 AC coupled as well.
Herein lies two problems, Audio Engine used a nice opamp for this setup, but unnecessarily high number of them, and the choice of the input AC coupling and power stage coupling capacitors were conductive polymers, the NJW1159 and 5532 chips are AC coupled with what appears to be X7R or worse grade ceramics at 10uf. None of that are even close to audio grade use...
Last edited:
Part 3, the solution, electrically
Using my Fluke meter, I determined that the DC bias across any one of these caps is ~1mV or less, right at the limit of detection on my Fluke. I bypassed one set at a time and observed the change in the sound quality and watched for any issues. After some experimentation, I decided to:
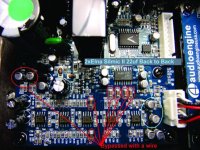
Bypass all ceramics between the NJW1159 and 5532 ICs, keep the input DC blocking capacitor, but replace the polymer cap with some nice Silmic II capacitors, 22ufx2 per channel in a back to back configuration. This is second best to using films, but I don't have any sufficiently high valued films, and there really isn't much space. The last set of polymer caps coupling the signal to the TDA7294 are also bypassed.
Now to upload a picture of what I'm talking about...
Using my Fluke meter, I determined that the DC bias across any one of these caps is ~1mV or less, right at the limit of detection on my Fluke. I bypassed one set at a time and observed the change in the sound quality and watched for any issues. After some experimentation, I decided to:
Bypass all ceramics between the NJW1159 and 5532 ICs, keep the input DC blocking capacitor, but replace the polymer cap with some nice Silmic II capacitors, 22ufx2 per channel in a back to back configuration. This is second best to using films, but I don't have any sufficiently high valued films, and there really isn't much space. The last set of polymer caps coupling the signal to the TDA7294 are also bypassed.
Now to upload a picture of what I'm talking about...
The image.
As mentioned above.
The right most blue circled caps are the polymer caps which couple the inputs to the next stage.
The large looking SMDs are 10uf ceramics. Given their physical size and capacitance, they have to be X7R or similar.
The left most set of caps couples the signal to the TDA7294 chips (not pictured).
Attachments
Last edited:
Part 5, the enclosure
To dampen the enclosure, I decided to use some open cell foam + silicon/latex mixture. The mixture is spread onto the foam pads and used as a bonding agent for the foam to adhere to the enclosure. This accomplishes 2 things, (1) dampen the enclosure, (2) absorb internal waves. I have used this same technique before on DIY speakers and it works quite well.
This was done on all available sides of the speaker enclosures on the inside. Thicker pads were used for the side walls, where unsupported mass is larger.
After this application, the speakers aren't quite so underdamped anymore.
Last edited:
Part 6, the results
Unfortunately I do not have a calibration and measurement condenser mic... So I did some listening tests (I always did listening tests between changes to the amplifier and speaker enclosure).
I allowed my friend to listen to the speakers without telling him any specifics about them, and he commented that the imaging and dynamics were really good. This is a great observation, because I set out to improve the imaging and details. The mid bass isn't as bloated anymore, I suspect this was due to underdamping in the first place.
Overall, these speakers are now very resolving and tempered. Tons of resolution and great as near-field listeners.
Now the bonus. After my friend has listened to these speakers, and expressed how great they were (after the mods, which he doesn't know yet), I informed him that these were his birthday presents. He is ecstatic!
As a reflection, I have no idea why Audio Engine designed the pre-amp stage the way they did. There really wasn't a need for so many buffers in my opinion. The input impedance of the volume control is sufficiently high, that you can get away with just 1 NJW1159 chip to receive after a single set of DC blocking capacitors at the input, and since Audio Engine decided to use the buffered outs of the NJW1159 chip, they should have skipped the next 5532 to double buffer the signal. The choice to use high capacitance ceramics to couple between stages was also very poor, as is the use of polymer caps to couple signal. It looks like they literally steam rolled the capacitor choice, using one type for everything, power and coupling.
Last edited:
Can you please post a picture of the x7 10uF capacitors that you found in the amplifier
I did. It is above in the post titled "The Image". The capacitors are marked. 3 sets are SMD ceramics, 2 sets are conductive polymers. The polymer sets are on the left most side and right most side of the image. The SMD Ceramics are all in the center.
One of the SMD Ceramics set is coupled to the pre-out stage, so bypassing these only brings better results to the pre-outs. If you are not planning to use the pre-outs, then this is not important. I bypassed them while I was at it poking around, and I'm not sure my friend will use the pre-outs or not. If you are using the pre-outs for more than just subwoofer usage, I'd recommend the last set of conductive polymers in the signal path (located at the right most bottom of the picture) be taken out and replaced with some coupling grade caps too.
ADDENDUM (Correction for image labeling error):
Capacitors that are responsible for the input signal coupling are labelled "C3" and "C4", the output capacitors are labelled "C21" and "C22".
My images have these marked incorrectly with "C3" and "C21" exchanged in function.
SO, to reiterate:
Input coupling caps are "C3"+"C4", output coupling caps are "C21"+"C22".
This was brought to my attention while I was corresponding with someone replicating the modifications.
wonderful,wonderful,wonderful info. I've been prowling the audio swamp for several weeks now and I'm glad to hear from some one else who also has run into a whole load of garden fertilizer.
At first I thought hmm, I know nothing after reading various papers. After looking at designs and hearing superlatives from various audio reviewers who wouldn't know a Coulomb from a 747 I think I recognize con at work. Same deal on speaker design . I must of looked at a zilllion cutaways on Horn cabinets. While I know little I know enough to be dangerous and what I saw I didn't like. MLK excepted.
I keep a stack of stuff to read on the kitchen table while eating for amusement. Wifey is not so amused. If I don't understand it I won't believe it is my motto in all things. Right now I don't believe much in Audio. Chip amps I like, especially Ti/National. That I can understand. Does a paying customer,who knows nothing, want to see a under-populated board? Are they looking for a new Pope right now? er, yes and no or is it no and yes?
The world is run by marketing people and that's the bottom line.
- Status
- This old topic is closed. If you want to reopen this topic, contact a moderator using the "Report Post" button.
- Home
- Amplifiers
- Chip Amps
- Audio Engine 5+ Amplifier Modifications