for some reason the online stores I have checked don't seem to have the IC in stock.
but the store I have in mind for the other components are...
Capacitors | DigiKey
and
Jameco Electronics - Electronic Components Distributor
i'll keep searching for the TDA
but the store I have in mind for the other components are...
Capacitors | DigiKey
and
Jameco Electronics - Electronic Components Distributor
i'll keep searching for the TDA
so far I've found these...
3300 uF 25 volt electro
R3300/25-VP-R: JAMECO VALUEPRO: Passive Components
470 nF alum
EEE-1HAR47SR Panasonic Electronic Components | PCE3934TR-ND | DigiKey
220 pf ceramic
DC220: JAMECO VALUEPRO: Passive Components
100 nf
MY.1: JAMECO VALUEPRO: Passive Components
TDA
TDA1557 Audio Amplifier 2-Channel,Stereo Class B 22Wx2@4(Ohm) 6V~18V SIL-13
I really wish I could find one site that had all this stuff, lol.
lm3886 is a vastly different chip.
HEStore.hu - Elektronikai alkatrészek a legjobb áron!
here You can find all items needed for the amp, but shipping would be like 10 USD or so.
by the way, the parts You have found all seem to be okay, expect for one.
The 470 nf alum capacitor is not a good choice. its a surface mount capacitor, would be difficult to solder, not to mention alu caps are not the ones to use at the designated position.
")
keep it up, and i will promise to help You with building it.
HEStore.hu - Elektronikai alkatrészek a legjobb áron!
here You can find all items needed for the amp, but shipping would be like 10 USD or so.
by the way, the parts You have found all seem to be okay, expect for one.
The 470 nf alum capacitor is not a good choice. its a surface mount capacitor, would be difficult to solder, not to mention alu caps are not the ones to use at the designated position.
keep it up, and i will promise to help You with building it.
hmm, bit of update, the site that sells the IC seems to have everything needed.
470 nF capacitor
470nF 0.47uF 100V 5% Polyester Film Box Type Capacitor
100 nf capacitor
100nF 0.1uF 100V 5% Polyester Film Box Type Capacitor
220 pf capacitor
220pF 50V Ceramic Disc Capacitor
3300 uF /25 v capacitor
-> not found, but 4700 uF / 25 v is 100% okay to use
4700uF 25V 105C Radial Electrolytic Capacitor 16x26mm
battery clip
9V 9-Volt Battery Clip / Connector Snap
The IC
TDA1557 Audio Amplifier 2-Channel,Stereo Class B 22Wx2@4(Ohm) 6V~18V SIL-13
do not forget to get some heatink.
salvage something, old radio, blown computer psu, whatever..
without a heatsink, its not going to work.
3.5mm Stereo Plug
this should be helpfull too, as You want to connect this thing to a source.
the bigger, the better.
say.. something in the size of a cigar box will do absolute fine.
How hot it wil get depends on how hard You drive the little amp.
It realy depends on what load will it have to drive, for testing even a small heatsink will do.
Later on You will see if You need a bigger heatsink or not.
Probably an old computer CPU heatsink is more than enough, specialy if the fan is used too.
BTW, if You -in the mean time- go near a computer store, You should go and grab some thermal transfer compund. The stuff used between chips and heatsinks.
No need for fancy stuff, the cheapest is more than good enough.
whoooha good news.
I usualy mount the IC on a heatsink first, then solder stuff.
Thisway it can dissipate heat, i won't fry the poor thing so easyli.
Other than that the heatsink adds mass, and allows easy handling/holding at a fixed position.
Did You manage to get heatsinks ?
good news.I usualy mount the IC on a heatsink first, then solder stuff.
Thisway it can dissipate heat, i won't fry the poor thing so easyli.
Other than that the heatsink adds mass, and allows easy handling/holding at a fixed position.
Did You manage to get heatsinks ?
yeah, I got some bigger ones like they had in the youtube videos I saw. about the size of a deck of playing cards with vents on it.
anyway I can play with this on a bread board before I start soldering? I've only soldered speakers before and this thing looks a little harder to solder, lol.
anyway I can play with this on a bread board before I start soldering? I've only soldered speakers before and this thing looks a little harder to solder, lol.
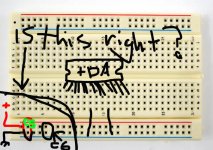
all the parts fit on the bread board just fine. I tried to wire it up according to your schematic, but I got no sound. I'm sure I have the C5 and C6 wired up wrong. the first part is a little confusing to me. I have the power running to the positive and negative rails on the side of the breadboard.
the schematics make it seem to me that C5 is on that rail with the positive lead on the positive rail and the negative lead on the negative rail. same with C6 it looks like it's down stream of C5 and connected to both the positive and the negative rail.
I also have everything that says ground hooked up to the negative rail. is that right?
attached is the best "picture" I can give you, lol, sorry.
everything else is clear and makes sense. it's just C5 and C6 that confuse me.
attached is a picture of how I had them on the bread board. I basically circled the location and holes they were plugged into....
everything else is clear and makes sense. it's just C5 and C6 that confuse me.
attached is a picture of how I had them on the bread board. I basically circled the location and holes they were plugged into....
Attachments
I did it. I got it working last night! I was pretty excited about it.
the first two capacitors were confusing me but I figured it out. I searched the forum for other posts on the 1557Q and found some helpfull things. maybe the other IC was bad, or maybe the way I had the IC grounded was wrong, either way it works. thanks so much for your help arty.
could I use two of these little amps on the same battery? can I bridge the left and right channels of each one?
also, I found a tone control circuit on 41hz.com and I'm going to try that next.
o my god, i forgot to post the assembly guide ...
Darn, sorry mate, i wish i would not had forgot it..
I feal so.. ashamed of my self..
on the otherhand, congrats on Your first amplifier
Sadly it can not be beridged, as it is allready bridged.
The chip has 4 amps inside total.
2x2 bridged.
You could use 2 of them from the same battery, but it may make it go hot if You drive them hard.
Actualy this amp takes only a bit of patience to set up working.
Basicly if i was You i would add a volume pot. It would make it a lot better, if volume could be adjusted, i would say.
The next big task would be making a proper powersupply for this amplifier.
And afterwards a proper switch on circuitry, to avoid "plop" sound when You turn it on.
The tone controlls would be the last thing, by that time You will be able to make a decent one.
Anyways i em verry happy You managed it, and reported back.
- Status
- This old topic is closed. If you want to reopen this topic, contact a moderator using the "Report Post" button.
- Home
- Amplifiers
- Chip Amps
- newbi chip amp questions.