Hi All,
Its been a while since I posted but thought I would hold up on my promise to share pictures of the completed amp. Its done and I am very very happy with it.
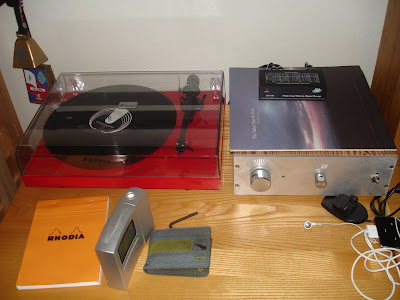
The enclosure is a very simple design with front, rear, middle and bottom panels made of metal and the rest of Aluminum. I came up with the design with inspiration from others work on the internet and choose it since I like the classic look and it requires no tapping of holes in the metal. The lack of need for tapping is the major reason for this design since I dont not have the tools or know-how to tap holes. The wood is southern white pine reclaimed barn board from the Rockefeller horse stables on the Hudson river.
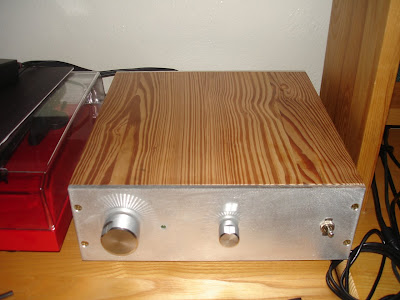
There are just three controls on the front. The one of the left is volume and is connected to and Alps Blue potentiometer, next to the volume is a power LED, the middle selects between the three inputs and the right switch is power. The knobs are attached to .25" aluminum rod from the hardware store. The rod passes through the case via a nylon bushing and connects to the rotary elements using shaft extenders. Finding the knobs and shaft extenders was pretty difficult and I ended up turning to cannibalizing other amps for the parts needed.
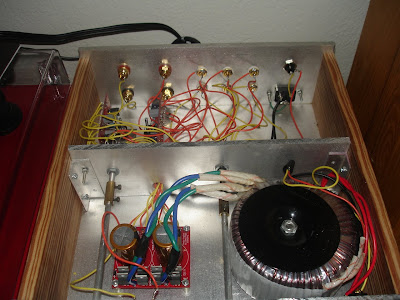
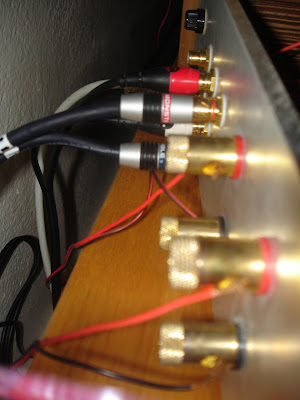
Inside the amp is quite a bit of wiring. The amp is built as nearly dual mono meaning that each channel has its own amplifier chip and board but there is only one power supply board and transformer. The transformer is pretty large, 330VAC, and adds quite a bit to the near 20 lb weight of the amp. I bought the power supply boards and chips from chipamp.com and then purchased the rest of the components from various online and local suppliers. While I could have bought a full kit it was fun for me to source each part. Soldering each part to the board was pretty easy despite this being my first real soldering experience. The wiring proved to be the hardest part for me and took the most amount of time.
I am very pleased with the way the amp sounds. It is a definite improvement from my previous compact shelf system though it still needs better speakers to do it justice.
In order to get everything right the build took much more time than expected and ended up costing me around $200. Not to bad considering the amps in the price range and the amount that I learned in this project. Building a chip amp is pretty easy and highly recommended for anyone looking to get into electronic projects.
Thanks to all the help from this forum, couldn't have done it without you!
Its been a while since I posted but thought I would hold up on my promise to share pictures of the completed amp. Its done and I am very very happy with it.
The enclosure is a very simple design with front, rear, middle and bottom panels made of metal and the rest of Aluminum. I came up with the design with inspiration from others work on the internet and choose it since I like the classic look and it requires no tapping of holes in the metal. The lack of need for tapping is the major reason for this design since I dont not have the tools or know-how to tap holes. The wood is southern white pine reclaimed barn board from the Rockefeller horse stables on the Hudson river.
There are just three controls on the front. The one of the left is volume and is connected to and Alps Blue potentiometer, next to the volume is a power LED, the middle selects between the three inputs and the right switch is power. The knobs are attached to .25" aluminum rod from the hardware store. The rod passes through the case via a nylon bushing and connects to the rotary elements using shaft extenders. Finding the knobs and shaft extenders was pretty difficult and I ended up turning to cannibalizing other amps for the parts needed.
Inside the amp is quite a bit of wiring. The amp is built as nearly dual mono meaning that each channel has its own amplifier chip and board but there is only one power supply board and transformer. The transformer is pretty large, 330VAC, and adds quite a bit to the near 20 lb weight of the amp. I bought the power supply boards and chips from chipamp.com and then purchased the rest of the components from various online and local suppliers. While I could have bought a full kit it was fun for me to source each part. Soldering each part to the board was pretty easy despite this being my first real soldering experience. The wiring proved to be the hardest part for me and took the most amount of time.
I am very pleased with the way the amp sounds. It is a definite improvement from my previous compact shelf system though it still needs better speakers to do it justice.
In order to get everything right the build took much more time than expected and ended up costing me around $200. Not to bad considering the amps in the price range and the amount that I learned in this project. Building a chip amp is pretty easy and highly recommended for anyone looking to get into electronic projects.
Thanks to all the help from this forum, couldn't have done it without you!
")
- Status
- This old topic is closed. If you want to reopen this topic, contact a moderator using the "Report Post" button.