Recently I found 2 LM1875 and I'm interested to make a small stereo amp with them.
After a quick search for PCB layout, I landed here.
But unfortunately I found that some photos are deleted now or perhaps I missed the detailed feedback and photos of any successfully completed project following a PCB-layout posted here (with the exception of one or two) despite so much valuable information or guidance posted here by the kind and experienced members.
Earlier I looked into the datasheet of LM1875 and was utterly disappointed to see such a careless, confusing misaligned PCB-layout in an official datasheet contrary to the nice and clean TDA2030/50 PCB layout.
So,to be on the safe side, I am badly in need of a DIY ready-to-build LM1875 PCB-layout that was tested extensively by our members and built with their entire satisfaction.
Please help me choosing one.
Thank you.
The LM1875 is pin compatible with your TDA2030/50 PCB's. But if you want an LM1875 specific, just read through this thread and look for AndrewT's comments. I see some cases where he said: "I like this" which is pretty much a grade of A+.Earlier I looked into the datasheet of LM1875 and was utterly disappointed to see such a careless, confusing misaligned PCB-layout in an official datasheet contrary to the nice and clean TDA2030/50 PCB layout.
So,to be on the safe side, I am badly in need of a DIY ready-to-build LM1875 PCB-layout that was tested extensively by our members and built with their entire satisfaction.
Please help me choosing one.
After you select a nice PCB, you can then try out various schematics to see what results you like best. LM1875 is a general purpose power op-amp and is capable of supporting many different designs.
The LM1875 is pin compatible with your TDA2030/50 PCB's. But if you want an LM1875 specific, just read through this thread and look for AndrewT's comments. I see some cases where he said: "I like this" which is pretty much a grade of A+.
After you select a nice PCB, you can then try out various schematics to see what results you like best. LM1875 is a general purpose power op-amp and is capable of supporting many different designs.
Thank you so much Daniel for your answer. I will make the pcb and report you back here.
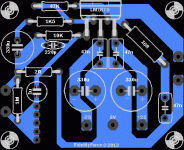
Here is a very compact LM1875 PCB.
Thank you so much Daniel. Much appreciated!
I'd like you to look at the "2R" "input groundlift resistor" that has been used to create a "signal star" ground.
That groundlift resistor will help you in PCB design.

I'm sure you'll want the signal star ground feature. However, depending on your application, you may wish to rearrange the small signal+ components for your design.
P.S.
To support an especially weak MP3 player so that it doesn't run into the headphone protection range which is useless to amplify, you can change the amplifier's feedback resistor to 56K, thus the MP3 player set not higher than 70% can push the amp to full blast. Setting high gain relocates the compromise to the power amp so that a modern source can be useful (but really high gain costs a tiny bit of power amp quality). The gain setting shown on that board is already high enough for a computer to push a 25w amp near max without straining the computer sound chip too much. RMAA software, which is free, can help you determine what output level a given computer can do cleanly.
This amp design contains compensation, and therefore, you might get higher quality by setting lower gain (33K feedback resistor) and then push with a preamp as needed.
That groundlift resistor will help you in PCB design.
I'm sure you'll want the signal star ground feature. However, depending on your application, you may wish to rearrange the small signal+ components for your design.
P.S.
To support an especially weak MP3 player so that it doesn't run into the headphone protection range which is useless to amplify, you can change the amplifier's feedback resistor to 56K, thus the MP3 player set not higher than 70% can push the amp to full blast. Setting high gain relocates the compromise to the power amp so that a modern source can be useful (but really high gain costs a tiny bit of power amp quality). The gain setting shown on that board is already high enough for a computer to push a 25w amp near max without straining the computer sound chip too much. RMAA software, which is free, can help you determine what output level a given computer can do cleanly.
This amp design contains compensation, and therefore, you might get higher quality by setting lower gain (33K feedback resistor) and then push with a preamp as needed.
Last edited:
Wow I can't believe the 1875 is still being discussed after all these yrs. I was the apps eng who supported it back in the 80's. I've been poking around on this site to look for ideas for an active crossover and amplifier for a simple 2-way loudspeaker. The LM3886 seems to be improved over the 1875 and of course the 386. It's probably more stable and has better thermal shutdown capability. I was thinking about building a board that would be fitted to the back of a std 2-way speaker (ala plate amp that subs use). I'm thinking about 40W (6" driver) + 25W (tweeter). Feed power with an AC brick supply, would like + and - rails, on-board bridge, outputs DC coupled, Linkwitz-Riley active crossover, user adjustable, time delay compensation. I really think passive crossovers are adequate, at best. Any thoughts or references you can provide me, Daniel?
I had only two thoughts on that.
LM3886 pounding out the bass, teamed up with LM1875 run from LM317&LM337 doing a pretty job with the high fidelity treble. You got all the power, none of the shout, none of the clipping.
If you use a LM317&LM337 pair per each LM1875 chip, your treble will have the bigger stereo separation of dual-mono, but with the low cost of only one transformer to run the whole thing.
I had only two thoughts on that.
LM3886 pounding out the bass, teamed up with LM1875 run from LM317&LM337 doing a pretty job with the high fidelity treble. You got all the power, none of the shout, none of the clipping.
If you use a LM317&LM337 pair per each LM1875 chip, your treble will have the bigger stereo separation of dual-mono, but with the low cost of only one transformer to run the whole thing.
I've read somewhere about not using linear regs.(1.5A max for LM317&LM337 ) in power amp. They can be used in preamp P.S. though,
or does using it for treble app. reduces the load on linear P.S.? Pls elaborate.
Personally, I'm using +/-21 SMPS for LM1875
One more thing-what is the dimension of the PCB shown in #246? The design is way better than the one in LM1875 datasheet.
Thanks,
availlyrics.
Last edited:
I'd like you to look at the "2R" "input groundlift resistor" that has been used to create a "signal star" ground.
That groundlift resistor will help you in PCB design.
I'm sure you'll want the signal star ground feature. However, depending on your application, you may wish to rearrange the small signal+ components for your design.
P.S.
To support an especially weak MP3 player so that it doesn't run into the headphone protection range which is useless to amplify, you can change the amplifier's feedback resistor to 56K, thus the MP3 player set not higher than 70% can push the amp to full blast. Setting high gain relocates the compromise to the power amp so that a modern source can be useful (but really high gain costs a tiny bit of power amp quality). The gain setting shown on that board is already high enough for a computer to push a 25w amp near max without straining the computer sound chip too much. RMAA software, which is free, can help you determine what output level a given computer can do cleanly.
This amp design contains compensation, and therefore, you might get higher quality by setting lower gain (33K feedback resistor) and then push with a preamp as needed.
Oh Daniel,
you are absolutely right, I want to use the starground feature.
First, I'll try to follow your this PCB design regarding the placement of the signal+ components.
In every case, in my humble opinion, I've got a truly excellent and very very satisfactory result using Rod Elliott's Preamp from the ESP site.
So I have a plan to connect that preamp as a frontend to this amp to ensure proper level and evade mismatch if any while trying out different input sources. So I will try with a 33K feedback resistor as per your suggestion. I prefer to play at low volume yet not compromising on the details or high frequency loss.
Thank you really so much for your very kind and well thought out informative guidance.
")
All of the gaps between ground and other traces should be made as narrow as possible, especially those between signal and signal ground. Signal ground should fill every open area on signal side. Otherwise you are making antenna for hum (and RF). Remember to also tightly twist together the signal and signal ground wires, ALL the way from board to input jack.
Also, why connect signal ground and power ground at all? The signal ground should go back to the star ground, usually just after the PSU caps, separately.
Also, why connect signal ground and power ground at all? The signal ground should go back to the star ground, usually just after the PSU caps, separately.
Leach in the Lo Tim paper tells us why.why connect signal ground and power ground
I just wanted to show the 2R separating the signal ground from the power ground. And the point is: That resistor is just a really helpful tool to use during layout.
Next step. . .
Personally, I would like to improve the output device quality well before any other complexity is introduced. In my opinion, Parallel Amplifier, is necessary in order to prevent hardships in component selection and do-overs that would surely happen if the cart is before the horse. The "output device upgrade" of paralleling removes the cheap tone from the chip amp. The parallel chip amplifier doesn't require either overlarge or botique capacitors installed at the chip to dump distortion along with some of the audio. Nope. That's not needed. Quite simply, the Parallel LM1875 performs like a small discrete amp of high quality.
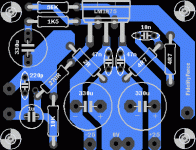
Here is a very compact LM1875 PCB.
Daniel,
I was about to make that pcb following the design that you posted here but as I can see the copyright of this design belongs to Fidelity Force.
Could you kindly confirm whether a copy or two of this PCB can be made in a purely DIY hobbyist and strictly NO commercial situation or not?
I am asking this mainly because I intend to post photos of my homebrewed two PCBs following this design and the amplifier and want to report my observation, success or failure if any, what worked for me, what not, etc. here in this thread.
Sorry for this silly question.
Eagerly awaiting your answer,
Thank you.
I felt bad after posting my request earlier at post # 256 and was worried about a catastrophic confusion.
So I am trying to make things more clear.
Actually there are several cases where the author naturally expects a "thank you" or a post card or a thanks-giving mail for his hard work.
Some just expect a polite request and then usually give kind permission to use their works.
And I personally believe it is a good gesture to abide by the wish of the author.
So kindly tell me if I need to ask for the author's permission to use this design apart from giving proper credit to the author and other always helpful members like Daniel.
I do apologize for any confusion that might have occurred.
Thank you so much.
Last edited:
Copyright for LM1875 belongs to National Semiconductor division of Texas Instruments and usage rights automatically come along with every purchase of the LM1875 chip. Anything FidelityForce is always free for non-commercial use and/or educational use. However, if you want your own PCB design, with your name or brand on it for commercial use, I'd suggest rearranging the input a bit more sensibly, which is a significant difference that would be yours.
P.S.
An actual production board would be at least 20% smaller.
P.S.
An actual production board would be at least 20% smaller.
Last edited:
Fingers hurt! Oh ouch. Perhaps 20% smaller was a brag after all. But, I did knock out the cost of the big power wasting resistor, the cost of big counter-productively ringing box caps, and the PCB did get smaller.
I wanted to build a gain comp amp for Mp3 player. The amp will go to max before the source starts straining. There is a slight cost to the power amp for doing this, but yet a great relief to the source is more important. This simple plan keeps a modern source within its clean range and therefore in a useful condition. Of course there are more complex ways of doing this, but here it is with just one chip, the LM1875.
Character: Miniature Doberman--It is small but thinks it is big.
So, basically, THIS, will be highly dynamic and VERY LOUD!
Attachments
Leach in the Lo Tim paper tells us why.
Thank you, AndrewT. I will read it.
- Status
- This old topic is closed. If you want to reopen this topic, contact a moderator using the "Report Post" button.
- Home
- Amplifiers
- Chip Amps
- LM1875 PCB, Which To Use