Hi Chris. Thanks for the post. I can see about scanning what I have but that may be awhile. I am not opposed at this point to recapping the amp since it will never be original anyway. Honestly, I'm not opposed to sending it to a professional as long as it's not too expensive and I get it back unlike your friend experience. I had a "friend" "check out" a power 650 I bought new and somehow it was sold with his car!
If you would like a crack at this amp think of a ballpark price for repair and let me know.
Thanks, Pat.
If you would like a crack at this amp think of a ballpark price for repair and let me know.
Thanks, Pat.
Hi Pat,
I'm in Canada, otherwise I would certainly have a look at your amplifier. I would leave the stuff you could do yourself, no point in having me do that stuff. My concern would be the costs of shipping to and from Canada.
I think my ballpark would have to be somewhere between $30 and $150, depending on parts. I'm thinking of a bench time between 1/2 hour and 2 hours at $60 / Hr.
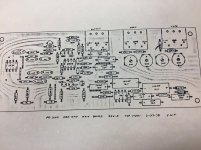
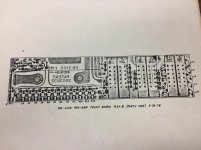
One thing I forgot to mention was that these amplifiers are famous for having broken transistor leads. Very difficult to find as they break at the solder joint near the bottom of the hole. I always support the two heat sinks with brackets when I am working on them. I've had many let go as I took them apart before starting, and after during put together. Frustrating. I'm talking about any parts mounted on the heat sink and PCB. The best thing to do is desolder all those parts and remove the PCB. Check for short legs and watch for leads easy to move back and forth (they are about to go). If an amp has been in a shop where they couldn't fix it, I just replace all those power devices and often that fixes the amp. The important thing is I don't get callbacks for broken transistor leads. Just remove them and check that they are all solid. This is easier to do with a large Solder Sucker (DS-017), around $20 ~ $30. The cheap ones often break early in life, sometimes really early.
Too bad we weren't closer to each other, but you can probably get it repaired with our help.
-Chris
I'm in Canada, otherwise I would certainly have a look at your amplifier. I would leave the stuff you could do yourself, no point in having me do that stuff. My concern would be the costs of shipping to and from Canada.
I think my ballpark would have to be somewhere between $30 and $150, depending on parts. I'm thinking of a bench time between 1/2 hour and 2 hours at $60 / Hr.
One thing I forgot to mention was that these amplifiers are famous for having broken transistor leads. Very difficult to find as they break at the solder joint near the bottom of the hole. I always support the two heat sinks with brackets when I am working on them. I've had many let go as I took them apart before starting, and after during put together. Frustrating. I'm talking about any parts mounted on the heat sink and PCB. The best thing to do is desolder all those parts and remove the PCB. Check for short legs and watch for leads easy to move back and forth (they are about to go). If an amp has been in a shop where they couldn't fix it, I just replace all those power devices and often that fixes the amp. The important thing is I don't get callbacks for broken transistor leads. Just remove them and check that they are all solid. This is easier to do with a large Solder Sucker (DS-017), around $20 ~ $30. The cheap ones often break early in life, sometimes really early.
Too bad we weren't closer to each other, but you can probably get it repaired with our help.
-Chris
Yes, this amp is delicate! I have made sure I had the bottom covers screwed on while working on component side and top cover on while looking at solder side of board.
I am going to make clamps out of wood I think. Running the length of the heat sink then across to tie together. Wood is safe against shorts so I hear.
Your ballpark is more than reasonable given your experience with the amps.
Shipping would be more I suspect but it may be an option.
Perry was thinking 2n6488 and 2n6491 for outputs? Do you agree? Would these also be suitable for the power supply?
I do not have any thought of putting this in a car ever and ultimate SQ out of it is also not needed. Close to original would be good, making it more reliable would be better.
It's a novelty collector item.
Hi Pat,
Your plan sounds solid with regard to the clamping method. 2N6188 and 2N6491 are what I use for outputs on these. They work very well. Continue using the 2N3055T for the other NPN power transistors. I'd have to look up parts to give you an opinion on a replacement for those transistors. What are you using for driver transistors for the audio amp section? You can go with MJE type TO-126 parts, or if they are TO-92 signal transistors, you could try MPSW06 and MPSW56. Those are the taller TO-92 transistors that are rated at 1 watt dissipation. I would upgrade any of the signal transistors that run hot.
One thing that is a bit of work I used to do. I just remembered this. To stabilize the case and heat sinks, I drill and tap all the holes for #4-40 screws and enlarge the case screw holes. You won't believe how much of a difference that makes. File that under a must do with these amps. That adds about an hour to the job, but you really, really want to do that. If you can find black screws, it will look a lot better too.
As I think on this amplifier of yours, more memories are returning.
Best, Chris
Yes, good idea on the #4's. I would maybe only do it on the under side of amp however to maintain outward appearance. Maybe sides too but top IDK.
I am just a tinker' at most, could I sub the 2.2uf Tantalum with a 2.2uf electrolytic near the secondary to see if it will power up? And should I go ahead and pull all the outputs prior to doing so.
I don't have 2N3055T on my power transistors, they are the same stuff as the outputs.
JE 2024 and 2023 I believe.
Thanks, Pat.
Hi CHEM2010,
Mostly I would be concerned about the border and the customs clearing charges. If you're in Canada, no problem.
It's mostly work, fixing those. Once you have the 4-40 holes drilled and tapped, you're ready to dry-fit the transistors. Typically they all need to be replaced as the leads will crack if they haven't already. I think I used to dry-mount all the transistors and solder them on the PCB, then take the heat sinks off and grease them up before reassembly. Mostly the critical thing is to prevent the board from flexing in relation to the heat sinks. I alternate between bolting the bottom or the top as I work to keep everything locked together. Then once it goes together it only fails if you blow it up. That can take some doing.
Interestingly, it used to be sound quality that was the focus of early car amps. It wasn't until the claims of super amps and 1 farad capacitors at the amp rack that sound quality fell for the gods of "thump". I got out of that industry about the time that Nakamichi and McIntosh got out. Nothing left to feel good about in car audio, just bonk-tick sounds today.
It's amazing how far 50 wpc (for real) used to bring you back then. My last system was 70 wpc in the rear and 4 x 35 watts with an electronic crossover. It went louder than you'd want and sounded clean. Back then I had a Denon DCC-8920 and Nakamichi TD-700 as head units. Switching the Nak on switched the inputs to the Nak deck. They both had good tuners. I still have all that stuff. I need an old car to stick it into.
-Chris
Hi Pat,
If you don't have any alternatives, I'll fix it for you. Let's keep your costs down, drill and tap all those holes for 4-40 screws. You can find black slot pan-head screws later, use silver ones for right now. Stick any new parts inside the unit. May as well use 2N6488 for the switching transistors and for the audio outputs use 2N6488 and 2N6491. They are both still current numbers. These days they are cheap compared to when I was doing car audio repair! Replace all tantalum capacitors with poly-aluminium ones.
-Chris
Modification
Hey Chris, would it be possible (maybe picture ) could you replay the modification you make on the amp?? Is this considered " Type II" modification? I have about 30 250 and 2100 I am working on so this thread has really helped!! yea I have a problem. LOL love these Amps!!
Hey Chris, would it be possible (maybe picture ) could you replay the modification you make on the amp?? Is this considered " Type II" modification? I have about 30 250 and 2100 I am working on so this thread has really helped!! yea I have a problem. LOL love these Amps!!
- Home
- General Interest
- Car Audio
- Fosgate PR-2100 help