Hey i'm new to this forum and car audio in general. i dont know much anout amp design and function but i have read through Perry Badin's website and feel i have a basic understanding of how it works.
i have a mmats d300hc amp thats showing 73v on the amp casing.
the amp still seems to runs fine if its insulated from anything it can short out on. i have had a look inside and was using a ohm meter to try and find where the problem is coming from by testing resistance between the outer case and certain places where i thought it could be shorting out but had no luck. i used a voltmeter to test to find places where the 73 volts could be from and four of the output fets had this voltage and the other four had about 36v (i think) also the rurg3060c dual diodes also had this voltage but i couldnt find any paths form the casing to the fets or diodes using the ohm meter.
My question is how should i go about finding the short to the casing and where would be some good places to look?
The casing has also shorted onto the car at one point before i knew that there was a voltage on the casing and was wondering if this could have damaged any part of the amp.The amp seems to fuction fine when it is insulated from anything it can short out onto
any help would be much appreciated
Cheers
You may have a leaking insulator between the transistor and the heatsink. If you can't find any components that read 0 ohms between their tabs (or center legs) and the heatsink, you may have to remove the mounting screw for each one that has 73v on its tab and pull them away from the heatsink.
Find the ones with 73 v on them and mark them (or remember which ones they are). Remove power from the amp and measure the resistance from those components to the heatsink. Then begin to lift one at a time until the meter reads OL (or whatever it reads with open leads).
If there is any foreign material around the perimeter of the transistor, remove it before lifting the component. The plastic washers under the screws will likely break (could be the problem now) so expect to have to replace them. Do NOT power up the amp without having the components tightly clamped to the heatsink.
The only components with 73V on them were four of the output fets and the two dual diodes. i measured resitance the resistance between all of these components and the heatsink and all showed up as open circuit.
what do you mean by removing the screw for them of i cant find one that reads 0 ohms?
thanks for the help
what do you mean by removing the screw for them of i cant find one that reads 0 ohms?
thanks for the help
What happens when the heatsink of the amplifier comes in contact with a grounded piece of metal (small spark, intense spark, amp blows fuse, amp shuts down...)?
Is the meter auto-ranging?
If not, set it to it's highest resistance range and check the resistance between the heatsink and components again.
Is the meter auto-ranging?
If not, set it to it's highest resistance range and check the resistance between the heatsink and components again.
ok multimeter was set on too lower range, it now reads 12 in the 20 KOhm range with all fets and dual diodes unscrewed and not in contact with the heatsink. it also read 12 in the same range with them screwed down.
the fets with 36v read open circuit in that same range.
i wasnt there when it came in contact with a grounded piece of metal but i know at least the amp shut down not sure about sparks or fuses though.
the fets with 36v read open circuit in that same range.
i wasnt there when it came in contact with a grounded piece of metal but i know at least the amp shut down not sure about sparks or fuses though.
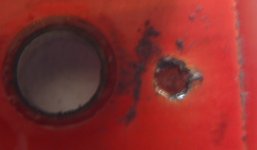
so far i have taken the anodized plat off the outer heat sink on one side, taking the other side off now.
when the plate is lifted off the heatsink it goes open circuit so this means the short is onto that plate which we already knew but is nice to have confirmed, thanks for the help will update soon
when the plate is lifted off the heatsink it goes open circuit so this means the short is onto that plate which we already knew but is nice to have confirmed, thanks for the help will update soon
- Status
- This old topic is closed. If you want to reopen this topic, contact a moderator using the "Report Post" button.
- Home
- General Interest
- Car Audio
- mmats d300hc voltage on amp casing