The boards are presently available. I posted the picture already in a different thread. Although they are still not listed on my site, they can be ordered directly. The price is the same, just add a comment that payment is for a new design. Kit price also did not changed.
The rectifiers board, is the same as the new LM3875 board and accepts snubber, more option for bypas caps as well LED output.
The rectifiers board, is the same as the new LM3875 board and accepts snubber, more option for bypas caps as well LED output.
It was posted here: http://www.diyaudio.com/forums/showthread.php?postid=614348#post614348
I might try the new boards over the weekend.
I might try the new boards over the weekend.
The rack is 12.5" tall, 12.5" deep. The space between metal bars is 16", not enough for most equipment, but perfect for ML preamp chassis and small DAC.
The aluminum bars are 1" x 3" , the top shelf is 2.5", two other are 1" ea.
I might start building CD transport soon, so more interesting info to be expected")
The aluminum bars are 1" x 3" , the top shelf is 2.5", two other are 1" ea.
I might start building CD transport soon, so more interesting info to be expected
It's the other way: acrylic has cutouts for aluminum bars. Although not really neccessary, it simplifies assembly as everyhning locks in place, and improves appearance as well.
All was done using basic wodworking tools: table saw, router and belt sander. Aluminum was later treated with alodine, took me 3 evenings to build it.
All was done using basic wodworking tools: table saw, router and belt sander. Aluminum was later treated with alodine, took me 3 evenings to build it.
Peter Daniel said:It's the other way: acrylic has cutouts for aluminum bars. Although not really neccessary, it simplifies assembly as everyhning locks in place, and improves appearance as well.
I really agree, the cutouts are the magic touch on that rack

any reason why top shelve is much thicker than bottom ones?
Aha - so you made all plexiglass work by your self ...
Is it hard to do those cutouts in plexi??
Interesting - been considering about pretty much similar stand for my "Patek Line" recently - but ofcourse - "student budget version" - so smaller and with thinner (15mm ones) shelfes and only 2 wide Al bars at sides for suport ...
Is it hard to do those cutouts in plexi??
Interesting - been considering about pretty much similar stand for my "Patek Line" recently - but ofcourse - "student budget version" - so smaller and with thinner (15mm ones) shelfes and only 2 wide Al bars at sides for suport ...
It's pretty easy to machine it. The cut outs were done on all 3 panels simultanously, by multiple runs over a router straight bit.
The top panel is thicker, because I had that particular material in stock, and since the top shelf supports a transport, more solid foundation is achieved. All material was bought surplus. The design was dictated by what was available at the moment of coming with the idea
The top panel is thicker, because I had that particular material in stock, and since the top shelf supports a transport, more solid foundation is achieved. All material was bought surplus. The design was dictated by what was available at the moment of coming with the idea
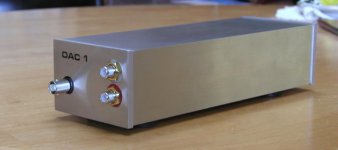
I made DAC enclosure prototype today. It's pretty straight forward, and no milling is required. If the tube length is chosen properly, attaching font and rear panels can be done by means of on board connectors: RCAs and power module. Additionally, front panel can be glued permanently, rear one provides access to the inside.
The finish is by brushing (on belt sander) and applying alodine, which gives the stainless steel look to the aluminum.
The finish is by brushing (on belt sander) and applying alodine, which gives the stainless steel look to the aluminum.
Attachments
Banned
Joined 2002
- Status
- This old topic is closed. If you want to reopen this topic, contact a moderator using the "Report Post" button.
- Home
- More Vendors...
- Audio Sector
- AudioSector-chip amp kits, dacs, chassis