That design works by creating an eddy current in the copper ring, which in turn creates a magnetic field that is the opposite of the permanent magnet field. High rpm is needed to get a sufficiently strong effect to create a strong enough repulsive force to act as a bearing. However, if you were to replace the copper ring with magnets polarised as a mirror image it should work for low rpm...
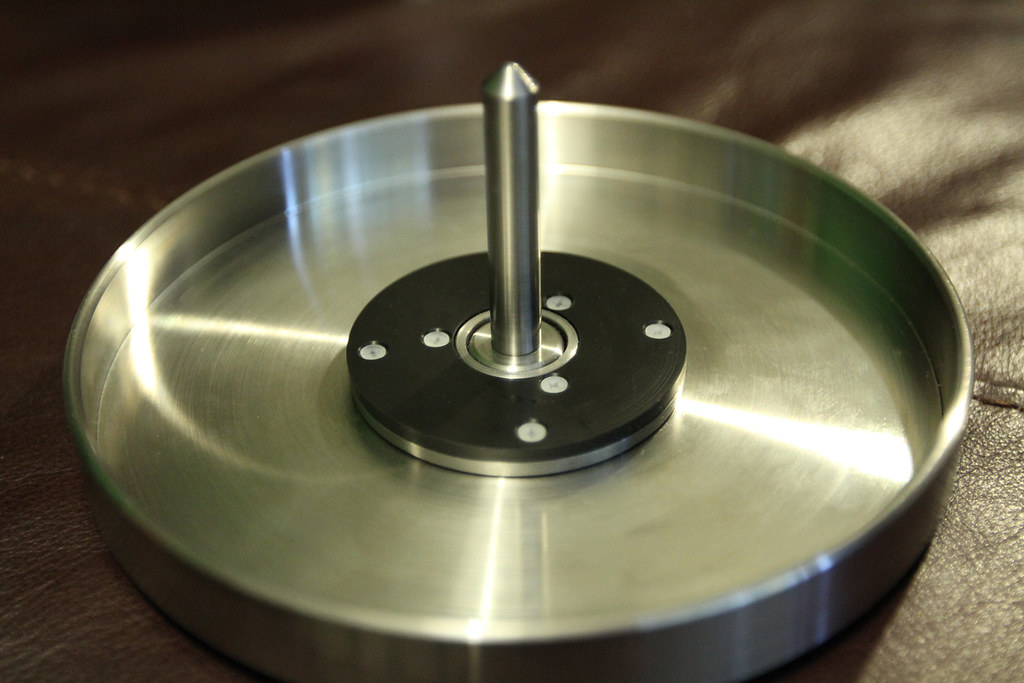
I designed and built my DIY MagLev assembly for my LP12, but I have also tried a modified version of it with an AR turntable.
I built this some time ago after seeing others' ideas on this forum.
The Tranquility one is very close to my design, (both mine and TP's design follow similar principles, and I understand that one respected contributor on here also advised TP, so similarities between many of this type of design is to be expected. Mine uses laser cut acrylic, thin Poron sheet, O Rings and a thicker rubber ring underneath the lower section.
My system is called the Kilt because it's what's underneath that counts.


You can see where the magnets are positioned here:

You can see my original post, describing this, and my success with it, on the following page in this thread, under the username ictmanager (which I was before I retired!), way back in July 2007 when I first made a maglev system.
http://www.diyaudio.com/forums/analogue-source/96655-magnetic-turntable-bearing-23.html#post2204810
Last edited:
") Yes, there is definitely renewed interest in this topic now! I respect TP's work and the quality of their products very much.
Yes, there is definitely renewed interest in this topic now! I respect TP's work and the quality of their products very much.I'll post more pics of my old experiments on this topic on here assoon as I can find some spare moments! In the meantime, there is some of my info on linnforums.
This is a link to the thread about TP Tranquility, which also includes some of my work from 2007 which was inspired by the work of others on DIY Audio.
Tiger Paw Tranquility
A list of early turntables with magnetic bearings should include Sato Seimitsu Kogyo (佐藤精密工業), also known as TEIC (Tokyo Denshi Kiki - 東京電子機器). TEIC sold turntables under the "Magnefloat" moniker, and were subsequently acquired by TEAC.
You can see a gallery of one such turntable here. TEIC MF-102SB
hth
You can see a gallery of one such turntable here. TEIC MF-102SB
hth
Hi Jcarr.
I knew of Teac turntables of course, but I had not realised that they incorporated ferrite magnets into theirs!
Amazing!
Very, very similar to my stainless housing for my ring magnets! But also similar in arrangement (just not similar in size!) to the maglev magnet on the Platine Verdier.
As they say, there's nothing new under the sun.
Except that it might have appeared first under the rising sun!
Thank you for the very interesting information.
Best regards, David
Last edited:
microwaves...
Prompted by this, i grabbed an old NEC microwave from the dump. It had a goldstar magnetron inside. I have to say, the ring magnets in this are just perfect for this application. Now i need to work out how to shield them with some sort of steel cup so the stray magnetic field isn't a problem.
There is a source of ring magnets that seem to have been overlooked here.
Microwave ovens.
The "magnetron", (What we call the vacuum tube that produces the microwaves here in the US), is easily removed from a broken Microwave oven, and each Magnetron uses two ring magnets. They are quite powerful, and easily removed from the Magnetron. Usually, however, one ring magnet is larger than the other.
If you don't mind finding a source if junked microwaves, you should have a virtually inexhaustable source of nice ring magnets.
Oh, and the north and south poles are situated on the faces, giving you quite a repelling force.
Prompted by this, i grabbed an old NEC microwave from the dump. It had a goldstar magnetron inside. I have to say, the ring magnets in this are just perfect for this application. Now i need to work out how to shield them with some sort of steel cup so the stray magnetic field isn't a problem.
I designed and built my DIY MagLev assembly for my LP12, but I have also tried a modified version of it with an AR turntable.
I built this some time ago after seeing others' ideas on this forum.
You can see where the magnets are positioned here:
Very nice work congrats I envy you; I'm also other Linn LP12 owner.
Much credit is due to Ynwoan from me, as well as thanks to folk like yourself, sq225917, for sharing ideas on here, as it was largely discussions on this forum a few years back which had led to my design being fully realised.
My renewed interest in further developing my version now has me turning some stainless steel supports. The topic's got me gripped again. And so have the magnets occasionally. Ouch! Another blood blister!
My renewed interest in further developing my version now has me turning some stainless steel supports. The topic's got me gripped again. And so have the magnets occasionally. Ouch! Another blood blister!
Last edited:
I installed my Tranquility the other evening - a wonderful increase in SQ!
The Tranquility is supposed to drop the noise floor by 3 or 4dB - which is understandable, given the weight of the end of the bearing stub pressing down on the thrust plate at the bottom of the bearing housing is reduced by 90%. I couldn't really pick this lower noise floor directly ... but I could immediately pick the results of this lowered noise floor! A more dynamic presentation, better imaging and better clarity are what comes through, as a result of low level detail being improved (from the noise floor dropping).
The music is just so much more “immediate” with the Tranq and clarity has improved. This is a different improvement to what I heard with Edmund Chan's composite inner platter (that caused bass to 'flow' more organically) but is definitely a most welcome further improvement.
Andy
I installed my Tranquility the other evening - a wonderful increase in SQ!
The Tranquility is supposed to drop the noise floor by 3 or 4dB - which is understandable, given the weight of the end of the bearing stub pressing down on the thrust plate at the bottom of the bearing housing is reduced by 90%. I couldn't really pick this lower noise floor directly ... but I could immediately pick the results of this lowered noise floor! A more dynamic presentation, better imaging and better clarity are what comes through, as a result of low level detail being improved (from the noise floor dropping).
The music is just so much more “immediate” with the Tranq and clarity has improved. This is a different improvement to what I heard with Edmund Chan's composite inner platter (that caused bass to 'flow' more organically) but is definitely a most welcome further improvement.
Andy
Hi Andy, I also have Edmund's composite inner platter and my own version of a Maglev bearing...(see my previous posts).... Can I ask if you are also using Edmund's Mober DC supply, or Linn's DC supply or the Premotec motor system? Cheers, David
Hi Andy, I also have Edmund's composite inner platter and my own version of a Maglev bearing...(see my previous posts).... Can I ask if you are also using Edmund's Mober DC supply, or Linn's DC supply or the Premotec motor system? Cheers, David
Hi David,
Yes, I saw your posts on your maglev - very well done!
No, I'm not using any of those 3 motor units. I did start off with the 110v Premotec and a Lingo 3 but then I came into contact with a guy named Steve Tuckett (here in Australia), who has developed an advanced AC motor speed controller (the 'Number9'). "Advanced" in that you can adjust:
* obviously, the hertz being fed to the motor ... for speed.
* the phase difference between the 2 motor windings. A cap introduces a 90 deg phase difference ... but in fact the optimal phase difference - which delivers the minimum motor vibration - is a few degrees less than this. I was able to hold the motor in my hand whilst I adjusted the phase difference by 0.01 deg increments ... and feel when the motor had the minimum vibration.
* the voltage fed to the motor. Increasing voltage increases motor vibration - which is why the Lingo reduces it to 80v, after the platter is up to speed. But when you have got the phase angle right - so you have minimum motor vibration - you can increase the motor voltage without any negatives.
So I am running my 24v Premotecs at 30v - which gives substantially more dynamics to the music.
* it can also drive 2 motors - with the ability to set a phase difference between the 2 motors. Obviously, this is irrelevant for an LP12 or Thorens or Rega ... but is highly appropriate for my 'SkeletaLinn'. Just as increasing the voltage to the motor results in increased dynamics ... having 2 motors (with separate belts) driving the platter, further increases the dynamics.
I bought one of Steve's prototypes in 2016 and this forced me to move to the 24v Premotec that Rega use, instead of the 110v version that Linn use. However, his production version - which is coming out soon - is able to drive several different voltage motors
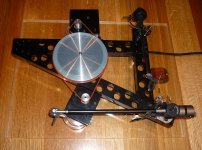
I did post on the Linn Forum a couple of years ago, when I developed my SkeletaLinn but just in case you missed this, here is a pic.
Andy
Regards,
Andy
Attachments
Could someone describe exactly the project to mod a Linn bearing, with pictures, magnet supplier with exact part number or description, etc.
TIA
Felipe
It's not about modding a Linn bearing. The bearing stays as it is. It's about positioning two ring magnets, one near the bearing base, and one under the inner platter.
These ring magnets are facing opposite ways, so to speak, so that their magnetic fields are in opposition, and this has the effect of the upper one attempting to move upwards and away from the lower one. This causes the platters not to become lighter (an impossibility!) but to put less pressure on the bearing tip.
I made my own MagLev system quite a long time ago, but my interest in it has been awakened and I am currently building a (hopefully) improved version.
The principle of the system is shown in the pic below (my drawing)
Do you have a Linn LP12?

Last edited:
Could someone describe exactly the project to mod a Linn bearing, with pictures, magnet supplier with exact part number or description, etc.
TIA
Felipe
The Tiger Paw site can tell you more: https://www.tiger-paw.com/tranquility
Andy
It's not about modding a Linn bearing. The bearing stays as it is. It's about positioning two ring magnets, one near the bearing base, and one under the inner platter.
These ring magnets are facing opposite ways, so to speak, so that their magnetic fields are in opposition, and this has the effect of the upper one attempting to move upwards and away from the lower one. This causes the platters not to become lighter (an impossibility!) but to put less pressure on the bearing tip.
I made my own MagLev system quite a long time ago, but my interest in it has been awakened and I am currently building a (hopefully) improved version.
The principle of the system is shown in the pic below (my drawing)
Do you have a Linn LP12?
Yes I own a Linn LP12 with Ekos and Shure V15 III.
Many thanks for the link Andy.
Sharing is caring.
There are no trade secrets here. I am happy to help or even supply parts.
My magnets are 50mm ring magnets, 28mm hole, 3mm thick, neobdymium.
The most important thing is concentricity (ie making sure that everything is manufactured precisely so that it all centres exactly on the centre line of the bearing.
The second thing is to ensure that the magnets do not physically touch any metal part of the turntable.
The third thing is to experiment with the separation of the magnets.
A DIY solution WILL require you to design and manufacture some parts by turning or laser cutting. These could be in stainless steel, acrylic, nylon, delrin, etc. Use rubber O-rings and self adhesive felt to prevent contact between the magnet and other components.
The way to measure the effectiveness of the Maglev system is to become a CRANE. Fit the separate parts of the Maglev system to the subchassis and to the inner platter.
Place the inner platter on a table top, and position 4 pieces of cotton so that they loop around the spindle of the inner platter, in such a way that you can LIFT the inner platter by hand, the right way up. Tie a loop in the cotton threads at the top and attach a spring balance. Now weigh the inner platter. Second stage is to fit the outer platter TO the inner platter, in the process trapping the 4 threads between the two. Now weigh the combined inner and outer platters. The combined weight of mine was around 4kg.
Now position the combined inner and outer platters in place on the turntable, so that the Maglev system is doing its work. Attach the spring balance again, and what you will be weighing will be the total of the two platters plus the upper Maglev component's weight.
The result on mine of mine is just under 0.5kg.
That means the pressure on the thrust plate is reduced to 0.5kg, and the rest of the combined platters' mass is transferred from the upper Maglev component through the lower component directly onto the subchassis. Less rumble, and more opportunity for tiny sonic details to break through without being 'masked'. Win-win.
Last edited:
- Status
- This old topic is closed. If you want to reopen this topic, contact a moderator using the "Report Post" button.
- Home
- Source & Line
- Analogue Source
- Magnetic turntable bearing