Hello kevinkr,
Kinda the point of the exercise") Actually, the tracing losses do need to be put back into the rotational energy...eventually. For all practical purposes, I do not expect to actually "hear" the speed drag due to any heavy passage (that would have to be one heck of a album to drag down my platter).
Actually, the tracing losses do need to be put back into the rotational energy...eventually. For all practical purposes, I do not expect to actually "hear" the speed drag due to any heavy passage (that would have to be one heck of a album to drag down my platter).
Casey
I think the mass of your turntable is so great that small variations in load due to tracing forces will be so heavily integrated that your motor will never seem them..
Kinda the point of the exercise
Actually, the tracing losses do need to be put back into the rotational energy...eventually. For all practical purposes, I do not expect to actually "hear" the speed drag due to any heavy passage (that would have to be one heck of a album to drag down my platter).Casey
valveitude said:Hello kevinkr,
Kinda the point of the exercise
Casey
Quite true, any energy lost has to be returned to the system, provided the overall energy lost is a small percentage of the energy stored in the system there shouldn't be any discernable change in speed during heavily modulated passages..
I had a Pink Triangle turntable which used a badly botched
implementation of the technics belt drive motor and their own electronics, speed was not even stable from the beginning of the record to the end, and heavily modulated passages resulted in a very discernable reduction in pitch. Needless to say I hated it, and got rid of it very quickly. The above was true both with the original motor and electronics and the replacement electronics from PT. I tried to locate an old SL-23 to cannabalize the control electronics from, but this was pre-internet, pre- eBay and I was unsuccessful.I finally sold it to a fellow in the UK who was able to get it upgraded with the latest drive electronics and seemed happy with it.
kevinklr,
A couple grams drag, at most, vs. a 25+ lb. flywheel...I know where I 'll be putting my money
I shudder when I think about what this hobby was like "back in the day". I think the Internet is the biggest advance for our fetish we've seen.
Casey
provided the overall energy lost is a small percentage of the energy stored in the system there shouldn't be any discernable change in speed during heavily modulated passages.
A couple grams drag, at most, vs. a 25+ lb. flywheel...I know where I 'll be putting my money
but this was pre-internet, pre- eBay
I shudder when I think about what this hobby was like "back in the day". I think the Internet is the biggest advance for our fetish we've seen.
Casey
valveitude said:I think the Internet is the biggest advance for our fetish we've seen.
I think you'll find that the internet has been the biggest advance for
a lot of fetishes.
I had a long weekend, which can only mean 1 thing…turntable progress. There are a lot of pictures in this post, so it may take awhile to load, if like me, you’re stuck on dial-up.
First order of business was finishing the bottom plinth profile. After grinding the last one, I really wasn’t looking forward to it. This time around though it wasn’t so bad, pre-cutting with the router saved a lot of time. In order to match up the profiles, I clamped the plinths together while grinding…

…which enabled me to get a close match…
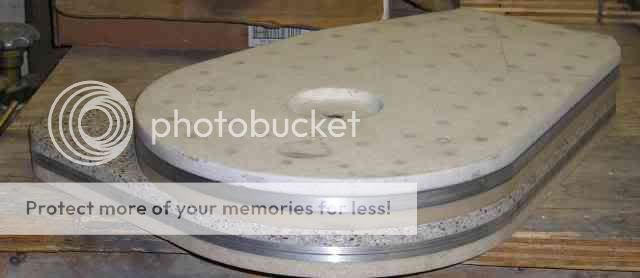
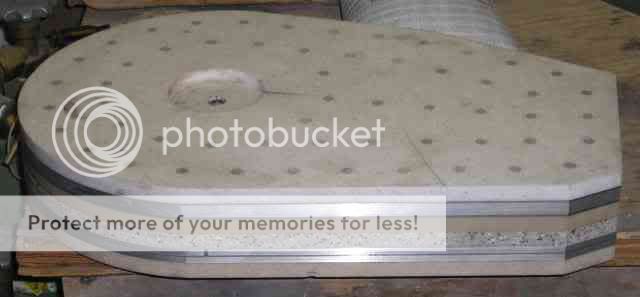
… you can see that the metal in the bottom plinth has a lot of flaws, I was going to leave it exposed, like the top plinth, but covering it will look better. Next I drilled small pilot holes through both plinths, while clamped together, where I intended to mount the feet. I then cut holes with a hole saw in the bottom plinth…
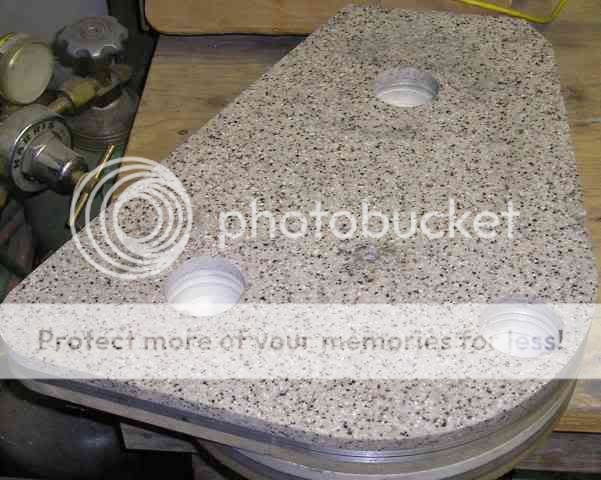
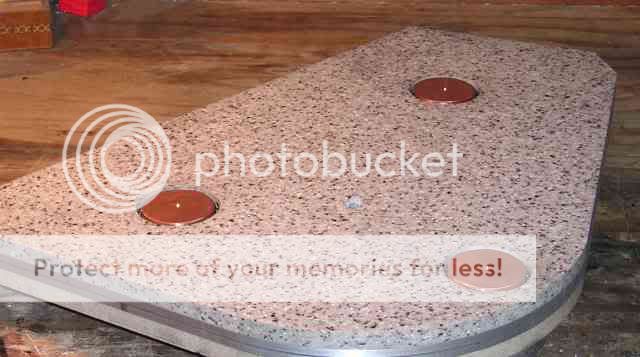
…I then fabricated some bottom covers out of Corian to cover the hole, and provide a mounting point for the bottom feet. Once mounted to the plinth, I glued threaded studs to the discs while a nut was screwed down with a shoulder washer to ensure the studs were square…

…up to this point, everything took about as long to do as was expected…that changed.
I don’t normally post a “step-by-step” description of the work done, but in this I will case (well..kinda, its still compressed) in order to show how much effort went into the “feet”. First I cut off a piece of brass stock, and mount it on the lathe…

…then its squared up with a couple of rough cuts, and a clearance hole is drilled…

….then a start hole is bored to ensure the tap drill-bit drills true center, then the hole is sized for the thread tap with a 29/64’s bit…

…then a 9/16’s shoulder is bored…

…a ½-20 thread tap is ran through. This was the biggest PITA… you scrape brass, not cut it. A tap cuts..much fun ensued…

…I then glued a slug of drill-rod into the shoulder hole…

…next up was the most time consuming step. The cutting properties of brass and drill-rod couldn’t be any more different. I had to find a cutting tool that could do both. I found a small carbide tipped boring bar filled the bill..it cut the drill rod, and scraped the brass, but I could only cut .01” a pass…

…once the point was cut, I sized, and polished the foot…

..and cut to length…

… between 2-3 hours (depending on breaks)after picking up the brass, I have a foot…

…repeat as necessary…

Once all the feet were mounted, I filled up the cavities in the bottom plinth with lead shot…

…and covered the shot with discs that had holes with a profile that match the feet (60 deg.)…
…I then ran a bead of RTV silicone between the discs and the plinth, and sat the top plinth on them. After tapping it around to get the two plinths aligned, I put the bearing and platter on. It has been left to cure overnight…
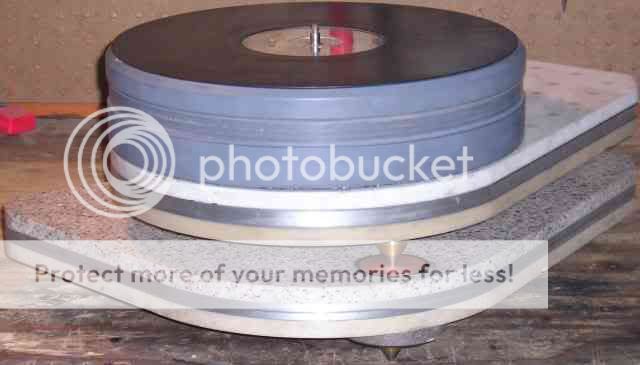
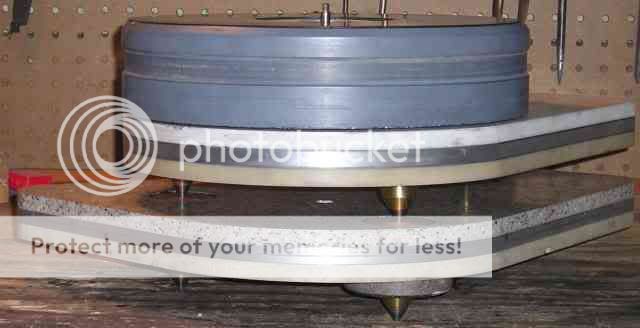
Note the points on the bottom plinth have dug in around ¼” into the bench top…I think I will be making some discs for these feet as well.
After this run, I’m pretty sore, but I can’t help but smile at the progress.
Casey
First order of business was finishing the bottom plinth profile. After grinding the last one, I really wasn’t looking forward to it. This time around though it wasn’t so bad, pre-cutting with the router saved a lot of time. In order to match up the profiles, I clamped the plinths together while grinding…
…which enabled me to get a close match…
… you can see that the metal in the bottom plinth has a lot of flaws, I was going to leave it exposed, like the top plinth, but covering it will look better. Next I drilled small pilot holes through both plinths, while clamped together, where I intended to mount the feet. I then cut holes with a hole saw in the bottom plinth…
…I then fabricated some bottom covers out of Corian to cover the hole, and provide a mounting point for the bottom feet. Once mounted to the plinth, I glued threaded studs to the discs while a nut was screwed down with a shoulder washer to ensure the studs were square…
…up to this point, everything took about as long to do as was expected…that changed.
I don’t normally post a “step-by-step” description of the work done, but in this I will case (well..kinda, its still compressed) in order to show how much effort went into the “feet”. First I cut off a piece of brass stock, and mount it on the lathe…
…then its squared up with a couple of rough cuts, and a clearance hole is drilled…
….then a start hole is bored to ensure the tap drill-bit drills true center, then the hole is sized for the thread tap with a 29/64’s bit…
…then a 9/16’s shoulder is bored…
…a ½-20 thread tap is ran through. This was the biggest PITA… you scrape brass, not cut it. A tap cuts..much fun ensued…
…I then glued a slug of drill-rod into the shoulder hole…
…next up was the most time consuming step. The cutting properties of brass and drill-rod couldn’t be any more different. I had to find a cutting tool that could do both. I found a small carbide tipped boring bar filled the bill..it cut the drill rod, and scraped the brass, but I could only cut .01” a pass…
…once the point was cut, I sized, and polished the foot…
..and cut to length…
… between 2-3 hours (depending on breaks)after picking up the brass, I have a foot…
…repeat as necessary…
Once all the feet were mounted, I filled up the cavities in the bottom plinth with lead shot…
…and covered the shot with discs that had holes with a profile that match the feet (60 deg.)…
…I then ran a bead of RTV silicone between the discs and the plinth, and sat the top plinth on them. After tapping it around to get the two plinths aligned, I put the bearing and platter on. It has been left to cure overnight…
Note the points on the bottom plinth have dug in around ¼” into the bench top…I think I will be making some discs for these feet as well.
After this run, I’m pretty sore, but I can’t help but smile at the progress.
Casey

Hello DaveM
Thanx. I wish I the time to do this . The sad truth is, if I had an accurate prediction of the work involved, I probably would have resigned it to the "someday" pile, and spent the energy elsewhere...good thing I didn't. I feel that this will most likely be my last TT, and I plan to be enjoying it a long time after the memory of the labor fades .
Hello choky,
...and yet, not
That is awesome. You keep making me wish I had the time to be doing this myself. Too many projects, too little time.
Thanx. I wish I the time to do this
. The sad truth is, if I had an accurate prediction of the work involved, I probably would have resigned it to the "someday" pile, and spent the energy elsewhere...good thing I didn't. I feel that this will most likely be my last TT, and I plan to be enjoying it a long time after the memory of the labor fades .Hello choky,
it's ugly !
...and yet, not
I'm suffering a bit from "paralysis thru analysis" regarding the platter surface (mat). It is my understanding that a direct coupling is the sonic choice, hence my planning on using a "mat" cut out of a record laminated to the top surface.
I have been having second thoughts on this, and can't help but feeling I would manage to embed some crud into the grooves of the clamped record.
So the question...what are my options here ? I don't want to de-couple the record (the goal of virtually all commercial offerings), and I want enough "give" that if I miss a speck of dust, it will push into the mat, and not the album. This sounds like two mutually exclusive properties to me...thoughts ?
just a thought-
top platter (or mat,in this case) for EMT927 and EMT930 in "everyday" version is made from plexi with scarf (hehe-franch hats material) on top;
but-"measuring" or "etalon" mat (made original in EMT factory) for these two workhorses is made from pure glass.
I see several times on net that some biggest EMT fans sayed that this sort of mat is ultimative and best solution ,at least for EMT.
anyway- EMT927 is Al chassis with Al base platter,EMT930 is bakelite chassis with Al platter.......
just for record ......
btw-did I say that I like exactly that sort of uglyness?
choky
Interesting. Is this "scarf" material faux silk ? In fact, a piece of black silk laminated to the top might be a good compromise ..hmmm.
In that case.. it is quite ugly
top platter (or mat,in this case) for EMT927 and EMT930 in "everyday" version is made from plexi with scarf (hehe-franch hats material) on top
Interesting. Is this "scarf" material faux silk ? In fact, a piece of black silk laminated to the top might be a good compromise ..hmmm.
btw-did I say that I like exactly that sort of uglyness?
In that case.. it is quite ugly
Regarding Platter Surface...
Michael Fremer writes about the choice of platter surface in his review
of the Continuum Audio Labs' turntable in the latest Stereophile.
Mr. Fremer worried about the choice of a hard platter surface due to
the possibility of dust being embeded and causing a frying-egg noise
that can be impossible to remove.
The designer of this cost-no-object turntable felt that the hard surface
provided the most effective vinyl / platter coupling and the best sound.
So i guess you clean the platter and record each time before playing,
or use a thin mat for protection.
(great job on your DIY turntable, amazing!)
Hello moe29
Yep..it was this article that brought my latent fears to the fore. The best playback in the world isn't worth toasting a favorite LP.
This would be ok if I knew I got it all, and that no dust particle drifted onto the surface after cleaning, but before the record went down..I live in a desert like climate, and dust is a constant battle.
I'm thinking along the lines of somthing just thick enough, and just pliable enough, to allow a dirt particle to "push" into the mat rather than the record. I was originally thinking I would laminate it to the top, but I'm thinking now that I will want it to be easily removable so that I can listen to different materials.
Ahh..the joys of "Audiophilia Neurosis"
Thank you
Mr. Fremer worried about the choice of a hard platter surface due tothe possibility of dust being embeded and causing a frying-egg noise that can be impossible to remove.
Yep..it was this article that brought my latent fears to the fore. The best playback in the world isn't worth toasting a favorite LP.
So i guess you clean the platter and record each time before playing,
This would be ok if I knew I got it all, and that no dust particle drifted onto the surface after cleaning, but before the record went down..I live in a desert like climate, and dust is a constant battle.
I'm thinking along the lines of somthing just thick enough, and just pliable enough, to allow a dirt particle to "push" into the mat rather than the record. I was originally thinking I would laminate it to the top, but I'm thinking now that I will want it to be easily removable so that I can listen to different materials.
Ahh..the joys of "Audiophilia Neurosis"
(great job on your DIY turntable, amazing!)
Thank you
I read that article as well, and as I recall the manufacturer provided a thin mat that did exactly what you are talking about. It also mentioned that the mat would stick to the record each time one was removed. The author said this was a bit annoying, but well worth it. I believe he said it was similar to the material used in the plastic sleeves. Maybe a piece of rice paper?
DaveM
DaveM
DaveM,
I'll have to re-read it, but I was left with the impression that it was rubbery...hmm. At any rate it was this vague description that motivated me to ask this forum for ideas.
So, two suggestions so far 1) a "scarf" material (silk?), and 2) rice paper. I can see how either one could work. Any other suggestions ? I will probably cut donuts out of each material and give a listen.
Casey
I read that article as well, and as I recall the manufacturer provided a thin mat that did exactly what you are talking about. It also mentioned that the mat would stick to the record each time one was removed. The author said this was a bit annoying, but well worth it. I believe he said it was similar to the material used in the plastic sleeves. Maybe a piece of rice paper?
I'll have to re-read it, but I was left with the impression that it was rubbery...hmm. At any rate it was this vague description that motivated me to ask this forum for ideas.
So, two suggestions so far 1) a "scarf" material (silk?), and 2) rice paper. I can see how either one could work. Any other suggestions ? I will probably cut donuts out of each material and give a listen.
Casey
I could be mistaken, but as I recall the turntable that Fremer was having these problems with used a vaccum clamped platter and it was the vaccum action that caused enough pressure to embed the dust. I dont think that it would be as big of a conscern if only the weight of the record was involved.
Mass Loaded Vinyl Noise Barrier is an option I have been considering, you get the vinyl to vinyl interface as well as added mass and it comes in various thicknesses down to 1/16 inch.
vinyl bar has clear version that might be easier to see dust on and keep clean
Regards
James
vinyl bar has clear version that might be easier to see dust on and keep clean
Regards
James
Good thought, but whatever you use as a mat should be softer than Vinyl. If it is not, the threat of embedded dust is an issue.
About the vaccum hold down, you are 100% right. So then the question is whether a good clamp could cause the same issue. I have a MMF-7 that comes with a threaded clamp and a felt mat. I have stopped using the mat because it holds lint and dust and picks up enough static to stick itself to the record. The platter is acrylic. That being said, I have not had an issue with embedding dust into the record, and I have not been particular about keeping the platter clean.
I think you will be fine using a fairly hard surface, as long as you are not planning a huge hold down in combination with an outer clamping ring.
Dave M
Hello ch83575,
You are correct, I am using a reflex clamp, ala VPI.
Hello tvi,
Thanx for the link. It looks too lossy for my table, but perfect for some speaker enclosures.
DaveM
Hmm...My original plan involved recycling an old record into a mat, I cant see vinyl being harder than acrylic. Pehaps I'm looking for a solution without a problem Wouldn't be the first time the 'Pile got somthing wrong. That said, I still want a fall back position in case I find I need it.
Casey
You are correct, I am using a reflex clamp, ala VPI.
Hello tvi,
Thanx for the link. It looks too lossy for my table, but perfect for some speaker enclosures.
DaveM
I have a MMF-7 that comes with a threaded clamp and a felt mat. I have stopped using the mat because it holds lint and dust and picks up enough static to stick itself to the record. The platter is acrylic. That being said, I have not had an issue with embedding dust into the record, and I have not been particular about keeping the platter clean.
Hmm...My original plan involved recycling an old record into a mat, I cant see vinyl being harder than acrylic. Pehaps I'm looking for a solution without a problem
Wouldn't be the first time the 'Pile got somthing wrong. That said, I still want a fall back position in case I find I need it.Casey
- Status
- This old topic is closed. If you want to reopen this topic, contact a moderator using the "Report Post" button.
- Home
- Source & Line
- Analogue Source
- Corian Turntable Fun