Casey- my main problem is the macining- the tools at my disposal are a power drill and a router.
Andy,
The at-110e has an elliptical stylus, but for £25 it is well regarded. I was thinking of making my own arm.
James
p.s. To avoid thread-jacking, I will open a new thread.
Andy,
The at-110e has an elliptical stylus, but for £25 it is well regarded. I was thinking of making my own arm.
James
p.s. To avoid thread-jacking, I will open a new thread.
JesseG-
I was in a hurry in my last reply, and see I didn't answer your question about the pulley..oops.
The short answer is no. My new motor is 600 rpm, as opposed to the 300 rpm the pulley was cut for. Since , in theory, I won't have the shaft vibration to tame with my new design, I wont need this style of pulley (fingers crossed).
Going back to the PVC tubing for a moment, I forgot to mention that the length is about an inch, which is why I'm not to concerned with it twistng up. I can see if the tube was ran the height of the pictured mount twisting would be a concern.
Nordic-
Yep, it's a problem. Every design is a compilation of compromises. In my case, the inverted splindle bearing and (now) double stack pulley bearings were chosen to minimize the effects of the belt pull.
jrevillug & NjoyTHEMUSIC-
In my opinion, access to tools is the problem to DIY. The trick is to work your design around what you have. The biggie with a TT project is the spindle bearing. If you can't make one (and it's not likely you can with a drill & router), then look at what others have done. My favorite that I have seen (sorry I can't remember the guys name or link, maybe someone here can point to it) is the bearing using an engine valve, valve guide, and ball bearing. Mount the valve upside-down on the plynth, bore (drill) your platter to fit the guide, put ball in guide, and slide your platter-guide-ball assy. onto the valve stem..a very clever solution. As for the platter, using your router with a circle cutting attachment can get you a reasonably round disc that can be trued up with a sanding drum on your drill motor attached to a cheap drill press attachement ( or you can make a stand for it.
If it were me, I would look in the phone book for any cabinet shops that do Corion counter work. Case the place out to find were the actual work is done (Corion is worked in the shop, not the field), and ask about there cut-outs. I'm sure they will either give you a couple, or at least sell them to you cheap.
The biggest thing to remember..HAVE FUN.
-Casey
I was in a hurry in my last reply, and see I didn't answer your question about the pulley..oops.
The short answer is no. My new motor is 600 rpm, as opposed to the 300 rpm the pulley was cut for. Since , in theory, I won't have the shaft vibration to tame with my new design, I wont need this style of pulley (fingers crossed).
Going back to the PVC tubing for a moment, I forgot to mention that the length is about an inch, which is why I'm not to concerned with it twistng up. I can see if the tube was ran the height of the pictured mount twisting would be a concern.
Nordic-
Something that keeps nagging at me with these belt driven type TTs is the unbalanced force on the shaft of the rotating motor.
Yep, it's a problem. Every design is a compilation of compromises. In my case, the inverted splindle bearing and (now) double stack pulley bearings were chosen to minimize the effects of the belt pull.
jrevillug & NjoyTHEMUSIC-
Casey- my main problem is the macining- the tools at my disposal are a power drill and a router.
In my opinion, access to tools is the problem to DIY. The trick is to work your design around what you have. The biggie with a TT project is the spindle bearing. If you can't make one (and it's not likely you can with a drill & router), then look at what others have done. My favorite that I have seen (sorry I can't remember the guys name or link, maybe someone here can point to it) is the bearing using an engine valve, valve guide, and ball bearing. Mount the valve upside-down on the plynth, bore (drill) your platter to fit the guide, put ball in guide, and slide your platter-guide-ball assy. onto the valve stem..a very clever solution. As for the platter, using your router with a circle cutting attachment can get you a reasonably round disc that can be trued up with a sanding drum on your drill motor attached to a cheap drill press attachement ( or you can make a stand for it.
If it were me, I would look in the phone book for any cabinet shops that do Corion counter work. Case the place out to find were the actual work is done (Corion is worked in the shop, not the field), and ask about there cut-outs. I'm sure they will either give you a couple, or at least sell them to you cheap.
The biggest thing to remember..HAVE FUN.
-Casey
jrevillug & NjoyTHEMUSIC-
Found it..
http://www.altmann.haan.de/turntable/
...very clever idea. I would stay away from the stepper motor though..the ones I tried were very noisy ran as synchronous motors.
-Casey
Found it..
http://www.altmann.haan.de/turntable/
...very clever idea. I would stay away from the stepper motor though..the ones I tried were very noisy ran as synchronous motors.
-Casey
Going back to the PVC tubing for a moment, I forgot to mention that the length is about an inch, which is why I'm not to concerned with it twistng up. I can see if the tube was ran the height of the pictured mount twisting would be a concern.
Hi Casey (and All)...
I agree that if your coupling tube is short, and the two shaft ends are close to each other, the tubing will not collapse. However keep in mind that the closer the two shaft ends are, the less vibration damping effect of the PVC tubing. The surface coupling between the shaft surface and the inside surface of the PVC will stiffen the PVC. I think you will need some space (say, 1/2in) between the 2 shaft ends for the PVC to do its intended job. Fill this space with silicon grease and your coupling will have two vibration modes to help cancel the nasties.
I took a lesson from your experience with the iron powder in a previous motor mount where the intended vbibration damping effect was killed by the damping material packing to near solid by the vibration it was intended to cancel.
I just finished a quite ambitious hifi rack. The shelves are hollow and filled with sand. From reading your post I changed from using the fine concrete sand to playround sand (much coarser) and did not fill the shelves all the way full. Instead, they are 7/8 full so the fill has a chance to shift around a bit. I hope that will give it a better chance of continuing to do it's job.

When are we going to see some more pictures, Casey?
Jess
Jess-
As it turns out, the length of the PVC coupling is exactly ½”. I have decided to give it a go hollow for now. The inside space needs to be compressible to some extent, otherwise it becomes to rigid (think of a high pressure water hose). It seems to hold fine..for now, If it twists up I'll fill it.
Umm…now
First, I give you reason 462 why, when you are tired, it is time to walk away. I tend to give myself a schedule for the work so that I can squeeze as much as I can in a weekend. This can get me in trouble. I was intent on getting the components I needed to build the coupler done Fri. night. It takes a fair amount of finesse to run a 6-32 tap through a ¼” of steel, a finesse I apparently don’t possess after being up 20 hrs. I was just about done with the first hole, when..*tink*…

… I now had half of my tap using my collar as its permanent resting-place. Time (past time) for bed.
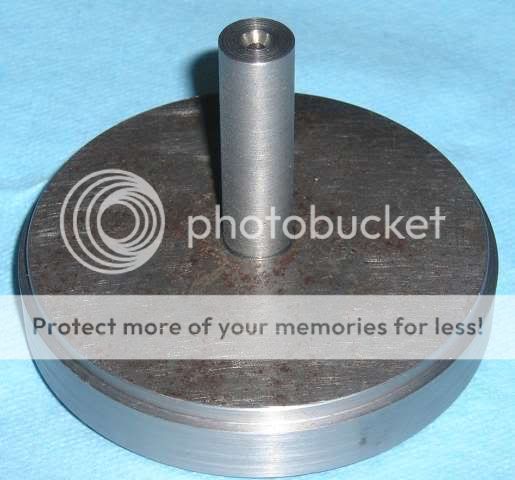
Sat. morning after coffee and an hour of waking up and another hour to get to the store and buy a new tap, I examined my dilemma, and decided there was no way to remove the dead tap without scrapping the piece. Instead I used a 1/8 oxide stone on the Dremel, and carefully ground the tap flush on both sides. I then re-drilled the piece, and tapped my holes. These are the pieces of the coupling…

I had decided to include one Sorbothane barrier in the coupler after all. I carefully marked out the round disc so that the balance would be reasonably close with the blocks, and made a jig that was cut to fit the OD of the two pieces that were to be glued together…
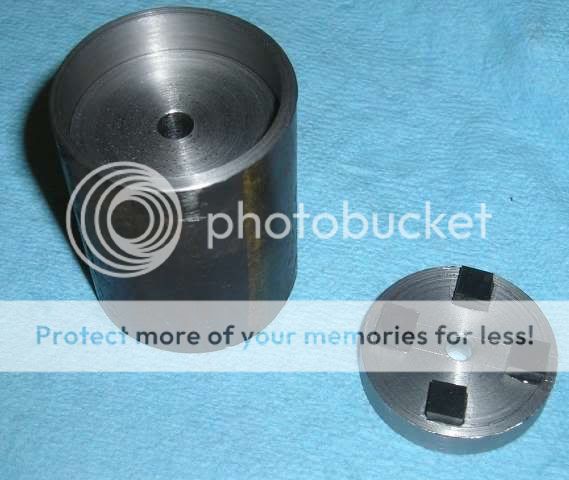
…in the picture the top piece is already seated in the jig. This is what the “drive shaft” looked like assembled…
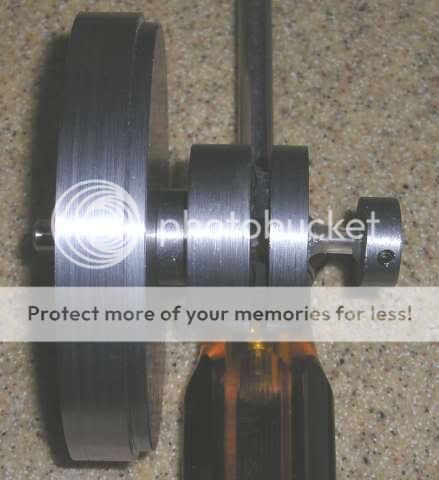
I eagerly cobbled it to the motor to see how well it would work. Not well. It turns out that the Sorbothane is formed in a mold, and the thickness varies around .02”. I cut all my blocks for the suspension and coupler in one go, so they came from one end of the sheet to the other, as such they are not consistent. Neddless to say, the back disc wasn’t square, and once it started to spin, it would try to level itself, throwing the whole shebang out of balance..WAY out of balance.
Seeing that getting a balanced shaft using this approach would be another huge bunny trail, I abandoned it, and JB Weld’ed the two pieces together..good thing I made the jig…
A made another alignment tool to center the suspension on the top plate. The OD on the fat end is the same as the OD of the bearings (5/8”) and fits snuggly in the plate, while the other end is drilled and reamed to to fit the motor shaft…
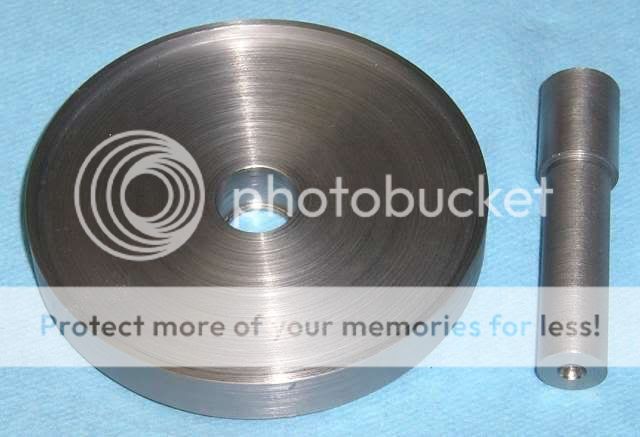
I slid the pin in the top plate…
…and after shimming the top blocks of the suspension so that it would seat square, and fastening the motor solid to the bottom ring, I glued the assembly to the top plate…
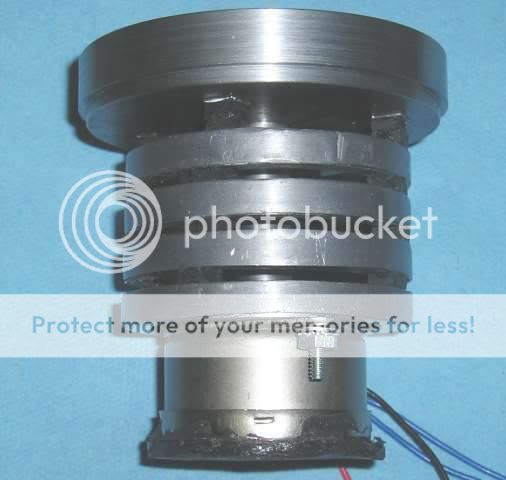
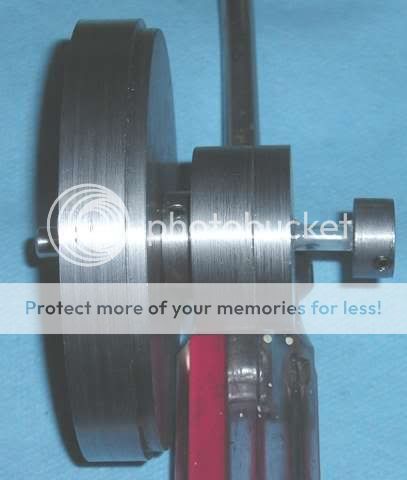
…after the glue dried, I removed the pin and motor, and assembled the components…
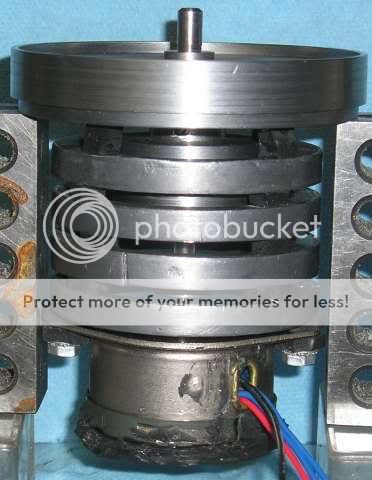
…the motor is running in this picture.
I bought my bearings from the only place in town that stocked them, and was concerned when I discovered that I could feel play in them. A bearing this small shouldn’t have discernable play, I was further alarmed when I spun them with just the spindle and top half of the coupler mounted …I could hear them. Well, they are junk. I should have got a clue with the $7 retail price tag..real quality here. The good news is that I “kilt dead” my motor noise, the not so good news is that my bearing noise at this point is beyond bad. If I loosen the set screw on the motor, so it can spin free, there is nothing but eerie silence. The bearing noise is too great to tell how effective the PVC is from isolating the buzz from the spindle ,though I imagine it is, but I can’t tell for now.
So it seems my journey to the “perfect” motor will be a little longer, but I feel all but assured of success. I will order some good German bearings first, and if it’s still too noisy (I doubt it), I have a couple other ideas to try. Bottom line, a quite bearing is a heck of a lot easier than a quite motor…which I now have.
Well, That’s it for now.
-Casey
I think you will need some space (say, 1/2in) between the 2 shaft ends for the PVC to do its intended job. Fill this space with silicon grease and your coupling will have two vibration modes to help cancel the nasties.
As it turns out, the length of the PVC coupling is exactly ½”. I have decided to give it a go hollow for now. The inside space needs to be compressible to some extent, otherwise it becomes to rigid (think of a high pressure water hose). It seems to hold fine..for now, If it twists up I'll fill it.
When are we going to see some more pictures, Casey?
Umm…now
First, I give you reason 462 why, when you are tired, it is time to walk away. I tend to give myself a schedule for the work so that I can squeeze as much as I can in a weekend. This can get me in trouble. I was intent on getting the components I needed to build the coupler done Fri. night. It takes a fair amount of finesse to run a 6-32 tap through a ¼” of steel, a finesse I apparently don’t possess after being up 20 hrs. I was just about done with the first hole, when..*tink*…
…
I now had half of my tap using my collar as its permanent resting-place. Time (past time) for bed.Sat. morning after coffee and an hour of waking up and another hour to get to the store and buy a new tap, I examined my dilemma, and decided there was no way to remove the dead tap without scrapping the piece. Instead I used a 1/8 oxide stone on the Dremel, and carefully ground the tap flush on both sides. I then re-drilled the piece, and tapped my holes. These are the pieces of the coupling…
I had decided to include one Sorbothane barrier in the coupler after all. I carefully marked out the round disc so that the balance would be reasonably close with the blocks, and made a jig that was cut to fit the OD of the two pieces that were to be glued together…
…in the picture the top piece is already seated in the jig. This is what the “drive shaft” looked like assembled…
I eagerly cobbled it to the motor to see how well it would work. Not well. It turns out that the Sorbothane is formed in a mold, and the thickness varies around .02”. I cut all my blocks for the suspension and coupler in one go, so they came from one end of the sheet to the other, as such they are not consistent. Neddless to say, the back disc wasn’t square, and once it started to spin, it would try to level itself, throwing the whole shebang out of balance..WAY out of balance.
Seeing that getting a balanced shaft using this approach would be another huge bunny trail, I abandoned it, and JB Weld’ed the two pieces together..good thing I made the jig…
A made another alignment tool to center the suspension on the top plate. The OD on the fat end is the same as the OD of the bearings (5/8”) and fits snuggly in the plate, while the other end is drilled and reamed to to fit the motor shaft…
I slid the pin in the top plate…
…and after shimming the top blocks of the suspension so that it would seat square, and fastening the motor solid to the bottom ring, I glued the assembly to the top plate…
…after the glue dried, I removed the pin and motor, and assembled the components…
…the motor is running in this picture.
I bought my bearings from the only place in town that stocked them, and was concerned when I discovered that I could feel play in them. A bearing this small shouldn’t have discernable play, I was further alarmed when I spun them with just the spindle and top half of the coupler mounted …I could hear them. Well, they are junk. I should have got a clue with the $7 retail price tag..real quality here. The good news is that I “kilt dead” my motor noise, the not so good news is that my bearing noise at this point is beyond bad. If I loosen the set screw on the motor, so it can spin free, there is nothing but eerie silence. The bearing noise is too great to tell how effective the PVC is from isolating the buzz from the spindle ,though I imagine it is, but I can’t tell for now.
So it seems my journey to the “perfect” motor will be a little longer, but I feel all but assured of success. I will order some good German bearings first, and if it’s still too noisy (I doubt it), I have a couple other ideas to try. Bottom line, a quite bearing is a heck of a lot easier than a quite motor…which I now have.
Well, That’s it for now.
-Casey
Hello All,
After contemplating my bearing noise problem, I have decided to try a different approach. Intsed of "hunt and pecking" for the quietest cage bearing, I decided to go with Oilite sintered bronze ( I ordered them locally, but thy're similiar to these). I rejected these originally because of there loose tolerance, but it occured to me that I could simply turn my spindle to fit ( it also gives me an excuse to make a spindle a little taller than the original I made..that one was a little short). Of course that means I might have to make another one if I had to replace the bushing, but since these things are known for there very long life in conditions far more severe than this one, I have decided to take a chance.
I will modify it slightly by cutting a 60 deg. bevel in the top (and a matching bevel on the spindle) to ensure the shaft/pulley runs true center.
Thoughts ?
-Casey
I will modify it slightly by cutting a 60 deg. bevel in the top (and a matching bevel on the spindle) to ensure the shaft/pulley runs true center.
Hi Casey.
Sintered bronze (and Oilite) makes a good bearing - especially for low or medium speed applications. Soak your new Oilite bushing in motor oil overnite (Oilite is porous bronze) before installing it and it will do its job happily for many years.
Be VERY careful about overdoing the precision of your fit. Oilite bearings rely on a 1-2thou clearance to work. When the shaft starts turning, it generates a little heat. The Oilite swells slightly and exposes the oil molecules, thus providing the lubrication. Too close a tolerance and the bushing has nowhere to swell and will seize the shaft (even on small shafts at low rpm).
Your idea of tapering the shaft/bushing fit at the lateral end might help, but please remember that the Oilite expands in ALL directions as it warms up.
The good news - an properly fit Oilite bearing supporting a steel shaft can be SILENT! I mean absolutely silent. It was the preferred bearing for most scientific equipment up until the advent of teflon.
Good luck with this
Jess
Hi Jess,
I can't thank you enough for jumping in with info...you no doubt saved me a lot of grief. I had originally stayed away from the Oilite bushing because of the "sloppy" fit, I couldn't understand why no one made one with a tighter running fit (I'm used to .0005" for a 1/4" shaft), now I know why.
The bushings I purchased came pre-oiled. Would you still recommend this ?
Now thats what I'm talkin' about.
Thanks again,
Casey
Be VERY careful about overdoing the precision of your fit. Oilite bearings rely on a 1-2thou clearance to work. When the shaft starts turning, it generates a little heat. The Oilite swells slightly and exposes the oil molecules, thus providing the lubrication. Too close a tolerance and the bushing has nowhere to swell and will seize the shaft (even on small shafts at low rpm).
I can't thank you enough for jumping in with info...you no doubt saved me a lot of grief. I had originally stayed away from the Oilite bushing because of the "sloppy" fit, I couldn't understand why no one made one with a tighter running fit (I'm used to .0005" for a 1/4" shaft), now I know why.
Soak your new Oilite bushing in motor oil overnite (Oilite is porous bronze) before installing it and it will do its job happily for many years.
The bushings I purchased came pre-oiled. Would you still recommend this ?
The good news - an properly fit Oilite bearing supporting a steel shaft can be SILENT! I mean absolutely silent.
Now thats what I'm talkin' about.
Thanks again,
Casey
The bushings I purchased came pre-oiled. Would you still recommend this ?
Yep! In a previous incarnation as a motorcycle racer I used to rebuild transmissions, clutches, etc many of which had Oilite bushing supporting VERY hard-working shafts. We allways used to *top-up* the new bushings before pressing them into their new home. It may not have been absolutely necessary, but I never had one burn out. Cheap insurance...
Another point on topic - most mass-manufactured turntables and ALL direct drive tt motors use brass bushings - some with performance far surpassing the small, cheap bearings they carry. If you want to check my previous statement, pull the platter on a 1980s belt-drive Japanese table (or even a Rega) and measure the bushing ID and the shaft OD - I'll bet they are all 1-2thou clearance.
My DIY table has the sintered bronze bushing and a Delrin thrust plate in mount as its spindle bearing. I had a machinist make a new spindle (longer than the stock one from the old Kenwood table ) from stainless steel and I polished it nicely. The base of the spindle was machined in a blunt convex shape highly polished to seat on the Delrin plate to affix my 7 inch dia MDF drive platter to and then support my 12 in Dia Corian/MDF record platter. The bushing works well and is very silent. The tolerances are in or around 1 thou. I did seal up the base that holds the Delrin thrust plate to the board I built to hold it all together so I can put a few drops of bearing oil in it and did smear some petroleum jelly up the spindle for an added thin film. If I give my patter a light spin it will freely spin for several seconds. It is not the most perfect setup but I have no issues with quiet and low friction revolving of the platter.
Hi Phileas Fogg,
Thanx for the confirmation (nice table by the way).
Jess-
Okey-Dokey..Do I use regular 'ol motor oil, or would something lighter like "3-in-1" be in order ?
-Casey
The bushing works well and is very silent. The tolerances are in or around 1 thou.
Thanx for the confirmation (nice table by the way).
Jess-
We allways used to *top-up* the new bushings before pressing them into their new home.
Okey-Dokey..Do I use regular 'ol motor oil, or would something lighter like "3-in-1" be in order ?
-Casey
Hello maxro,
That would be a bad thing
Thanx for the tip,
Casey
Don't use 3 in 1 it will dry up and turn into glue.
That would be a bad thing
Thanx for the tip,
Casey
Hi Casey:
Maxro is correct - 3n1 will dry up. I have always used heavy gear oil - 50w diesel engine oil will work fine or 90w differential lube was ideal if memory serves. Got to your local lube shop with a pickle jar and they will certainly give you a cup or so, enough for 5000 bushings.
Phileas - thanks for the reality check - its been more than a few years since I did much of this stuff
Onward and inward
Jess
JesseG said:Maxro is correct - 3n1 will dry up. I have always used heavy gear oil - 50w diesel engine oil will work fine or 90w differential lube was ideal if memory serves. Got to your local lube shop with a pickle jar and they will certainly give you a cup or so, enough for 5000 bushings.
I personally use ATF (automatic transmission fluid) mixed 50/50 with something else. 80/90W diff. oil is a little heavy IMHO, and besides it stinks, literally.
Jeff
vinylkid58 said:
I personally use ATF (automatic transmission fluid) mixed 50/50 with something else. 80/90W diff. oil is a little heavy IMHO, and besides it stinks, literally.
Jeff
ATF reeks pretty badly too. If you own a vehichle, you probaly have a spare quart of 10w40 around. Just use that and it won't be a problem.
- Status
- This old topic is closed. If you want to reopen this topic, contact a moderator using the "Report Post" button.
- Home
- Source & Line
- Analogue Source
- Corian Turntable Fun