No one will probably ever take me seriously again!
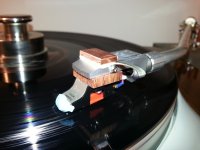
At the risk of looking like an idiot and permanently embarrassing myself I have posted a most implausible looking picture of how I am torturing my poor old Panasonic strain gauges.
These cartridges are light, typically 3.5gms and compliance extremely low, 8 x 10⁻⁶ dynes to 10 x 10-6 dynes, and track at high tracking forces as high as 4.5gms for an EPC-460C or EPC-465C, which are rather contradictory characteristics.
The 18gm AT Technihard is the highest mass head shell I have found off the shelf, and I have several of them, making them a reasonable starting point. The Schick was really designed for SPU cartridges weighing between 28 - 30gms, and even with the AT shell 21.5gms is too light for balance.
One of the other problems with the Panasonic is that the cartridge is rather squat which means with most modern arms and shells a spacer is required to keep the lower edge of the head shell from bottoming out on the playing surface. (I also cannot adjust my arm this low)
I have fabricated an ~ 3/16" (1.6mm) spacer out of Bubinga that is placed between the cartridge and shell. This has 3 benefits; it provides some additional mass (about 1gm), is quite lossy in the HF, and provides sufficient height to allow a reasonable arm height off of the record. (Note that I may try a copper spacer at some point with some gripping stuff to decouple the spacer a bit from the shell)
I'm still quite short of optimum mass for arm balancing, and for that matter given the low compliance of the 465C used on this arm, the LF resonance. I have added approximately 6gms of copper bus bar (I tried bronze but did not like the result.) this increases total mass of the head shell to about 28.5gms. I am using a bit of the gripping stuff or alternately blu tac to hold it in place. (I think I may prefer the blu tac to the gripping stuff here)
The little blob of blu tac on the nose is perhaps the weirdest bit, but is also quite critical. The strain gauge transducers are mounted in the relatively flimsy nose, and excite the housing, and therefore each other. The blu tac damps the end of the nose and reduces microphonics, ringing and coupling between the transducers. This might be the single most effective thing I have done.
It is worth noting that none of this would be necessary if these cartridges had been packaged in a better cartridge body. I am (apparently successfully) compensating for many of the failings of this body. I can only imagine what one in a proper body would sound like. These are excellent sounding devices with some effort.
Attachments
Despite being listed as an input transformer I would recommend the Lundahl LL1948 for this task. You may want to experiment with larger output coupling caps if you elect to go this route. (try it with the originals first)
You would wire the end labeled input in the transformer wiring diagram to the outputs of the pre-amplifier. On the input side ground the - side and connect the + side to the audio output. (Just use the board connections provided)
You have balanced or unbalanced outputs with the transformers. Reverse the connections on the right channel transformer secondary to flip the phase.
I will eventually build one with this option and can advise at that time what is needed to make it work best.
Attachments
Thanks for the info! At this point, I will try to complete the phono first. Once the phono works, I will try to add the transformer. Btw, do you have a retail source for the transformer? It sounds very nice that I can have balanced outputs, too. I would love to have balanced outputs to the preamplifier.
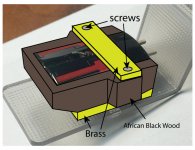
Actually, I am thinking of modifying the SG cartridge, too. Here is the plan. I will use epoxy to glue the cartridge in a wood body with solid brass as base plate because it seems to me that it is not easy to remove the motor from the plastic body. I will fill the gap between wood body and the plastic body with epoxy too.
Attachments
DaveG had some clear photos back on page 22-,#220 of the guts inside one.
I do like wood to be used somewhere along the lines of a solid foundation if rebuilding one.
Not quite sure yet what order of constrained layer damping..,.
Epoxy might prove to be too stiff, but it sure is easy to implement.
Hot glue might work well since it stays relatively soft and absorbent of resonance.
Drilling a hole in the front body and pumping some hot glue in would solve that end and of course be permanent with no further mods possible..,.
The only way to approach a rebuild would be to seperate all pieces on a table and pour a glass of wine and think it thru !
Regards
David
Last edited:
Not a good idea, the operating points of the tubes and CCS drift a small amount over time and I do not think it would be easy to tell the difference between internal drift and azimuth errors, it is pretty stable, but is it stable enough to permit the measurement of uV of DC error between the channels, that I doubt.. When you design using low drift op-amps with massive amounts of negative feedback to stabilize parameters, and high precision references it would not be too difficult to do, but that was not within the stated goals of this design.
(It is something I could consider adding in a future design if that comes to pass.)
(It is something I could consider adding in a future design if that comes to pass.)
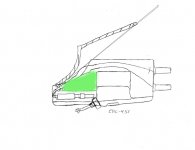
If anyone is rehousing a Panasonic strain gauge and has cad cam capability and can make drawings I have been offered what might be an opportunity to get some rather interesting cartridge bodies made. (Not sure of cost or time frame, but this is something outside of my current skill set.)
Well I have spent a couple of days playing around with the 450C I recently purchased on eBay, it initially seemed promising but suffered from severe distortion from about the midpoint of any typical LP.
I purchased a replacement stylus and continued to observe this behavior, and I noticed that the stylus was off kilter when installed on the cartridge.
I determined that there was some crude on the yoke and was able to remove it and reinstalled the stylus. It was definitely better.
The jury is out on whether or not the cartridge is defective or not, but I have set it aside for the moment and will come back to it later.
For the moment given its relative rareness and both the typically high cost of acquisition and OEM replacement styli I find I cannot recommend this cartridge. It's sole advantage is somewhat lower tracking force and higher compliance which make it compatible with lighter arms.
Given that the design is substantially dissimilar to the later cartridges which I have more experience with (as do most playing with strain gauges) I have to suspect that cost may not have been the only reason this cartridge design was not perpetuated in a later design.
What if mine is typical of the performance of any of these cartridges now?
Delighted to hear it!
Here is another prospect:
450CII in good shape.
Panasonic Strain Gauge CD-4 Cartridge EPC-450c-II + NOS 672-DQ (451c) Stylus | eBay
Here is another prospect:
450CII in good shape.
Panasonic Strain Gauge CD-4 Cartridge EPC-450c-II + NOS 672-DQ (451c) Stylus | eBay
Noted.
In fact, I think if the whole SG system can't meet performance exception, I will suspect the cartridge is the most dominant factor.
This is true I think, and it is clear that the cartridge is extremely sensitive to locale. Iteration and experimentation will get you there with effort, it is likewise possible to go to far so it is always good to be able to quickly backtrack to the last change. i.e. make one change at a time and vet it before moving to the next.
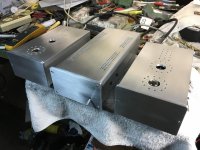
Been running up the whole enchilada for 5 hours to check if the cooling holes I added were enough since a stubborn insistence on using this type of enclosure required a lot of extra work..,.a more open bigger style enclosure is way easier
and sure many will be making it this way.
With 29 C ambient in my closed garage, and 103 F outside today ! - I redid the old single heat sink (58C without enclosure!) in the PS , with a copper sandwich on the bridge bolted to the side , and an infrared thermometer pointed on the bridge inside, its stable at 43 C and cool enough overall for a long life.
The phono boxes are running just warm to the touch and cooler than the PS enclosure overall.
I will initially be running it on a JVC QL -10 direct D just to break in the signal path and rubber suspension before transfering it to my air bearing platter/air bearing linear TA combo I built for the time being.
Will be Resurfacing the boxes and Anodizing everything when I get a handle on how to anodize myself and have already bought the sulfuric acid, plastic containers, distilled water, lead,water pump, etc. and already have numerous power supplies needed.
The ET2 short headshell TA I showed earlier , requires a new TT design in the works and ultimately where it will wind up in the end.
Regards
David
Attachments
- Home
- Source & Line
- Analogue Source
- Playing With Panasonic Strain Gauge Cartridges (And A Dedicated Phono Stage)