meanie
1) To fill and flood the cavities behind the chassis with silicon for the purpose of hoping to damp the chassis further. Then put it back into a new plinth, most likely using 5 pieces of 1/2 inch plywood sandwich together.
A modellers Clay/Putty such as the product Newplast has been shown to have good damping properties. ( To Damp is a one thing, selecting the cut off point is the skill, as an over damping can occur and may not be to your taste)
As your location is shown as Singapore, If Board Materials are limited to you and you are needing to purchase materials to produce a Plinth, have a look at increased compression Bamboo Boards, where the boards layers receive Vertical Loading and Horizontal Loading as part of the assembly.
I have seen reports where this type of Material has been referred to as a material that has attractive properties for Plinth use.
2) To remove the motor from the Sp10 chassis, and mount only the motor to the new plywood plinth.
This as a method is receiving a growing attention and those who are creating it and addressing the design for it correctly are reporting good results.
(again the compressed Bamboo Board Material might be better suited than a Plywood)
Definitely 2) IMO.
Mounting the motor in a plinth separate form the electronics has proven to be the best method. What this achieves is better control of vibrations generated by the motor. You can also build the plinth to brace the bottom of the bearing housing.
I have 2 SP10mk2's both in resin/bentonite plinths, one is in the stock chassis and the other is the remote motor mount. Put a stethoscope on the platter and tap the plinth, the stock SP10 is far more audible than the remote motor mount plinth. To say the stock one rings is a bit misleading but it clearly takes longer for the tap to damp than the remote motor SP10 which is a dull thud.
For plinth materials 24mm Permali or Panzerholts or Resin/Bentonite are the best materials to make a plinth from. As John said resinated Bamboo (chopping boards) is also very good and would be my preferred material over plywood.

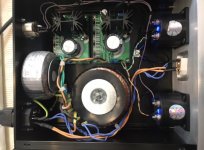
Re-capping the electronics is a waste of time, all caps on the electronic PBC's except C2, 4 & 6 on the Drive PCB are bypass for the electronics and will in all likelihood be good.
The PS by will need new electrolytic caps if it has not been done.
The purple Panasonic caps used in the SP-10MKII are generally regarded as average quality and are definitely past their useful life at this point. Most of these will show the tell-tale expansion at their bases.
C227 lives a hard life and 9/10 times will have physically leaked, and 8/10 that will have eaten away the traces on the PCB. If that has happened note that the through hole is also a via and repair accordingly.
C106 and C12-C17 are not bypass caps and the latter can lead to performance degradation of the drive.
Usage and environmental conditions play a significant role in how well these caps age. For units that have lived in hot and humid environments I routinely see green legs on at least half the caps in the motor unit. Similar for high-use units. And of course a capacitors health cannot be ascertained by physical signs alone.
Were these Elna's my advice would be different, but there is overwhelming evidence that these caps are on borrowed time.
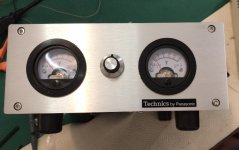
Hi everyone!
Hope i did not interfere with the current topic in this thread.
I am about to start rebuilding my 2nd SP10 MK2, and i need some advice from the Gurus here. Sometime back while i was restoring my first set, i hung the naked SP10 chassis for painting, and i accidentally knock it, it rang like a bell for a long time, this is no good!
So i was thinking to do the following:
1) To fill and flood the cavities behind the chassis with silicon for the purpose of hoping to damp the chassis further. Then put it back into a new plinth, most likely using 5 pieces of 1/2 inch plywood sandwich together.
2) To remove the motor from the Sp10 chassis, and mount only the motor to the new plywood plinth.
Both methods above allow me to use my 12 inch arm, whereas it obstruct the top cover when i mount it on the original Technics plinth.
Let hear it from the experts. Thank!
Be aware of trying to improve dynamic systems with static tools. Physical impulse "testing" doesn't really tell you anything about what's happening during playback, and the methods employed to damp any perceived issue may or may not have an impact to the sound, and that impact may or not be an improvement, whether objective or to someone preference.
If you do go down this route it would be great to do some before/during/after playback samples with controlled conditions as I've yet to see any data or valid testing put forth on these purported improvements.
Now you are getting close to mounting the mk2, before you close everything up, you might consider this tweak. To support the plinth ability as a sink for unwanted micro vibration, by padding the gap between the bearing cap and the plinth with a combination of lead sheet/flashing and barium loaded vinyl sheet. The vinyl will allow some compliance when CAREFULLY snugging down the plinth bolts. The idea is to better damp any ball/thrustpad noise by contact with the plinth mass. Care need to be taken to get just the barest amount of pressure on the bearing cap. The thin rubber membrane covering the bearing will also provide some compliance. I haven’t measured the effectiveness, but it seemed to do no harm. Warrjon has taken the principle further with a bearing brace in the Kaneta style plinth.
Bon,
Thanks. Will mass loaded butyl rubber work. And, why the lead?
Thanks,
Don
I second that. Sheet lead is soft enough to deform on contact with moderate snugging down. If you make the sheets full size it will contact the four fibre pads at the corners of the chassis base as well as the bearing cap. Lead is a health hazard but used with care in an isolated enclosure, the risk is minimal.2 sheets of 1.5mm lead to fill the void. it needs to be in contact with the chassis and plinth.
Using the 140v line is a great idea, I use it myself for an extra 32.5v supply fed in thru the power lead which means the control and drive pcb no longer share a supply.
Can you comment on any audible improvements using the modern quartz updating ?
Not yet. This is my first motor. And I really wanted to hear what happened. However, I am going to build a second project ... I will definitely test the modification. I will post the digitization to those who wish, my tape recorder will show if there is one. I'm 90 percent sure that she will ...
What lead does is allow vibration energy to pass more easily between certain metals.
As vibration energy travels through any medium it will reflect at a boundary. The amount of reflected energy will be dependent on the differing Acoustic Impedance (AZ) between the materials.
For example lets look at aluminium and brass.
An aluminium rod with vibration passing. As the energy hits the end where it meet air over 90% of the energy will be reflected back. If you add a brass end on the Al bar 13% energy will be reflected at the boundary. By adding a lead disk reflected energy drops to 5%.
I only have AZ for Polyester resin which is 0.29 Al is 1.73 so having the Al in contact with the resin will result in less reflection. So for the top of the plinth / chassis I would use no gasket.
It's more difficult where the bottom of the SP10 meets the plinth so lead here will result in a slight increase in reflected energy over having the bottom of the chassis in intimate contact with the plinth, but it's far better than having the chassis bottom in free air. I would add holes in the lead so it's in contact with the Al base not the feet on the base.
Reflected energy % at a boundary above critical angle.
Al to air = 91%
Al to Polyester = 51%
Al to Lead = 5%
Lead to Polyester = 65%
Last edited:
2 sheets of 1.5mm lead to fill the void. it needs to be in contact with the chassis and plinth.
... so having the Al in contact with the resin will result in less reflection. So for the top of the plinth / chassis I would use no gasket.
It's more difficult where the bottom of the SP10 meets the plinth so lead here will result in a slight increase in reflected energy over having the bottom of the chassis in intimate contact with the plinth, but it's far better than having the chassis bottom in free air.
This supports my experiments and observations, with about 10 completed resin/bentonite plinths so far. The plinth does the heavy lifting as far as vibration control is concerned. Improving the contact of dynamic components such as motor/bearings, tonearm base, with the resin/bentonite plinth brings audible benefits.
Improving the contact of dynamic components such as motor/bearings, tonearm base, with the resin/bentonite plinth brings audible benefits.
This got me thinking, so I thought I would run the numbers through my calculator.
Extruded aluminium has a grain structure and AZ will be different for longitudinal and shear waves, a good rule of thumb is shear will be about 50% of longitudinal.
Aluminium arm base's are made from round bar where the longitudinal will be in the vertical plane. Adding an aluminium arm board between the resin/bento plinth made from flat plate with the grain running horizontal will drop reflected energy from 51% to approx 15%.
For the EPA100 with a base made from Stainless Steel adding an aluminium arm board will reduce reflected energy at the base from 77% to 45% and adding a lead gasket will drop this to 6%.
- Home
- Source & Line
- Analogue Source
- The Incredible Technics SP-10 Thread