Any ideas why the old bearing ended up like that? The bronze did not retain oil and failed to lubricate? The spindle lacked proper hardening? The more i look at this, the more perplexed i get.
This is a simple machining finish problem. What you need to do is polish both surfaces.
Do not attempt to run in the surfaces, that is a very bad idea. Particles from the steel will embed into the bronze, causing the bronze to actually wear the steel surfaces.
Go to the Klingspor website. They have a sample kit of abrasive cloths which run the range from 2000 grit equivalent up to 12000 grit equivalent. Work your way up from the 2k to the 12k in steps. I typically use 2,4,6,8, then 12. BTW, the 12000 grit produces an optically clear finish on Lucite. (yah, I do use reading glasses).
Always polish the surfaces by rotation, do NOT run the abrasives up and down (radially). And, it is not entirely necessary to remove every single solitary scratch on the surfaces as long as the scratches are circumfrential. Since you are not removing significant meat from the surfaces, you can use your fingers and pinch the cloth over the shaft. If you are uncomfortable using fingers, a simple tongue depressor backing will help when using the 2 or 4k. But fingers is good for 6 up.
For the bronze, same deal. But you may find it necessary to be a little more aggressive as the marks there are abysmal. But first, I would recommend trying the cloth.
This is a typical problem with antique clocks by the way. It's possible to go crazy with tools and techniques, but I find that teaching the students how to do it by hand first helps understanding. Using tools here can easily run you past where you want to be, then you will indeed be replacing the bronze.
jn
Last edited:
This is a simple machining finish problem. What you need to do is polish both surfaces.
Do not attempt to run in the surfaces, that is a very bad idea. Particles from the steel will embed into the bronze, causing the bronze to actually wear the steel surfaces.
Thanks JN and a couple of questions:
1. I experimented a bit on the "old" spindle before sending it back to the factory. Using car polishing compound and a sling brought fast and immediately audible/visible improvement. As this, unlike the abrasive kit is readily available, is it a bad idea to use it again?
2. Seeing how soft the spindle material is, why don't they do any polishing at the factory? Could there be an engineering reason for that?
3. Would polishing the bronze bushings not reduce their surface porosity? Is there a safe way of doing it?
4. What is worse for a tt bearing: noise or play?
A few tt bearings seem to use teflon rather than metal bushings. Among the ones i have owned are the LP12, Logic DM101 and from what i recall - the Trio L07.
Advantages/disadvantages to teflon bushings?
The Trio was the only one with a platter of comparable mass, but it was partially magnetically supported and there was no lateral pressure on the bushings - it was a direct drive.
Advantages/disadvantages to teflon bushings?
The Trio was the only one with a platter of comparable mass, but it was partially magnetically supported and there was no lateral pressure on the bushings - it was a direct drive.
Thanks JN and a couple of questions:
1. I experimented a bit on the "old" spindle before sending it back to the factory. Using car polishing compound and a sling brought fast and immediately audible/visible improvement. As this, unlike the abrasive kit is readily available, is it a bad idea to use it again? Sounds reasonable. Make sure it gets cleaned out well.
2. Seeing how soft the spindle material is, why don't they do any polishing at the factory? Could there be an engineering reason for that? Don't think so. Maybe somebody in the line retired and didn't inform engineering what was done to make the product good.
3. Would polishing the bronze bushings not reduce their surface porosity? Is there a safe way of doing it? Might a little, but just toss some synthetic nano-oil in. I use 5, 10, and 85 weight for clock work. Organic oils oxidize, gum up, then allow metal to metal.
4. What is worse for a tt bearing: noise or play? Noise in any case is unacceptable. Play with polished surfaces lubed, no prob unless it affects operation.
jn
Auto rubbing compound is good stuff. It comes in coarse and fine- I'd stick with fine unless things are really bad. Just be sure to clean it well before use. IMO, factories hate hand work; machine it and ship it.
Fitting perfect spindles to perfect holes is somewhat of an art. Working purely by hand you tend to mess up geometry. It gets shiny, but may not be perfectly round, constant diameter or straight. Using loops of stiff paper, rather than fingers, is better because the geometry is maintained better. I've never enjoyed hand lapping or polishing a bore. The ultimate method is with a Sunnen honing machine and sometimes you can find one at an engine rebuild shop. That guarantees perfect geometry and finish, but you need to start with an undersized bore. The best you'll do here is to knock off the high spots unless you can have a new bush fitted. I'd start with a wood dowel, split with a saw, and with a flat head screw in the end to spread the halves. Load it up with compound and spin away, taking care not to work any one area too much.
Fitting perfect spindles to perfect holes is somewhat of an art. Working purely by hand you tend to mess up geometry. It gets shiny, but may not be perfectly round, constant diameter or straight. Using loops of stiff paper, rather than fingers, is better because the geometry is maintained better. I've never enjoyed hand lapping or polishing a bore. The ultimate method is with a Sunnen honing machine and sometimes you can find one at an engine rebuild shop. That guarantees perfect geometry and finish, but you need to start with an undersized bore. The best you'll do here is to knock off the high spots unless you can have a new bush fitted. I'd start with a wood dowel, split with a saw, and with a flat head screw in the end to spread the halves. Load it up with compound and spin away, taking care not to work any one area too much.
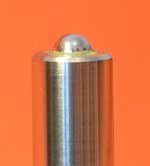
Been working for an hour on the spindle. Alternating a sling and some thick rubber backing to keep pressure uniform while applying chrome polish yielded considerable improvement. As an almost unattainable comparison standard i keep the spindle of a cheapo Thorens TD 150 next to it. The nail scratch test indicates there is still a long way to go.
As for the bushings - i honestly have no idea. The spread wood dowel idea may work on the upper bushing, but the lower one is not only deep, there is also no space between it and the super-duper Tidorfolon plate. So, there is simply no way the lower part of the bushing can be smoothed without damaging the bearing surface.
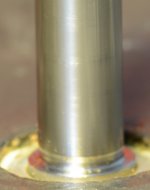
As mention earlier, it is not possible to disassemble the bearing well from the bottom, which is also seen from the AS promotional literature
http://www.drhifi.net.au/New Equipment/Acoustic Signature/Acoustic Signature Tidorfolon Bearing.jpg
As for the bushings - i honestly have no idea. The spread wood dowel idea may work on the upper bushing, but the lower one is not only deep, there is also no space between it and the super-duper Tidorfolon plate. So, there is simply no way the lower part of the bushing can be smoothed without damaging the bearing surface.
As mention earlier, it is not possible to disassemble the bearing well from the bottom, which is also seen from the AS promotional literature
http://www.drhifi.net.au/New Equipment/Acoustic Signature/Acoustic Signature Tidorfolon Bearing.jpg
Last edited:
The Tidorfolon part seems to be fitted in with a thread from the other end.
Bushings are sometimes fitted by using the thermal contraction/expansion method: they just fit when frozen, and they fit very tight when expanded at room temperature. I would try a freezing spray...
LIQUI MOLY - Motor Oils, Additives, Car Care - Products - Kälte-Spray
Bushings are sometimes fitted by using the thermal contraction/expansion method: they just fit when frozen, and they fit very tight when expanded at room temperature. I would try a freezing spray...
LIQUI MOLY - Motor Oils, Additives, Car Care - Products - Kälte-Spray
The Tidorfolon part seems to be fitted in with a thread from the other end.
Don't know about a thread but i can assure you there is no slot for a screwdriver. As i have an extra housing i can always drill through the Tidorfolon to get to the bushings and then choose a less exotic friction plate.
After polishing the spindle for a while, it now looks pretty much like a spindle, rather than the pin on a weight-training machine. Dropped it in, let it run. Not completely silent but a huge improvement. Will let it run for a week and then inspect it.
What really p***es me off is that the same treatment on the old worn-out spindle would have achieved a similar result without the added cost of shipping a platter back and forth and paying for a new bearing. My blind faith in German engineering needs to be re-examined.
Last edited:
If it was mine I would consider removing the bottom plug any way you can and taking a smaller diameter engine valve or drift punch and quickly heat the top section with a propane torch and start tapping the upper bushing's perimeter all around to get it out.
After you have polished the shaft to your satifaction you would need a replacement that fits the shaft.
The problem is finding an oilite bushing to fit the outer Dia. The outer Dia. Can be machined to fit and a taller bushing might be better with more surface area.
The bottom bushing might not be a serious noise contributer but do what you can with the upper one since this area always takes the most wear.
The other option is to machine teflon side plugs ala. Well Tempered style and adjust away.
You could even do a 3 top and 3 bottom teflon side plug if the 2 top 2 bottom style Well Tempered arangement is not to your liking.
Well , I have Final Tool MK II with exactly the same platter and bearing .It is filled with oil since I could see oil bath on the top of bearing (or it's just oil from the bushing). It is very smooth and quiet. I will be home in about a week and will try to take some pictures if you still need it . For now if I were you I'd just pour some 5/50 synthetic oil and would not worry about a few hair lines on the shaft. If factory says that the noise should go away with run in it should go away . If not they should arrange for pick up or pay for shipping and do it again. My 5 cents . DO NOT go with any DIY , custom machinist and "best diy bearing in the world " waste of time and money. My 5 cents.
Last edited:
I will be home in about a week and will try to take some pictures if you still need it .
Thanks. I will really appreciate this. I wouldn't be so paranoid if i didn't see the old destroyed bearing. And the new one making very similar noises to the old. And 3 days of continuous running in with no improvement.
Of course, there is no way to know for certain if the machinist who made your bearing is still doing the job...
Any specific reason to recommend the synthetic oil? Is that what you have been using?
My friend has an old Acoustic Solid Royal with similar bearings .After many contradictory posts I don't know who stole the design from whom (Acoustic Solid from Acoustic Signature or vice versa ) but they were virtually identical for many years. My friend tried to find out what kind of oil he should use. I contacted distributor of Acoustic Signature (Acoustic Solid rep was clueless ) and he advised few drops 5/50 synthetic oil. The reason I advised against DIY solution was that the bearing type appears to be optimal for the platter you have and you spent enough money already. If you didn't offend Germans too much try to work out the problem in polite , professional manner .It almost always works.
My friend copied Teres/Galibier bearings (which appear to be much more advanced ) and Acoustic Solid platter and results were not great. I tried to warn him that Thom Mackris of Galibier remarked once that somehow their bearing doesn't sound optimal with uniform aluminum platter. PVC , acrylic or combined platters were fine
but (my friend ) wanted to have it his way. Best of luck and once I get home I'll pull my platter and post some pictures .Rgrds,L
If you didn't offend Germans too much try to work out the problem in polite , professional manner .It almost always works.
Tried it and didn't work. After seeing the pics they said they would talk to the technician who did the work. After that - silence.
A one off repair/replacement like this for a dubious third world customer probably does not get their full attention. And there may be a few fine touches that full sticker price paying customers enjoy. Who knows?
The story about your friend with the inverted bearing is incredibly useful and appropriate - a big thanks!
This design looks like a total hack job. Seems to me no matter who designed and fabricated these components should have done a much better job..
I've worked with toolmakers that saw customer prints that called for a +0.0000 -0.0001 tolerance on the spindle shaft and a +0.0001 -0.0000 on the bearing in a motor assembly for medical instruments... Just to be sure they met the customers requirements the cut the tolerances in half. Of courses Supermic was needed to measure the parts but they easily met spec.
If you can find a journeyman toolmaker he should be able to do what's needed. If the shop has Sip grinders then that's an indication you are working with quality machinists.
Last edited:
Hi P...., (ok let's stay anonymous for the moment)
spent the better part of the night reading through this thread and sorting the chaff from the wheat. Now I really regret that I couldn't visit you a couple of weeks ago...
I was thinking hard what to do in that sad situation. Maybe you are right in your remark about 3rd world customer. Bastards!
First I have some questions.
- do you have access to a micrometer to measure the spindle in 3-4 points over the length? A caliper would possibly not precise enough.
- I remarked a black spot on the lower end of the bearing sleeve (pic in post #29). I first had the impression the bearing was totally closed, but this seems not to be the case. Is this the infamous Tidorfolon?
Now my plan - you see I like a challenge!
If you can measure the (polished as best as you can) spindle as mentioned above (to 0,01 mm resolution), then send me the bearing housing. I will remove the Oilite bushings and replace them with Bronze bushings. If necessary I would cut off the lower part of the bearing and use a screwed-on cap, maybe with another thrust plate (different possibilities here, to discuss). It seems the diameter of the housing is sufficiently large to do this.
The only unknown in this is that I cannot check it on the actual spindle - except we make some to-and-fro postal traffic. I agree that sending the heavy platter is a no-no, and I would advice against trying to remove the spindle.
To show that I'm able to do that I add a picture of another bearing I built some weeks ago (If I manage to do this, that is...no preview available here)
If you want I can give you a phone number in your city where you can ask about me...
Greetings, H.
spent the better part of the night reading through this thread and sorting the chaff from the wheat. Now I really regret that I couldn't visit you a couple of weeks ago...
I was thinking hard what to do in that sad situation. Maybe you are right in your remark about 3rd world customer. Bastards!
First I have some questions.
- do you have access to a micrometer to measure the spindle in 3-4 points over the length? A caliper would possibly not precise enough.
- I remarked a black spot on the lower end of the bearing sleeve (pic in post #29). I first had the impression the bearing was totally closed, but this seems not to be the case. Is this the infamous Tidorfolon?
Now my plan - you see I like a challenge!
If you can measure the (polished as best as you can) spindle as mentioned above (to 0,01 mm resolution), then send me the bearing housing. I will remove the Oilite bushings and replace them with Bronze bushings. If necessary I would cut off the lower part of the bearing and use a screwed-on cap, maybe with another thrust plate (different possibilities here, to discuss). It seems the diameter of the housing is sufficiently large to do this.
The only unknown in this is that I cannot check it on the actual spindle - except we make some to-and-fro postal traffic. I agree that sending the heavy platter is a no-no, and I would advice against trying to remove the spindle.
To show that I'm able to do that I add a picture of another bearing I built some weeks ago (If I manage to do this, that is...no preview available here)
An externally hosted image should be here but it was not working when we last tested it.
If you want I can give you a phone number in your city where you can ask about me...
Greetings, H.
This was a really nice surprise H ")
And an even kinder offer!
As mentioned earlier on, i do have an old housing which is just perfect for experiments. Indeed, the black spot on the bottom is the patented substance you mentioned.
After polishing the spindle i ran it for a few days, while working on the drive system. Not sure if i've put more than 24 hours of total run time but there is already a marked ridge, where the bushings touch the spindle. As much as i hate to admit it the current combination of spindle/bushings is just unusable.
Attachments
- Status
- This old topic is closed. If you want to reopen this topic, contact a moderator using the "Report Post" button.
- Home
- Source & Line
- Analogue Source
- Modern bearing engineering, a sad story