Well ,Micro Seiki used bronze (gun metal )platter in their best tables so it may be OK in the base cross.I wanted to incorporate a lead/oil filled chambers but machinist was beginning to look at me with a strange face so I decided to save it for future ") Thank you for rubber band (O-rings tip )!!! I have original Teres bearing and clone of Galibier PVC platter and crude Anvil weight but enough it's an off topic.
Thank you for rubber band (O-rings tip )!!! I have original Teres bearing and clone of Galibier PVC platter and crude Anvil weight but enough it's an off topic.
Isn't Merril Heirloom table ($8k ) a tweaked version of AR player ? The deck has some potential.
Thank you for rubber band (O-rings tip )!!! I have original Teres bearing and clone of Galibier PVC platter and crude Anvil weight but enough it's an off topic.Isn't Merril Heirloom table ($8k ) a tweaked version of AR player ? The deck has some potential.
For the platter rotation there are two answers :
- one of the two coils in the motor is broken ;
- or the capacitor is dead.
Had AR used a two phase motor that explanation might have been correct.
AR engineered a smaller motor to get the main motor spinning in the correct direction. It didn't always work. This was the AR I bought about 1963. The second AR that I bought about 1967 has only one motor and does not have the random rotation problem.
I had no knowledge of that particularity.
You say they are two motors in the first release of the AR ?
I found a page that has pictures of the differences. The newer design is much better, although the stylus in mine still sits at an angle.
A Photo Comparison of a “New” and “Old” AR XA | Vinyl Nirvana AR Turntable Acoustic Research Merrill Thorens For Sale
Here is mine clunker in works for ...I stopped counting years and money
You Sir are now officially my hero.
And the steam punk in the pics - a museum piece, no less. A Vienna Technical Museum piece, to be precise.
I found a page that has pictures of the differences. The newer design is much better, although the stylus in mine still sits at an angle.
A Photo Comparison of a “New” and “Old” AR XA | Vinyl Nirvana AR Turntable Acoustic Research Merrill Thorens For Sale
Very, very interesting !
Thank you.
nanook's 219 equipped diy TT.
Well, I replinthed my old Sugden and added my "219" tonearm. Added a used Ortonfon MC3 Turbo. Under CAD $120 total for the donor Sugden, materials for the plinth and the tonearm, and cartridge. Keeps upto my Alex/SME 309/Grado Sig8 MCZ, and in some ways betters it.
Well, I replinthed my old Sugden and added my "219" tonearm. Added a used Ortonfon MC3 Turbo. Under CAD $120 total for the donor Sugden, materials for the plinth and the tonearm, and cartridge. Keeps upto my Alex/SME 309/Grado Sig8 MCZ, and in some ways betters it.
Attachments
Mine is not finished yet
started my project a few weeks ago. i stripped a busted technics SL-23 for its spindle bearing and electronics. My father-in-law has made 4 turntables out of cannibalized vintage ones for himself and friends and encouraged me to make my own, I have a mint Pioneer PL-540 that has been my main TT for a few years.
I made separate plinths for the tonearm/platter and the motor electronics, they are both 6 layers of 3/4'' baltic birch ply. the top two layers are glued, then dynamat then the next three layers are glued and the bottom layer is loose, then 1/4" 3.5 long bolts hold everything together. the tonearm board is two layers separated so i can change arm boards in the future if i design or buy different tonearms. Unexpectedly the Dynamat it sandwiched unter tension from the bolts and keeps flowing out the sides of the plinth, i migh make thin spacers to keep the tension off or just wait an see if it stops. I had never worked with the stuff before, aparently it is sme sort of non newtonian fluid material. I thin it has an affect on deadening the plinth but not enough to justufy the cost-50 bucks for this project.
Under the tonearm board is a space where i can mount a boozehound labs jfet phono preamp, i plan on shielding that little box with copper foil and mounting a power supply externally.
the bearing felt a little rough so I polished it with jewelers rouge by spinning the spindle in the sleeve with an electric drill, it is very smooth now. Then turned a 2 inch rod of aluminum down on the lathe to fit the spindle sleeve and mount it in the biggest hole i could make with a spade bit (1 3/3").
the electronics were fairly straight forward to mount. i cut each layer of plywood out to mach the pattern i wanted, mounted the motor inside and routed out a place for the knobs. Speaking of knobs; i plan on making nice plywood ones to replace these cheapo plastic bits. I replaced the incandescent strobe bulb with a blue LED it looks cooler but is hard to see in a lighted room
the tonearm was made in one afternoon and is definitely a rough draft. It is a basic unipivot design; 12 inches long from pivot to needle tip. I turned the base on the lathe to as fine a point as possible and made an apposing cup, it is all aluminum. i found some jewel bearings on amazon and i have some very very hard steel that i will turn down for the final version. The arm is BB ply shaped with a belt sander and the brass screws make for fine azimuth and tracking weight adjustments, i was able to get exactly 1.8 grams for my ortofon 2m blue, and the azimuth was easily adjusted as well. The wire is some where in the 30-40 gauge range solid core enameled with a fabric sleves, father in law swears by this stuff and he has a huge roll of it, im going to try some ebay LITZ wire as well.
I played it for the first time before I left for work, when i took the pictures, it sounds surprisingly good, i was working at my father in laws house so i didn't have time to play it on my system but it was vey quiet , no rumble noise, no tracking issues, the speed selector switch need to be cleaned a bit. Overall i am very happy with my prototype, and the sound will only get better as i work on more.
total cost (not including cartridge) im guessing has been around $200, one sheet of BB ply-$60, bolts and hurricane nuts and spike feet- $70, dynamat- $50, aluminum rod-$20 the tt was free.
Hi.
Looking at these lovely threads inspires me.
Anyway i thouhgt i might join you in here, so heres my first tribute.
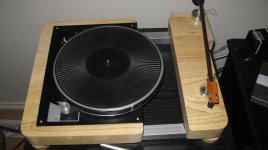
My deck cost me about $490.-
Micro Seiki Solid 1 belt drive motor-Modified Rega RB250 with red Ortofon needle-clamp from ebay, and DIY plinth and platter.


Looking at these lovely threads inspires me.
Anyway i thouhgt i might join you in here, so heres my first tribute.
My deck cost me about $490.-
Micro Seiki Solid 1 belt drive motor-Modified Rega RB250 with red Ortofon needle-clamp from ebay, and DIY plinth and platter.
Last edited:
Like this
To add a photo, files or non standard files.
First click "go advanced" in the box below the "quick reply" message box. Doesn't matter if you decide half way through a message to do that, it carries it forward.
Then click "Manage attachements". Maximise the new Window so that you can see all the text.
Click browse in the first box at the top and find your picture. Repeat for any more pictures.
Click upload... a message appears "uploading"
When complete the files will show as being attached. Now click the small text that says "close this window"
The pictures should now be attached and when you submit your post they will appear.
Make sure your pics aren't too big, a couple of 100k is plenty, and many members object when they are massive and it alters the margins
It tells you in the attachments window what max sizes are allowed.
If you want to attach a file that has a non standard format for example excel, circuit simulation etc then try putting the files in a zipped folder and attaching that.
You're welcome. You can also upload pictures to the gallery and paste links from there to get pictures to show "inline". Post #243 here.
http://www.diyaudio.com/forums/tubelab/157491-pictures-your-tubelab-amp-13.html#post3590060
http://www.diyaudio.com/forums/tubelab/157491-pictures-your-tubelab-amp-13.html#post3590060
started my project a few weeks ago. i stripped a busted technics SL-23 for its spindle bearing and electronics.
Nice! Did you use the original SL-23 platter? You might try adding some damping material to the platter to add mass and damp resonances.
Blue LED's are notoriously noisy, you might do better with a red or amber one, which would also look more "original" and probably be easier to see.
- Status
- This old topic is closed. If you want to reopen this topic, contact a moderator using the "Report Post" button.
- Home
- Source & Line
- Analogue Source
- The simple AR Turntable challenge