Lots of info in a short while .. thx to all !
The more I observe and study the arm + literature , but also having it playing records of course , I seem to get the picture more clear . which I consider the best way to learn .
Yes , I do enjoy this arm more than my ordinairy gymbal arms so far .. and working on more carriage and wand contructions meanwhile . I wasn't aware that somewhat higher vertical friction can be beneficial ( damping properties ) .. sounds plausible .
Paul
Last edited:
Bob,
I have had flawless success with them, maybe go for 8mm bearings as they are more common and work almost as well as 9mm. Also, my bearings are 3mm wide, maybe just maybe parts choice is mor important than I thought, as 12mm bearings did not work near as well. As the bearing gets larger I can see a need for degreasing, but not apparently necceassary for the smaller sizes it seems.
Colin
I've been working with 8mm rods and linear bearings. Polished the rod to a high gloss shine (mirror), degreased with "WHITE GASOLINE" (in Mexico it MAY BE the common name for Benzine) both rod and bearings, removed the bearings dust cover and TA RA, it worked.
I'm trying to make something similar to what "kiirojbl さんのチャンネル" is doing. In case you don't know his project you can find it here:
http://kiirojbl.exblog.jp/i109/
RGDS
PEMO
To all,
I think there should be a thread devoted to cartridge loading, this is off topic somewhat but playing with different mm carts I'm realizing as others have found that 47k is mostly always not optimal and could save a lot of cash for those who wonder why they all sound so different. With adjusted loading many surprisingly sound the same. Loading the At120e at 40.7k makes it sound world class, seems an optimal loading for this cart. Kind of makes me kick myself for not designing Adjustable loading into my phono stage.
Colin
Pemo,
Very aware of that arm, cool design but have my own reservations on its long term use and the fact I can't find a single video which offers a clear view of what the stylus is doing on off center records, this is a biggie and the little I can tell is there is a delay in reaction time to this issue which tells me more stress than I'd like is placed on the stylus.
Colin
Pemo,
Very aware of that arm, cool design but have my own reservations on its long term use and the fact I can't find a single video which offers a clear view of what the stylus is doing on off center records, this is a biggie and the little I can tell is there is a delay in reaction time to this issue which tells me more stress than I'd like is placed on the stylus.
Colin
Hi Colin, with biggie, do you mean heavy or big in size?
I was thinking on using carbon fiber pipe for the arm to reduce weight and of course inertia, vibration, and looks.

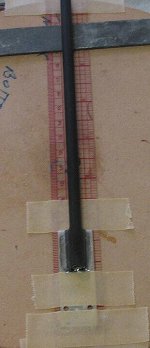
By the way. An issue I found with the chromed rod and linear bearing is temperature. When I started working with this, the temperature in Mexico City was around 22 °C. Now that temperature started dropping (5-6 °C in the morning or late night)
 , the linear bearing sticks a little in some parts of the length of the rod, which is logical.
About your other comment on the forces on the stylus, do you have any recommendations, now that I started working in this turntable?
Best regards,
PEMO
To all,
I think there should be a thread devoted to cartridge loading, this is off topic somewhat but playing with different mm carts I'm realizing as others have found that 47k is mostly always not optimal and could save a lot of cash for those who wonder why they all sound so different. With adjusted loading many surprisingly sound the same. Loading the At120e at 40.7k makes it sound world class, seems an optimal loading for this cart. Kind of makes me kick myself for not designing Adjustable loading into my phono stage.
Colin
Colin , since I noticed the importance of proper cart loading .. all my phono amps are equiped with a good Q rotary switch so I can switch between many values . roughly between 10K and 100K , steps such as 22K , 33K , 47K , 62K etc.
Perhaps a variable pot ( quality ? ) would give more precise tuning abillities . but I can assure that opt. cart load is absolute MUST ! one and other is pretty much predictable and easy to calculate .. inductancy , coil res. , capacitance etc.
Thought there was a large thread somewhere on this forum , or else AA or so .. will try to find it and share . very interesting read tough .
THX
Paul
Glass, Steel & Alternate Methods
[Addendum – Not being able to post the photos and text below earlier due to the ‘photo upload’ problem makes some of the material outdated already. Mounting an Ortophon Super OM cartridge (4.6g), with clips, and setting the pivot center point to nominal stylus position at 2 3/8” the maximum tracking force available WITH NO COUNTERWEIGHT is about 1.4g! The OM wants about 1.6g. Hence the counterweight portion of the wand will have to be shortened. More on this later. Apologies for my inability to post updates in a timely way. JRW]
I've been gone since 21Oct and doing a bit more than polishing my SS rod. One man's junk bin is another's treasure chest. I want to thank ChrisG for posting photos of his mounting method - it is not clear even now how whether there is movement possible inside the lower washer?
In the course of fabricating my carriage a number of observations have occured which I will relate - the bottom line being, there are a number of operating tonearms 'out there' already using Colin's design. The question is always, what is relevant to getting the best possible sound with minimum expense and effort. Obviously I've ignored that rule.
Many photos below of an alternative fabrication method for the 'yoke' portion of the carriage - to the point of minimizing weight. So to a 'Money shot' of the carriage:
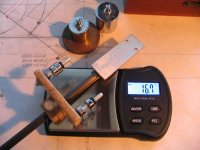
Weight_tonearm - With a freshly calibrated digital scale of 0.1g resolution, and without counterweight, cartridge, clips or wire = 16.7g. The wand is a 7" length of an Easton 3-39/440 carbon fiber over aluminum competition arrow (obtained as a throwaway)[ note above about the wand being too long, i.e too heavy]. The headshell is magnesium. The yoke is a balsa composite. The bearings are ACER C036 1/8"x3/8" (1/8" ID) Ceramic R2 ball bearings. The bearing axles 1/8" aluminum tubing. The 6 shoulder washers are 1/8" ID transistor mount insulators. The question is, is this attempt a creating a minimum weight carriage relevant?
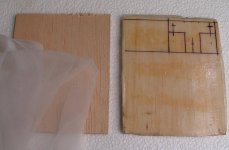
Balsa_composite - Many years ago I received a sample of the Baltek Corp's "Decolite Composite Panels" of balsa core and fiberglass skin. I had 1/4" thick balsa and nylon mesh in my junk bin. "5-minute epoxy" is cheap, it only took hours and hours ....
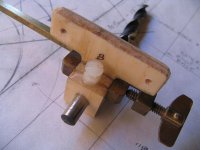
Carriage_assembly - The Easton arrow measure 0.266" diameter with a digital caliper. A 17/64" drill bit is needed, and some tweaking. The epoxied mesh is fragile, and will tear away from the balsa if not treated delicately. Nylon hardware for the 'adjust' screw. Balsa grain oriented vertically.
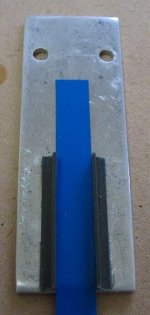
Bearing_assembly – I obtained the bearings used because I didn’t know any better back in July when I purchased them. I read the thread and it seemed then that ‘ceramic’ bearings were the version to purchase. It is apparent that advice has changed – as has ‘removing’ the dust shields and the lubrication. There has been some lack of clarity along the way.
A precision V-block is needed to glue (superglue) the aluminum axles in place. Of note, using a calibrated 0-5g digital scale each bearing weighed 1.07g. The yoke weighed 4.65g without the bearings and end-holder shoulder washers, but with the nylon adjustment hardware in place. The brass spacer between the bearings is 5mm wide. Great grief ensued during the gluing of the shoulder washer end caps. I used 'thread locker glue' on the end caps. Actually stark terror was the emotion for a bit of time. Things had to be redone once. In the end the outer bearings were glued in place along with the end cap due to the wicking action of the threadlocker glue. I gave up at that point, but as it turns out there isn't a problem. Be careful with wicking glue!
Headshell - The headshell is from a piece of magnesium stripe that's been in my junk bin for over 30 years. There's an interesting tout by a bicycle frame manufacturer online touting that magnesium is the most highly internally damped metal - and it is much lighter than aluminum. The short black pieces (superglued) are plastic L-angle (see below).
Wand_assembly - 5-minute epoxy again, attempting to make sure everything is straight and true. Of some note at the top of the photo is the piece of magnesium from which the headshell was cut. Magnesium 'rust' is a wonderful velvet black.
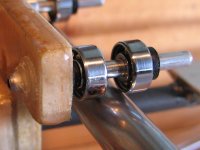
Polished Bearing Edges - Now we're getting to the nitty gritty! The resolution of this photo should be sufficent (at full size) for you to see the inner polished edge of the outer front bearing. Compare it to the outer edge of the inner bearing (closest to the yoke). You should be able to see the the outer edge of the bearing isn't so wonderful. The aluminum axles were polished too. Also note the nominal surface finish of the (only 15 minutes of hand polish) 17-4 Stainless Steel rod. More below.
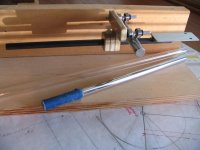
Tonearm_glass_steel - Now we come to where the madness meets the road as it were. I used the remaining cut off SS rod to create the fixture for further testing regarding creating an 'optimum weight' counterweight. Note both the 10mm borosilicate tubing and the 'almost polished' SS rod. Compare the polish of the rod to the SS rod inserted in the fixture.
But first more on the bearings: Their dust shields were removed and I put them in a bath of acetone, leaving them there for some time. Too my horror when I came back to them, there was obvious corrosion on the outer races and on the sides! The corrosion seemed to be associated with globs of the bearing lubricant adhering to the metal in the acetone solution. What was happening on the inside of the bearings?
Oh well, I've already written about the edge polishing (a timely process). Using an Xacto knife and 600grit sandpaper I polished the corrosion off as much as possible. The local Costco had a sale on "Dust Off" compressed gas, so I bought the six-pack. With all the bearing polishing with the dust shields off who knew what was going on inside the bearings.
That led to a sequence of four washings for each bearing with compressed gas 'exercising' between each washing. The Dust Off spun those little bearings up to 'singing speed', those babies were whining. After each wash the bearings seem to spin for longer and longer times - maybe 15 seconds of spin or more at the end after the gas was removed.
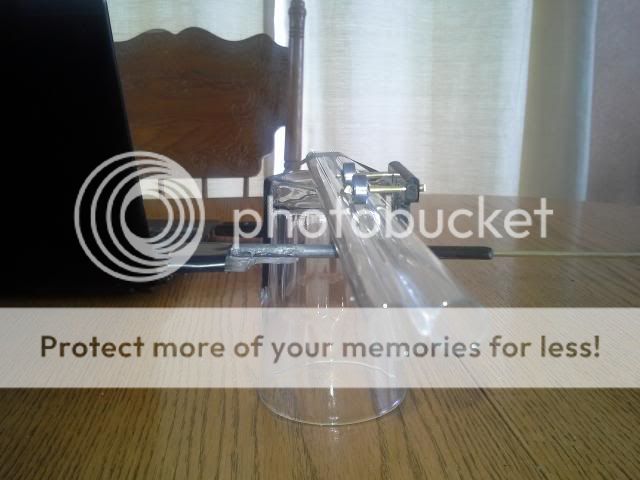
A felt-tip mark on the outer race of each bearing showed that they were all rolling equally on the fixture's rod. Then an 'wild and crazy' idea occurred to me, could I balance the carriage on both the longer polished SS rod and the borosilicate tubing and get some sense of 'how it rolled'? There was a bit of a shock coming.
My goal with the SS rod was to achieve a state of polish such that I couldn't see any imperfections under magnification of a x10 loupe. Foolish goal. Long story, but I ended 'dry polishing' the rod (in all my spare time in front of the TV) using "Bar Keepers Friend (since 1882)" cleanser & polish on a piece of T-shirt. Yep, the rod was smoothing down quite nicely at an atom or two per hour (I only slightly jest). Then I read the label on the canister ... oh well, who wants to live forever?
So with exaggeration for effect, the 'sound' of the bearings on the SS rod was a sexy "Sssss" and the sound on the glass tube was "Klackity-klak." Tube versus rod and resonant differences for sure, I attempted to damp the tube with my hands as I tipped the tube back-and-forth. A mechanically astute neighbor came by yesterday an I did the test for him. He heard the same sounds. The glass tube was much noisier.
Vertical Friction: Is very high with either the glass tube or the SS rod. Disturbingly so, given the polished edges on the bearings used. Displacing the carriage from the nominal horizontal ‘balanced’ rest position resulted in little or no return to horizontal with either material. I burnished several coats of DuPont “Dry Teflon” (in a liquid) onto the fixture’s unpolished SS rod and noted that resulted in a slight ‘return’ towards horizontal, but actually very little. Not being able to set a Tracking Weight by measurement means that this system has more than a little ‘art’ built into its ‘science.’ For musing, read the Mapleshade website’s treatise on continual adjustment of the Tracking Weight to compensate for the break-in of the cartridge’s suspension. “They” claim they can “hear” 0.01 gram difference in Tracking Weight. This is troublesome … as I might not have sufficiently golden ears.
Obviously these issues 'don't matter' since there are systems out there using glass tubing with great success, and bringing great enjoyment. The rolling speed of the carriage in this comparison between glass tubing and SS rod is probably hundreds of times faster than when playing vinyl. Hence the nice and sweet sound of polished bearing edges on polished SS maybe entirely moot.
You tell me, is the 16.7g weight of the carriage (without counterweight, cartridge, etc.) using exotic materials of any value to performance. I'll be testing my tonearm using an Ortophon Super OM cartridge measured at 4.6g weight. I 'wigged' for my birthday and got an Ortophon Rondo (Pass Pearl 2 under construction), it nominally weighs in at more than 10g. Is this tonearm going to work with that cartridge? One wonders? I'll come back online for the next couple days if there are questions.
John
[Addendum – Not being able to post the photos and text below earlier due to the ‘photo upload’ problem makes some of the material outdated already. Mounting an Ortophon Super OM cartridge (4.6g), with clips, and setting the pivot center point to nominal stylus position at 2 3/8” the maximum tracking force available WITH NO COUNTERWEIGHT is about 1.4g! The OM wants about 1.6g. Hence the counterweight portion of the wand will have to be shortened. More on this later. Apologies for my inability to post updates in a timely way. JRW]
I've been gone since 21Oct and doing a bit more than polishing my SS rod. One man's junk bin is another's treasure chest. I want to thank ChrisG for posting photos of his mounting method - it is not clear even now how whether there is movement possible inside the lower washer?
In the course of fabricating my carriage a number of observations have occured which I will relate - the bottom line being, there are a number of operating tonearms 'out there' already using Colin's design. The question is always, what is relevant to getting the best possible sound with minimum expense and effort. Obviously I've ignored that rule.
Many photos below of an alternative fabrication method for the 'yoke' portion of the carriage - to the point of minimizing weight. So to a 'Money shot' of the carriage:
Weight_tonearm - With a freshly calibrated digital scale of 0.1g resolution, and without counterweight, cartridge, clips or wire = 16.7g. The wand is a 7" length of an Easton 3-39/440 carbon fiber over aluminum competition arrow (obtained as a throwaway)[ note above about the wand being too long, i.e too heavy]. The headshell is magnesium. The yoke is a balsa composite. The bearings are ACER C036 1/8"x3/8" (1/8" ID) Ceramic R2 ball bearings. The bearing axles 1/8" aluminum tubing. The 6 shoulder washers are 1/8" ID transistor mount insulators. The question is, is this attempt a creating a minimum weight carriage relevant?
Balsa_composite - Many years ago I received a sample of the Baltek Corp's "Decolite Composite Panels" of balsa core and fiberglass skin. I had 1/4" thick balsa and nylon mesh in my junk bin. "5-minute epoxy" is cheap, it only took hours and hours ....
Carriage_assembly - The Easton arrow measure 0.266" diameter with a digital caliper. A 17/64" drill bit is needed, and some tweaking. The epoxied mesh is fragile, and will tear away from the balsa if not treated delicately. Nylon hardware for the 'adjust' screw. Balsa grain oriented vertically.
Bearing_assembly – I obtained the bearings used because I didn’t know any better back in July when I purchased them. I read the thread and it seemed then that ‘ceramic’ bearings were the version to purchase. It is apparent that advice has changed – as has ‘removing’ the dust shields and the lubrication. There has been some lack of clarity along the way.
A precision V-block is needed to glue (superglue) the aluminum axles in place. Of note, using a calibrated 0-5g digital scale each bearing weighed 1.07g. The yoke weighed 4.65g without the bearings and end-holder shoulder washers, but with the nylon adjustment hardware in place. The brass spacer between the bearings is 5mm wide. Great grief ensued during the gluing of the shoulder washer end caps. I used 'thread locker glue' on the end caps. Actually stark terror was the emotion for a bit of time. Things had to be redone once. In the end the outer bearings were glued in place along with the end cap due to the wicking action of the threadlocker glue. I gave up at that point, but as it turns out there isn't a problem. Be careful with wicking glue!
Headshell - The headshell is from a piece of magnesium stripe that's been in my junk bin for over 30 years. There's an interesting tout by a bicycle frame manufacturer online touting that magnesium is the most highly internally damped metal - and it is much lighter than aluminum. The short black pieces (superglued) are plastic L-angle (see below).
Wand_assembly - 5-minute epoxy again, attempting to make sure everything is straight and true. Of some note at the top of the photo is the piece of magnesium from which the headshell was cut. Magnesium 'rust' is a wonderful velvet black.
Polished Bearing Edges - Now we're getting to the nitty gritty! The resolution of this photo should be sufficent (at full size) for you to see the inner polished edge of the outer front bearing. Compare it to the outer edge of the inner bearing (closest to the yoke). You should be able to see the the outer edge of the bearing isn't so wonderful. The aluminum axles were polished too. Also note the nominal surface finish of the (only 15 minutes of hand polish) 17-4 Stainless Steel rod. More below.
Tonearm_glass_steel - Now we come to where the madness meets the road as it were. I used the remaining cut off SS rod to create the fixture for further testing regarding creating an 'optimum weight' counterweight. Note both the 10mm borosilicate tubing and the 'almost polished' SS rod. Compare the polish of the rod to the SS rod inserted in the fixture.
But first more on the bearings: Their dust shields were removed and I put them in a bath of acetone, leaving them there for some time. Too my horror when I came back to them, there was obvious corrosion on the outer races and on the sides! The corrosion seemed to be associated with globs of the bearing lubricant adhering to the metal in the acetone solution. What was happening on the inside of the bearings?
Oh well, I've already written about the edge polishing (a timely process). Using an Xacto knife and 600grit sandpaper I polished the corrosion off as much as possible. The local Costco had a sale on "Dust Off" compressed gas, so I bought the six-pack. With all the bearing polishing with the dust shields off who knew what was going on inside the bearings.
That led to a sequence of four washings for each bearing with compressed gas 'exercising' between each washing. The Dust Off spun those little bearings up to 'singing speed', those babies were whining. After each wash the bearings seem to spin for longer and longer times - maybe 15 seconds of spin or more at the end after the gas was removed.
A felt-tip mark on the outer race of each bearing showed that they were all rolling equally on the fixture's rod. Then an 'wild and crazy' idea occurred to me, could I balance the carriage on both the longer polished SS rod and the borosilicate tubing and get some sense of 'how it rolled'? There was a bit of a shock coming.
My goal with the SS rod was to achieve a state of polish such that I couldn't see any imperfections under magnification of a x10 loupe. Foolish goal. Long story, but I ended 'dry polishing' the rod (in all my spare time in front of the TV) using "Bar Keepers Friend (since 1882)" cleanser & polish on a piece of T-shirt. Yep, the rod was smoothing down quite nicely at an atom or two per hour (I only slightly jest). Then I read the label on the canister ... oh well, who wants to live forever?
So with exaggeration for effect, the 'sound' of the bearings on the SS rod was a sexy "Sssss" and the sound on the glass tube was "Klackity-klak." Tube versus rod and resonant differences for sure, I attempted to damp the tube with my hands as I tipped the tube back-and-forth. A mechanically astute neighbor came by yesterday an I did the test for him. He heard the same sounds. The glass tube was much noisier.
Vertical Friction: Is very high with either the glass tube or the SS rod. Disturbingly so, given the polished edges on the bearings used. Displacing the carriage from the nominal horizontal ‘balanced’ rest position resulted in little or no return to horizontal with either material. I burnished several coats of DuPont “Dry Teflon” (in a liquid) onto the fixture’s unpolished SS rod and noted that resulted in a slight ‘return’ towards horizontal, but actually very little. Not being able to set a Tracking Weight by measurement means that this system has more than a little ‘art’ built into its ‘science.’ For musing, read the Mapleshade website’s treatise on continual adjustment of the Tracking Weight to compensate for the break-in of the cartridge’s suspension. “They” claim they can “hear” 0.01 gram difference in Tracking Weight. This is troublesome … as I might not have sufficiently golden ears.
Obviously these issues 'don't matter' since there are systems out there using glass tubing with great success, and bringing great enjoyment. The rolling speed of the carriage in this comparison between glass tubing and SS rod is probably hundreds of times faster than when playing vinyl. Hence the nice and sweet sound of polished bearing edges on polished SS maybe entirely moot.
You tell me, is the 16.7g weight of the carriage (without counterweight, cartridge, etc.) using exotic materials of any value to performance. I'll be testing my tonearm using an Ortophon Super OM cartridge measured at 4.6g weight. I 'wigged' for my birthday and got an Ortophon Rondo (Pass Pearl 2 under construction), it nominally weighs in at more than 10g. Is this tonearm going to work with that cartridge? One wonders? I'll come back online for the next couple days if there are questions.
John
Attachments
-
 Weight_tonearm.jpg87.6 KB · Views: 778
 -
 balsa composite.jpg55.1 KB · Views: 772
 -
 carriage_assembly.jpg82.9 KB · Views: 762
 -
 Bearing assembly.jpg52 KB · Views: 752
 -
 Headshell.jpg31.4 KB · Views: 743
 -
 wand_assembly.jpg36.7 KB · Views: 332
 -
 Polished bearing edges.jpg87.3 KB · Views: 451
 -
 tonearm_glass_steel.jpg91.5 KB · Views: 468
nice work John !! don't bother about the weight to much
depending on the mass of the counterweight needed to balance and set VTA for a 10 Gram cartridge .. the total should be kept below 30 Gram ( Colin's words ) .
No idea if it would work out , I'm about to get my DL103R into action ( perhaps within a couple of days ) . will report about my findings !
THX ,
Paul
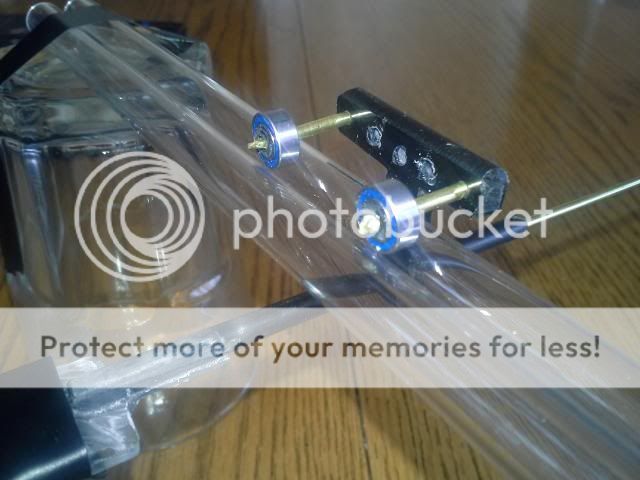
Yeah, I know, not quite in the spirit of this thread. But it was this thread that made me lose all that sleep thinking about this arm...so I thought, why not.
Moray James posted somewhere that two pieces of glass in a "V" shape could
work as well. I just couldnt imagine cutting a piece so thin that the arm would still be able to rock back and forth. I bought 12 pieces of glass tubing, what to do with them?. Then it hit me, ride the ridge....
The prototype weighs in at 20 or so grams...WITH the 6 gm cartridge, and counter weight.
I have to buy a bench drill press so I can bore the holes accurately....
but it seems to work beautifully, so far.
OK, I need you guys to tell me the pitfalls....


Good thinking PDR.
I would think Bearing width would be more important now but 2 bearings would be better than 4 IMHO.
kffern
But why? It`s still a 4 point contact carrier.
Hans.
Nice work !
potentially less bearing ( rolling ) friction , but bearing edge / glass radius contact barely visible on the foto's . indeed the bearing size ( width ) plays a large role with this concept . well ... in my view .
Nice and light construction !! wondering if those bearing rods can be a bit shorther in order to avoid resonance ?
Paul
spinning wheel;3702377 wondering if those bearing rods can be a bit shorther in order to avoid resonance ? Paul[/QUOTE said:My thoughts exactly. I was thinking , smaller glass, 8mm?? and you could go with the 3mm-4mm bearing width.
The only thing I cant wrap my head around is, on the flat glass pane, the one in a "V" version. A known working version. The bearing only rides up on either side. Here it will need to ride not only up but navigate the curve. will it loose momentum up and or back, in the journey.
I think the 11mm tube size with the 3mm bearings work remarkable well.
When slid back and forth on the rail its incredibly stable. I have it balanced right
now, when its dipped it comes back to rest in about 2 "nods". It will be faster
when its not balanced I'm sure.
The arm I'm using was abandoned.....that means I screwed it up,lol....when I was attempting to make a "T" carriage. Its junk and it was just a way to try the
double tube quickly. So its easy to change....like you guys mentioned, I'll make
the bearing rods shorter and raise the wand closer to the tubes. It hangs lower than it should as it was meant to ride higher on top of the tube.
My biggest challenge is to drill holes properly...straight and true...but I've brought home a Dremel drill press tonight, so that shouldnt be a problem anymore.
I have the morning off tomorrow and I'll try and get a new carriage built, and
post a you tube vid of it working. Like I say it glides remarkably well and its very hard to knock it off the rails.
Perry
- Home
- Source & Line
- Analogue Source
- DIY linear tonearm