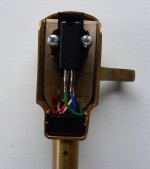
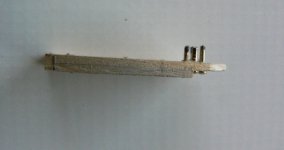
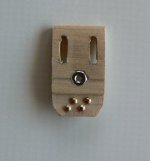
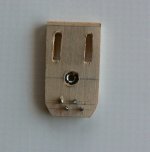
The photos show a cheap, easy DIY Empire cartridge sled I came up with to replace the ones that frequently seem to go AWOL. The secret is using brass plated 5/8” x 18 escutcheon pins - round headed brads. Hardware stores have them. The sled itself is made from 1/16” bass wood, which is also available at hardware stores, hobby stores and probably art stores. The wooden part is made of two pieces of bass wood laminated at 90 degrees for strength. Just to make sure this could be done without a shop full of tools, I did most of the work with an Exacto knife.
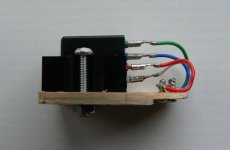
The 1/4” hole for the 4-40 nut, the holes for the pins, and the 1/8” starter holes for the attaching slots were done with a drill press, but a portable drill would work fine. Holes for the pins were done with an escutcheon pin shank mounted point down in the drill chuck. It’s very accurate and allows a press fit of the pins. The pins can be simply driven through, but the fit is less tight. The pins were cut to about 3/16” shank length before insertion. The 4-40 nut is a press fit into the headshell side of the sled. For extra security, both the pins and the nut could be superglued, but I didn’t find that necessary.
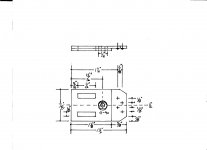
The pin and 4-40 nut locations are critical. The dimensions in the drawing, which is drawn at approx. 2X scale, are pretty accurate for the sled I built, but may not match other Empire headshells exactly. Check the positioning on your specific headshell. There is a curved section to the contacts in the headshell and the pin heads should hit slightly forward on the curves. Make sure you keep the relative orientation of the sled and the headshell firmly in mind so the pin pattern doesn’t wind up reversed. Want to guess how I know that?
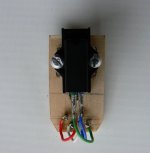
The cartridge connecting wires are soldered flat to the sled and loop to the rear. They need to be fairly short so they don’t tangle or prevent overhang adjustments. Check the polarity of the connections all the way to the RCA plugs. I wound up with polarity that didn’t match the Empire sled I used as a model, which is part of why I didn’t indicate polarity on the drawings. I used a set of commercial cartridge connectors that I cut one end off of, but making your own with mouse wire and “D” type computer connecters will work, too. Tinning both the exposed wire and the pin makes the final solder connection quicker and easier.
Making the sled was actually easier than explaining what I did so if there questions, let me know and I’ll try to clear things up.
The 1/4” hole for the 4-40 nut, the holes for the pins, and the 1/8” starter holes for the attaching slots were done with a drill press, but a portable drill would work fine. Holes for the pins were done with an escutcheon pin shank mounted point down in the drill chuck. It’s very accurate and allows a press fit of the pins. The pins can be simply driven through, but the fit is less tight. The pins were cut to about 3/16” shank length before insertion. The 4-40 nut is a press fit into the headshell side of the sled. For extra security, both the pins and the nut could be superglued, but I didn’t find that necessary.
The pin and 4-40 nut locations are critical. The dimensions in the drawing, which is drawn at approx. 2X scale, are pretty accurate for the sled I built, but may not match other Empire headshells exactly. Check the positioning on your specific headshell. There is a curved section to the contacts in the headshell and the pin heads should hit slightly forward on the curves. Make sure you keep the relative orientation of the sled and the headshell firmly in mind so the pin pattern doesn’t wind up reversed. Want to guess how I know that?
The cartridge connecting wires are soldered flat to the sled and loop to the rear. They need to be fairly short so they don’t tangle or prevent overhang adjustments. Check the polarity of the connections all the way to the RCA plugs. I wound up with polarity that didn’t match the Empire sled I used as a model, which is part of why I didn’t indicate polarity on the drawings. I used a set of commercial cartridge connectors that I cut one end off of, but making your own with mouse wire and “D” type computer connecters will work, too. Tinning both the exposed wire and the pin makes the final solder connection quicker and easier.
Making the sled was actually easier than explaining what I did so if there questions, let me know and I’ll try to clear things up.
Attachments
- Status
- This old topic is closed. If you want to reopen this topic, contact a moderator using the "Report Post" button.