My comments were concerned with the requirements of a turntable plinth system, although many of them would apply to the other important important electromechanical component, the loudspeaker, specifically the enclosure. A very good analogue for a simple vibrating system is the classical mass-spring-damper arrangement. Of course turntables and loudspeakers are a connection of vibrating components but it is useful to understand the behaviour of the simplest arrangement. Also to a great extent a vibrating system will have its behaviour determined by a dominant principal mode and understanding and controlling this mode is a key step in a satisfactory design. The equations of motion are determined by applying Newtons laws of motion, for circular and linear motion. Thankfully analysis of direct drive requirements is more straightforward than for drive systems where the motor is separate from the platter. For belt and idler drives, the system is an interconnection of two or more rotating systems about multiple axes of rotation.This seems logical but perhaps it might be useful to elaborate on the why's and hows of applying mass, stiffness and damping.
Mass: what does it do to help the stylus in the groove and where do you apply it?
Basically the requirement for plinth mass is in response to Newtons law that requires that every force has an equal and opposite reaction. In rotational terms, every torque has an equal and opposite reaction torque. Therefore a high torque direct drive like the SP10 mkII will tend to spin the plinth as motor torque is applied to the platter. The greater the plinth moment of inertia, the harder it is for the plinth to move even microscopically. Bear in mind the minute scale of the information the stylus is retrieving. I suppose there is a practical limit to the amount of inertia. The material stiffness is of consideration here because the plinth will have the frequency of its principal mode of vibration determined by the inertia and rotational stiffness (compliance). It would be desirable for this frequency to be away from frequencies of likely sources of extraneous excitation. In practice the choice of available plinth material limit the scope of choosing the principal mode frequency.
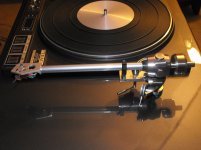
I have empirically verified the Audio Qualia observations of the damping effectiveness of a resin structure. The problem is to include adequate stiffness. My best attempts so far is achieved with a layered construction of isopthalic polyester resin and cut glass fiber matting. This is laid down in a mold a few layers at a time and built up over days to the desired thickness. The curing of the resin generates heat and limits the laying up to only a few mm at a timeStiffness: Getting back to that microscope pic of a diamond stylus reading the groove.... Any flexing in the plinth while the stylus traces the record groove is to be avoided because this will alter alignment geometry of the stylus/groove interface and also invite other disturbances such as micro-rocking of the platter out at the rim.
I would think that it is of utmost importance to provide a suitably rigid mechanical connection between the mounting of the tonearm and the mounting of the motor/platter.
Damping: This is where things get vague and wooly. The idea behind this is to reduce motor/bearing generated vibrations before they can reach the stylus/groove interface. Or to keep motor/bearing vibes from finding their way to the tonearm mounting.
The pages at Qualia Webs offer us some insight into the ultimate damping ability of various materials that have been tested there. Presumably the test is to drop a steel bearing ball from a specified height onto the test material. That test material has attached to it accelerometers which record the vibrations in the material that result from having had that bearing ball dropped onto it. This is really good information.......as far as it goes. But does it tell us everything we need to know about vibration damping in record player chassis design?
There needs to be testing using accelerometers and software that records the passage of these "real life" motor vibes through various materials. To track where these vibes actually travel. Can the vibes be conducted away from critical areas of the plinth and into areas designed to attract, hold and dissipate said vibes? I'd like to verify/quantify this. It would point us to more successful plinth designs.
The SP10 mkII mold template includes the cut-outs for the turntable and armboard. This is my reasoning for the effectiveness of a layered construction: assuming a perfect DD motor system, and ignoring extraneous inputs, the plinth requirements are to resist torque reaction (mass) and to effectively damp whatever the inertia doesn’t soak up. Since in the idealized situation this rotational motion is in a horizontal plane, a horizontally layered plinth with suitable damping material between layers is very efficient at converting any motor induced horizontal torque motion of the plinth into heat by shearing of the horizontal damping layers. As an added benefit, such a ply structure has considerable transverse stiffness and therefore coupled with high mass, provides an excellent platform for mounting of a tonearm.
What to do.......
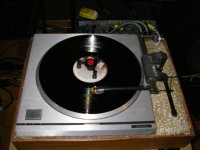
Next step is to remove the motor unit and electronics boards, switches and strobe from the aluminum chassis and put the platter and motor into an alternate plinth of my own design. The electronics boards will go in another separate project box. The new design will accommodate 9 inch tonearms easily. In particular, I have a Graham 2.2 tonearm waiting for a decent enough record player to be matched up to. To go with the Graham I have an Ortofon MC Jubilee cartridge that mates well to it. So the idea is that a very accurately driven platter, that of the SP10 mkII, provides the drive for a tonearm and cartridge capable of very good detail extraction,... if a little short on dynamic slammy-ness. Perhaps the mutually analytic character of both the sp10 mkII drive and the Graham will combine to produce a spectacular result that looks way, way deep into the record groove and extracts the most minute detail in a chrystal clear holographic manner. Wouldn't that be something!
Updated Technics SP10 quartz PLL drive
http://www.edsstuff.org/dd_museum.pdf
Turntable Forum • Alternate SP-10 plinth design?
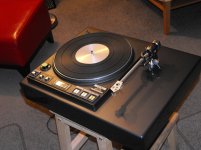
Put the Graham on this table.....
I have a supreme on my SP-15 and it is absolutely stunning
another link
There's an interesting thread on sp10 mkII bearing damage going on over at AudioKarma. Here's a link:
Bearing wear on an SP 10 mk II PICS - AudioKarma.org Home Audio Stereo Discussion Forums
There's an interesting thread on sp10 mkII bearing damage going on over at AudioKarma. Here's a link:
Bearing wear on an SP 10 mk II PICS - AudioKarma.org Home Audio Stereo Discussion Forums
a request........
I've stalled out on this project because of....well.....caution. The bearing housing bottom cap. The part that houses a thrust ball bearing. This I assume is a threaded piece that screws onto the upper housing casting.
Here's a photo:

The red arrow points to the part I mean. Moderate unwinding force, using implements of destruction, will not budge the piece. Until I gather some more information on just what is involved in the attachment of this part to its mating part, I'm not going to proceed. These are the only parts I have. I can't afford to break any of it.
I'm "guessing" that it is indeed a threaded part and that there may be some thread sealant/thread locker applied to the threads from the factory. If this is the case, I'll probably resort to something like a strap wrench after getting some penetrant oil into the threaded joint overnight. Or so I think.
Anyone have any experience taking this part off?
tia,
-Steve
I've stalled out on this project because of....well.....caution. The bearing housing bottom cap. The part that houses a thrust ball bearing. This I assume is a threaded piece that screws onto the upper housing casting.
Here's a photo:
The red arrow points to the part I mean. Moderate unwinding force, using implements of destruction, will not budge the piece. Until I gather some more information on just what is involved in the attachment of this part to its mating part, I'm not going to proceed. These are the only parts I have. I can't afford to break any of it.
I'm "guessing" that it is indeed a threaded part and that there may be some thread sealant/thread locker applied to the threads from the factory. If this is the case, I'll probably resort to something like a strap wrench after getting some penetrant oil into the threaded joint overnight. Or so I think.
Anyone have any experience taking this part off?
tia,
-Steve
I'm "guessing" that it is indeed a threaded part and that there may be some thread sealant/thread locker applied to the threads from the factory.
If there is thread locker applied to the threads, applying heat to it will break it down. Even moderate heat will help loosen the threads, but I'm guessing a lot of heat to this area of the motor housing wouldn't be a good idea.
The service manual doesn't show the motor housing in it's individual components. Figures.

jeff
The following url is interesting.
<http://www.vantageaudio.com/info/sp10acc.htm>
I have tried to contact Vantage but they can be difficult to contact at times be it by email or telephone.
They do brilliant restoration work and have sorted my SP10 with fully external electronics: although not yet completed, I saw the work just before completion and can say that I have not seen better.
If there is thread locker applied to the threads, applying heat to it will break it down. Even moderate heat will help loosen the threads, but I'm guessing a lot of heat to this area of the motor housing wouldn't be a good idea.
The service manual doesn't show the motor housing in it's individual components. Figures.
jeff
I'm guessing that the material of the larger housing is die cast aluminum of the A316 variety with a tensile strength around 23ksi . Less than half the strength of a high carbon steel. Not very good elasticity. Somewhat brittle. It could suffer a stress failure with hand applied force.
Good idea about the use of heat....and not too much of it. On the other side of that casting is a circular rack of coils with some sort of clear coating applied. We wouldn't want to melt that coating.

-Steve
The following url is interesting.
<http://www.vantageaudio.com/info/sp10acc.htm>
I have tried to contact Vantage but they can be difficult to contact at times be it by email or telephone.
They do brilliant restoration work and have sorted my SP10 with fully external electronics: although not yet completed, I saw the work just before completion and can say that I have not seen better.
I can appreciate the sentiment, but...............not even tempted to go there. This is, after all, the DIY Audio forum. So I'm gonna do it here. But I do request some information on this one piece.
I have yet to see any photos of the insides of the bearing cap I refer to. So I guess that means not too many of us diy'ers have actually refurbished their own SP10 bearings.
Not good.
These SP10 bearings are showing wear just like those of any other turntable after 35 years use. This will be a very important part of the project to get back into 100% condition.
-Steve
The following url is interesting.
<http://www.vantageaudio.com/info/sp10acc.htm>
I have tried to contact Vantage but they can be difficult to contact at times be it by email or telephone.
They do brilliant restoration work and have sorted my SP10 with fully external electronics: although not yet completed, I saw the work just before completion and can say that I have not seen better.
I can appreciate the sentiment, but...............not even tempted to go there. This is, after all, the DIY Audio forum. So I'm gonna do it here. And....................I just figured it out.
Here's where I'm at now:


The photos do indicate a generous amount of thread sealant/locker. I used a heat gun to warm that up. The rest of the casting did not heat up.
I installed the lower motor casing back into the chassis to increase the leverage when I applied a turning force using the strap wrench I just bought.
Right Hand threads. The cap unscrewed smoothly but with quite a bit of drag from the goo stuck in the threads.
I suppose it will be a good idea to re-assemble with same/similar sealant/locker.
Victory
-Steve
I suppose it will be a good idea to re-assemble with same/similar sealant/locker.
Yes, Loctite 242 Blue Threadlocker should do just fine. Just clean off as much of the old stuff as you can before re-assembly.
Loctite Threadlocker Blue 242 from Loctite Adhesives
jeff
Isophthalic polyester resin and bentonite Plinth
I spent a few weeks reading the Audio Qualia site. And ultimately built my own version of the cast plinth using isophthalic polyester resin and bentonite (dry cat litter) for filler. I did not use fiber glass of any sort. I saw no advantage to adding glass product into a proven highly damped combination and I do a bit of boat work on the side, so I have it available.
new damping factors - Audio qualia
The damping factor of this mixture is .618 where as Panzerholz is .599 and the frequency of the mixture is very low at 48HZ. From the reading on Audio Qualia site the lower frequency is better. Considering how hard and expensive Panzerholz is to get, it is a no brainer to go with isophthalic polyester resin and bentonite.
The mold is another story, it is like building the plinth inside out before you can start the actual plinth. I poured mine all at once and once it was not tacky to touch, ran water over it to keep it cool for the next 1/2 hour. No issues with fire or cracking. I did destroy the mold getting the plinth off of it, so it was a one time use.
I put wood sides on my plinth as part of the mold so the outside finish would be nice. We had just put down new hardwood floors and I used some spare pieces left over. See the attached picture. So they are glued on while casting the plinth. There are some thickness ratios to remember with any material and I tried to keep the wall and top thickness to about 30 mm.
I would do the mold differently next time (so it could be reused), but it came out pretty well and I hope there isn't a next time.
Rush
Attachments
Last edited:
I spent a few weeks reading the Audio Qualia site. And ultimately built my own version of the cast plinth using isophthalic polyester resin and bentonite (dry cat litter) for filler. I did not use fiber glass of any sort. I saw no advantage to adding glass product into a proven highly damped combination and I do a bit of boat work on the side, so I have it available.
new damping factors - Audio qualia
The damping factor of this mixture is .618 where as Panzerholz is .599 and the frequency of the mixture is very low at 48HZ. From the reading on Audio Qualia site the lower frequency is better. Considering how hard and expensive Panzerholz is to get, it is a no brainer to go with isophthalic polyester resin and bentonite.
The mold is another story, it is like building the plinth inside out before you can start the actual plinth. I poured mine all at once and once it was not tacky to touch, ran water over it to keep it cool for the next 1/2 hour. No issues with fire or cracking. I did destroy the mold getting the plinth off of it, so it was a one time use.
I put wood sides on my plinth as part of the mold so the outside finish would be nice. We had just put down new hardwood floors and I used some spare pieces left over. See the attached picture. So they are glued on while casting the plinth. There are some thickness ratios to remember with any material and I tried to keep the wall and top thickness to about 30 mm.
I would do the mold differently next time (so it could be reused), but it came out pretty well and I hope there isn't a next time.
Rush
That reads like excellent damping ability. Kitty litter in with isophthalic polyester resin. I see at Cat's site he discusses the material further.
Of course damping ability is one of the characteristics needed in producing a suitable plinth. Others might include rigidity and tensile strength. Of course if one is planning to use the original cast aluminum chassis, that chassis will provide much of the rigidity needed within the platform. But if one is to remove the motor from the original chassis and place it into another, then the new chassis now needs to combine not only damping ability but also meet the needs of rigidity.
So I'm thinking that while the 'kitty-litter-in-resin' material might be part of a solution, and is very interesting.... but if it is to be the entire solution it needs to harden into a material capable of becoming the entire supporting structure.
How hard and rigid does that stuff become after full cure?
-Steve
It does harden and become very rigid. The cat litter adds tensile strength as well. The Isophthalic polyester resin is the best of the polyester resins and you won't find it at Home Depot, you will have to go to a boat building supply company. It is very hard to sand and it can be polished. This stuff is perfect for this application. You can always add some carbon fiber to the mix for added rigidity, but I doubt it would be necessary if you keep a 30 mm thickness. If you needed a thin section, I would then use some fibers to reinforce along with the cat litter. You can even machine this stuff with a milling machine. It will wreck havoc with a bit though. It is very hard!
Rush
This seems a great result. I can attest to the hardness of the cured resin. I used the pure resin to mold a loudspeaker baffle with complex angled faces. The interior needed some shaping after curing. It was very difficult with a bastard rasp. Using an angle grinder with a coarse grinding pad produced unpleasant fumes and I don't recommend it. The resin does bind very well to timber, so using the mold as a cosmetic edge is a good idea. I have found though that any overfill runs, will soak deep into the timber and be very difficult to sand off. The timber tends to sand away and leave the resin proud. Your picture appears shows a high percentage of bentonite to resin. Were you happy with the ratio? Was even consistency easy to achieve?It does harden and become very rigid. The cat litter adds tensile strength as well. The Isophthalic polyester resin is the best of the polyester resins and you won't find it at Home Depot, you will have to go to a boat building supply company. It is very hard to sand and it can be polished. This stuff is perfect for this application. You can always add some carbon fiber to the mix for added rigidity, but I doubt it would be necessary if you keep a 30 mm thickness. If you needed a thin section, I would then use some fibers to reinforce along with the cat litter. You can even machine this stuff with a milling machine. It will wreck havoc with a bit though. It is very hard!
This seems a great result. I can attest to the hardness of the cured resin. I used the pure resin to mold a loudspeaker baffle with complex angled faces. The interior needed some shaping after curing. It was very difficult with a bastard rasp. Using an angle grinder with a coarse grinding pad produced unpleasant fumes and I don't recommend it. The resin does bind very well to timber, so using the mold as a cosmetic edge is a good idea. I have found though that any overfill runs, will soak deep into the timber and be very difficult to sand off. The timber tends to sand away and leave the resin proud. Your picture appears shows a high percentage of bentonite to resin. Were you happy with the ratio? Was even consistency easy to achieve?
I used a 50/50 mixture resin/bentonite, without re-researching I think that was the ratio recommended on the Audio Qualia site. I guess I was happy with the ratio, it was thick, almost like peanut butter. I blue taped the finished wood to keep the resin off it and removed the tape before the resin got very hard, a few minutes. You always wonder if you put too little harder in the resin until it kicks off, then you worry you put too much.
You can grind it if you use proper respiratory gear.
I poured mine from the top and the finish you see in the picture is the way it flushed out with a screed on the top of the wood sides. As far as even consistency, you had to keep stirring as you poured the mix to keep it even. Once in the mold it seem to be pretty consistent. The bentonite didn't settle as far as I could see. The top is slightly uneven due to the bentonite "rocks". It is very much like concrete, except it sticks to the screed when trying to smooth the top and leaves a void behind the screed. So you have to work it and push it around and let gravity level it out. I made 3 batches, 2 liters or so at a time as I recall, to fill the mold.
After it was hard, I used a saber saw to cut the correct cutout for the turntable. When I place the SP-10 in the hole the edge sat on the bentonite "rocks" with small voids around the edge. I tried to sand the area and realized how hard this stuff is.
So I taped the bottom of the turntable lip with aluminum tape and used mold release on the on the tape. Then I placed wood matches on the edge of the cutout to hold the turntable lip up off the top of the plinth a couple of mm and mushed more resin with chopped cotton fiber as a filler with a true peanut butter consistency about 13 mm under the lip. Just used a 25 mm spatula with a square edge to push the mush in.
I hope you guys across the pond will appreciate my use of mm instead of inches. I think in inches.
After that mix setup, removed the turntable, removed the matches and tape and have a level even surface for the turntable to rest on.
I used a Forstner bit in a drill press with a stop for the bottom of the plinth so the 5 screws would have a level and smooth surface to bear on. Same thing for the feet.
This project took me a few months from start to finish, but if you devoted a few weekends you could probably knock it out. Wood working is particularly hard for me. The wood edges were cut several times, mitering the corners and keeping the lengths the same. The mold was a lot harder than i first thought and I redid it a couple of times.
One thing about using resin is you can always sand it to roughen it up and add something to it. So if you have a bad cut or drill something in the wrong place, just fill it with more resin/bentonite and start again.
This would be perfect for a speaker enclosure or baffle. A couple of flat molds 30 mm thick and glue the edges together.
Rush
Last edited:
Is there any advantage in breaking the cat litter down to powder form? Also, can the 'mix' be successfully dyed to an acceptable colour?
Many thanks.
You can use a piece of screen and filter the larger particles out. You will need a lot more cat litter to get enough small particles to do this project or a grinder of some kind. Other than the finish, I don't see a benefit to using powdered Bentonite, but then I didn't try it. Maybe it would level out better.
This resin can be colored before you mix it, every color is available including black. A small amount of color goes a long way. I just didn't think of coloring mine. It can also be painted with any spray paint, although you would now need to sand it smooth. Think about a fiber glass boat.
When I did this I wasn't thinking I would be writing about it or I would have taken pictures and probably thought it through better.
Rush
Is there any advantage in breaking the cat litter down to powder form? Also, can the 'mix' be successfully dyed to an acceptable colour?
Many thanks.
There is no advantage to using the cat litter as a powder.
In fact, somewhere on the Qualia site he specifically states that powdered cat litter is not as effective.
Rush, Bon.
Great info regarding the properties of this Isophthalic Resin/bentonite.
The ability to make a plinth by casting rather than fabrication from more traditional materials like metals and wood really opens up some new possibilities with regard to shape and style.
Of course there is a fabrication involved. The mold has to be designed and built. But still, the prospect seems very interesting to me. It triggers imagination.
Thanks for this excellent input.
-Steve
Hi Steve. Although my main turntable interest is in getting the best I can from the SP10 mkII, I have applied the same ideas to a building a plinth for the Teac TN-400 turntable. This turntable had a brief production life before the introduction of quartz lock. It is a servo control design with a discrete strobe and touch sensitive controls. I have only seen the one in the flesh, for which I made a resin plinth. The magna-float is a partially magnetic levitation of the platter to reduce the load on the thrust bearing for performance and wear reasons. Apparently there were legal reasons for Teac to discontinue the TN-400.Rush, Bon.
Great info regarding the properties of this Isophthalic Resin/bentonite.
The ability to make a plinth by casting rather than fabrication from more traditional materials like metals and wood really opens up some new possibilities with regard to shape and style.
Of course there is a fabrication involved. The mold has to be designed and built. But still, the prospect seems very interesting to me. It triggers imagination.
Thanks for this excellent input.
-Steve
As discussed, expect to destroy the molds even with liberal application of mold release, unless you integrate the mold as part of the plinth timber cladding.
My buddy is ecstatic about the performance of the Teac TN-400 in this plinth and has in fact fitted a $4000 pickup arm.
Audio Origami - PU7
I agree that the potential of molded resin plinth is worth promoting. I have been plinth building for many years, and for high torque, un-suspended turntables, the resin composites is my highest performing construction.
My ultimate vision is removing the motor and bearing from my spare parts SP10 mkII and installing them in a resin composite plinth. The electronics will be left in the original chassis, or possibly installed in a custom metal case. I fantasise about getting close to mkIII performance. Many of the enhanced performance specs of the mkIII are more related to changes in the measurement methodology during the 70-80's spec wars.
Attachments


- Status
- This old topic is closed. If you want to reopen this topic, contact a moderator using the "Report Post" button.
- Home
- Source & Line
- Analogue Source
- SP-10 mkII, the next project