I did this just yesterday on mine. The allen is metric and with the allen out you will have to cut away the old rubber to get hold of the brass bolt that holds everything together.
You will not be able remove the bolt since the head is behind the bearing ring. I had to use a very small channel lock pliers to grab the bolt shaft. It took considerable torque to unscrew the collar. There must have been locktight used since it was very tough getting it to unscrew.
I did not use rubber again since it would be nearly impossible to get behind the head of the bolt to get back to. The original decoupling idea.
You would have to disassemble the bearing collar to do that. Using o rings or whatever inside the bolt perimeter and collar of the orginal area is useless since the bolt head is touching the collar ring solid now.
I just used some rca plastic insulators and screwed down the counterweight tube tight.
You loose the decoupling but I used shrink wrap on the arm shaft to cut down any resonances
This is a secondary JVC QL10 tt that this arm is mounted on and I do not consider either
The tonearm or table to be a SOTA design. Decent sound but no better than that.
Regards
David
Hi David,
Will you be able to make cross-section drawing of the tonearm part behind the bearing ring including all the mentioned components? From all the descriptions it is not clear to me how exactly the original design looks like so I am afraid to start the repair to not destroy the arm completely.
Thank you,
Witold
That was over 3 1/2 years ago
The way I explained it is really how you must take it apart.
The hard plastic simple replacement material is the wrong way to go on this arm.
With a low compliance low output MC certain mid bass transients would cause a transient ring that was easy to hear.
Even though I covered 80% of the arm tube with heat shrink, you must find a way to disassemble and get to the bolt so it's isolated like the original. They knew what they were doing with the original rubber isolation in this arm
I didn't go that far so your on your own.
The adjustable VTA mount was nice
Even before mine had any issues the arm is basic design at best,
You would be better off with a Rega arm replacement
Regards David

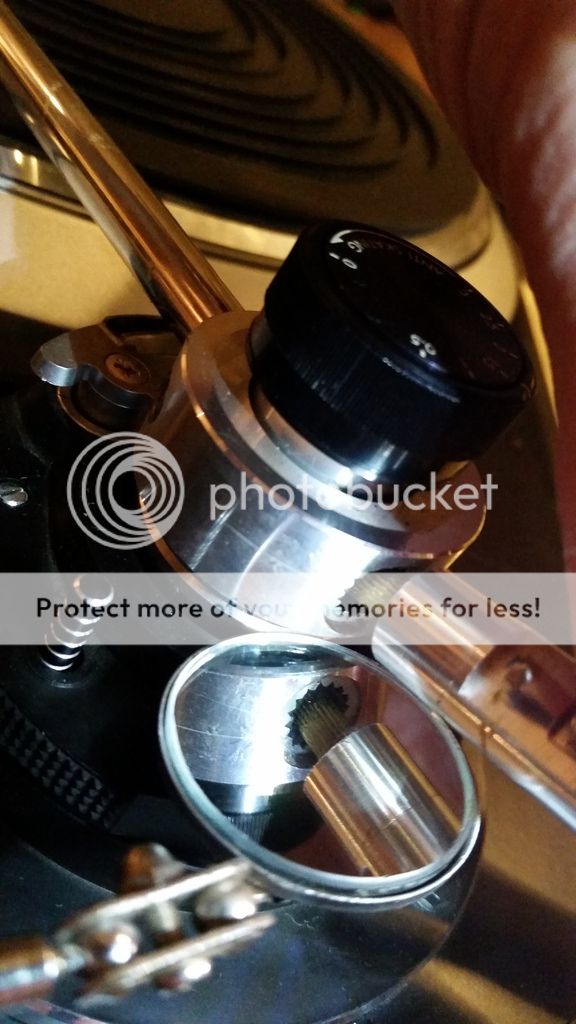
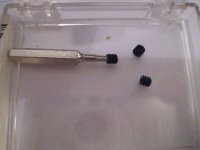
( updated info and disregard my older posts )
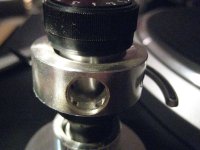
JVC UA-7045 tonearm / JVC QL-10 -101 direct drive combo
This is the rubber replacement and the tools needed are a 1.5mm allen bent in the shown manner to loosen the collar.
The same 1.5mm allen is used to loosen the same collar and old rubber combination from the counterweight assembly.
You unscrew the brass "bolt" that is entirely isolated in the old rubber.
How you isolate and the type of rubber is up to you, just no direct contact of metals.
The slotted screw driver is for reseting the horizontal bearings because they were loose on mine. Not as easy as it seems and takes time to do it right.
It would be easy to machine a seperate stem and sorbothane combo to replace the rather small surface area that the original rubber assembly consisted of. The collar is not long enough to support the CW rubber combination...,
You would be on your own as far as resonate behavior of the total system though.
No wonder they eventually sag and go away under the combined counterweight leverage.
Regards
David
Last edited:
While similar, the tonearm on my QL-7A doesn't have the two set screws pictured in your photo. That area (where your screws are) is much thinner. I can't determine how the head of the stub in being retained. It might be that the stub has a large head, preventing it from being withdrawn through the hole.
Looks like a pressed in assembly
You would have to do the same, unless you take it apart and drill, tap and set screw a modified similiar type assembly as mine. Rubber isolated
Or find a rubber collar with an interference fit lightly covered with soap to aid in press fitting it back into its serated hole.
The other option is to take the arm out of the TT and desolder the 5 pin connector.
Remove the anti skate knob on top. ( I didn,t do this on mine so watch out for the spring mechanism and how it attaches )
Make a similiar tool as I did with a slotted screwdriver for loosening the horizontal bearing and pull off the ring to modify to your hearts content.
You will have to be real careful in retighting the bearing. A 1/2 gram weight ( small corner of a dollar bill ) placed on the headshell.
You zero balance the arm and if the headshell " weight " does not deflect, you have the bearing too tight.
Regards
David
Last edited:
I'm doing my JVC QL-7 with Victor UA-5045 arm as we speak since the CW is sagging. The counter weight itself pulls right off, simple.
The shaft that the CW slides onto that has the rubber bushing is another story. If you rotate that shaft you'll see there is a tiny threaded hole.
That threaded hole has a very very tiny set screw inside. I'm a retired machinist and have a butt load of allen wrenches which I checked with my 0-1 micrometer.
I tried .045, .049, .062 (the smallest I have) and none would work. With a magnifying glass and a flashlight it looks to me like that tiny set screw hex is wallowed out so my allen wrenches wouldn't fit.
Getting a bit frustrated let's try something else. How about a small Torx wrench. That's it, a T6 Torx wrench will fit that screw.
I had to push very hard on the Torx wrench and finally the set screw came loose. What a PITA.
That tiny set screw was installed with something similar to locktite and it was a bear to break loose.
After all that the shaft with the rubber bushing still will not come loose no matter how much I turn and pull on it.
Looks to me like the 2 set screws under the collar hold in the rubber bushing and shaft in place.
Gotta find me another tiny T6 Torx bent in an "L" shape and see if I can get those 2 screws out. I just bet they where put in with locktite and since they are under the collar it's going to be a bear to get them out.
Tomorrow's another day. I'll be back.
Scrowl back and look at my picture #24
The size of the Allens is 1.5mm and needed a slight bend to access.
Mine had no Locktite but remember the single Allen that held the threaded brass insert did
Regards
David
Hi David,
I’ll have to pick up a 1.5mm allen wrench this weekend. Figures it’s the one I don’t have.
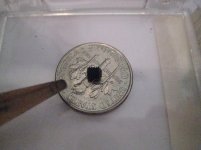
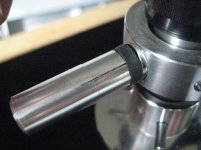
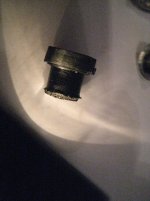
Take a look at my pics. Notice the saw cut split on the bottom side of the CW shaft.
That makes me think the job of the rubber bushing (besides isolation) is to compress the shaft together and hold everything in place.
If I’m correct, no wonder the CW sags. Once the rubber deteriorates it can’t compress the shaft and hold everything together anymore.
I’m still not clear on the brass screw you mentioned since I don’t see it.
If it’s enclosed in the rubber bushing that would explain why. Hmm.
Once I remove those 2 screws under the large round collar will the shaft and rubber bushing pull out or will I need to cut the rubber bushing in order to pull the shaft out?
Thanks,
Steve
Attachments
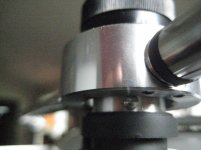
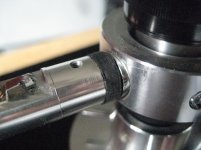

Remove the tonearm completely from the table.
When you remove the 2 set screws underneath, and pull it out you will then remove the single set screw you see in your picture on top.
Then with this set screw removed, you will unscrew the counter weight shaft to get to brass isolated rubber shaft .
You can see the squared end of the brass screw that is part of the rubber isolation in my picture.
How you make the rubber insulator is up to you but avoid at all costs a rigid coupling of any kind.
I originally did this and the sonic consequence was mid bass ringing very easy to hear.
You absolutely need counter weight damping any way you can get it.
Regards
David
Hi David,
Damn. I was hoping I wouldn't have to remove the arm.
Are you saying remove the entire arm including the base from the plinth
or just the arm itself and leave the base attached to the plinth?
Does that mean I'll have to disconnect/unsolder the Tonearm Wires?
Steve
Damn. I was hoping I wouldn't have to remove the arm.
Are you saying remove the entire arm including the base from the plinth
or just the arm itself and leave the base attached to the plinth?
Does that mean I'll have to disconnect/unsolder the Tonearm Wires?
Steve
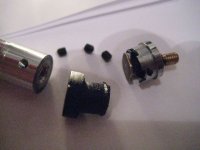
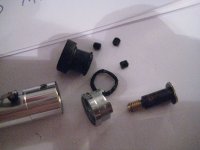
I did it David, I did it. 
Many thanks to you my friend, many thanks.
Luckily the 2 lower screws were not put in with locktite, just the top screw.
The 2 lower screws came out easy. Now I see what you meant about the
brass screw. It's just like you said, it's encased in the rubber washer, you
can't see it until the shaft is completely removed.
I'm so glad I didn't have to remove the Tonearm.
Tomorrow it's washer hunting day at my local hardware stores.
More pics.
Steve.
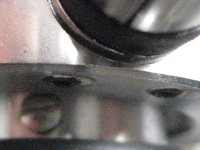
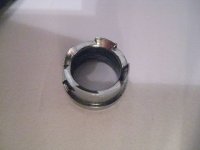
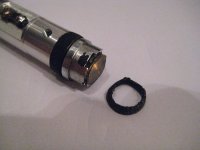
Good for you !
Now you see that small collar that surrounds the rubber.
No wonder they go away over time with too much leverage over a small area.
Ideally, a new insert made with a larger rubber area would be better and I might make one down the road.
This is not my main arm I use day to day, just that itch that needed scratching !
On the rubber and what to use, rubber tubing instead of washers would be more consistent overall, any broken space would allow it possibly change composition under tension.
Avoid rigid coupling at all costs like I did.
Regards
David
Good for you !
Now you see that small collar that surrounds the rubber.
No wonder they go away over time with too much leverage over a small area.
Ideally, a new insert made with a larger rubber area would be better and I might make one down the road.
This is not my main arm I use day to day, just that itch that needed scratching !
On the rubber and what to use, rubber tubing instead of washers would be more consistent overall, any broken space would allow it possibly change composition under tension.
Avoid rigid coupling at all costs like I did.
Regards
David
Hi David,
Yes, rubber tubing or solid rubber is what I plan to use. If I can’t find something at the local hardware stores McMaster-Carr sells a lot of rubber, cork, and felt products that are great for DIY.
If I need it machined I’ll ask one of my buddy’s at the machine shop I retired from. Damn, I missed my calling. As much as I love audio and my 30+ years of programming CNC machines I could be designing and building my own parts if I had my owe CNC Lathe and Mill.
Oh well, maybe in my next life.
If you've never seen a water-jet machine parts they are amazing. They will cut thru anything from wood, glass, rock, any kind of steel up to 6” thick.
They could cut thru a 4 inch slab of granite for a TT plinth with great accuracy.
I keep you posted on my progress.
Steve.
Attachments
Last edited:
- Status
- This old topic is closed. If you want to reopen this topic, contact a moderator using the "Report Post" button.
- Home
- Source & Line
- Analogue Source
- JVC QL-7 Counterweight Rubber Bushing