<snip>
About your comments on losing the "soul" of the turntable by backing off on the brake too much - it makes total sense to me. I would think the tension in the drive system provided by the eddy brake "pushing back" against the motor would tend to further stabilize the entire system.
I do believe this is exactly the case.
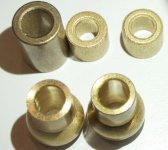
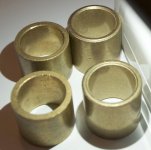
Attached are photos of all the various bushings I have purchased for rebuilding my Thorens TD 124/II. These bushings were purchased from three different vendors over the past few years. One of the main platter bushings is shorter than the other set. One of those sets was purchased as part of a larger Thorens parts purchase from someone on eBay who had no idea of the provenance of any of the parts. The E50 bushings were purchased from another vendor, while the remaining bushings, if memory serves me, were all purchased from Simone.
I took over 40 photos in an attempt to capture as much detail as I possibly could. Obviously none of the photos is in sharp focus on every surface of every part, which is why I am posting enough to try and represent the surfaces of all parts. Capturing enough detail on the I.D. to properly represent the surfaces was difficult, but I believe there is enough detail for one to get a fair understanding of the parts.
I noticed as I lay the bushings out, that the smaller ones for the idler wheel and stepped pulley transferred some oil to the surface they were placed on. None of the others transferred oil.
Attachments
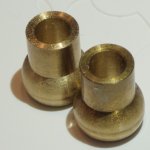
I wasn't satisfied with the level of detail I was able to get in my earlier E50 bushings photos, so I changed lenses and enhanced this second set. More detail can be seen because they've been heavily sharpened, but the result are photos that look much more grainy than the actual parts are. In many in this set, I tried best as I could to focus on the I.D.
Attachments
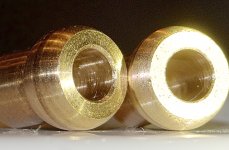
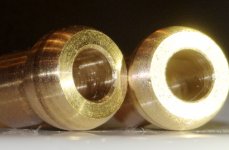
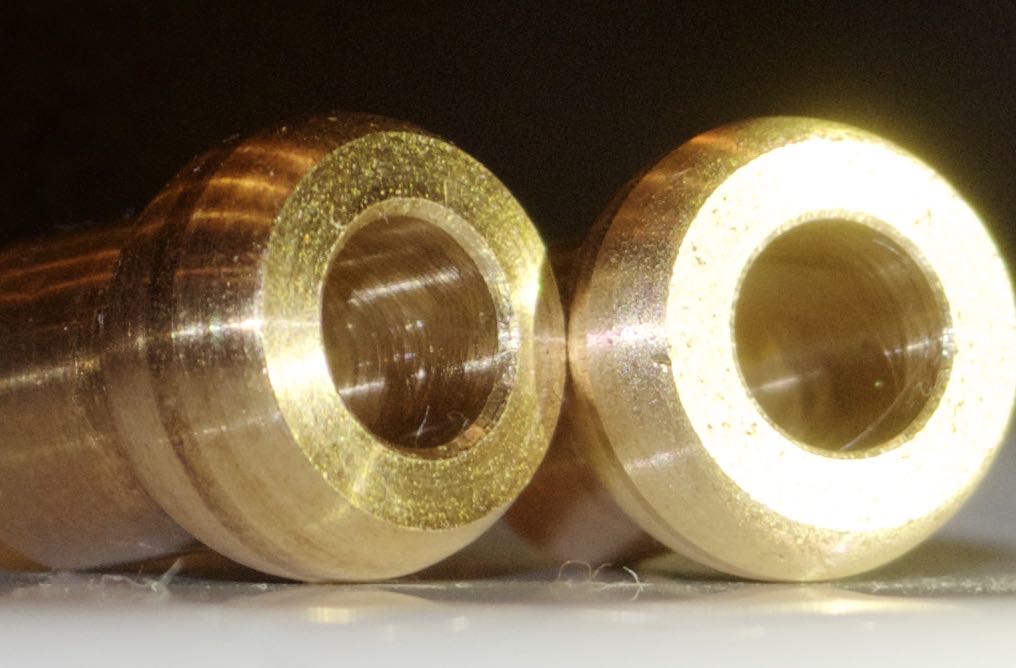
This is the first photo from that group of 4. It also appears to be porous bronze. This is more evident on the second bushing in the photo, where the lighting is overexposed. The porous surface of the material can be seen on the end face.
The inside diameters appear to have been smeared by improper cutting method. I'd guess that the machinist used abrasives to achieve final size in the Id. Smearing means that the porous surface has been sealed off. The smearing will prevent the bushing from self-lubing as it should.
Generally, the big no-no with this material is to use abrasives in order to achieve size. Sanding will smear/seal off the porosity of the bronze. The bushings have to be cut with sharp free cutting tools at speeds and feeds that will keep the porosity of the material open. And, at the same time, sizes need to be held this way.
-Steve
I do not remember, please what is the diameter of the shaft ?
4.75mm dia.
or
.1869 inches
-Steve
Noob questions. If we freeze old bush than dip in hot oil would it help ?
I had seen in some earlier philips and some modern TTs (Clearaudio I think) They use flywheel after motor for speed stability. Since we have stepped pulley between motor and idler Would a proper flywheel on stepped pulley help in stabilizing the speed ?
Thanks and regards.
I had seen in some earlier philips and some modern TTs (Clearaudio I think) They use flywheel after motor for speed stability. Since we have stepped pulley between motor and idler Would a proper flywheel on stepped pulley help in stabilizing the speed ?
Thanks and regards.
I would be very interested if someone can find a good material for these bearings. Sintered phosphor bronze is the better one so far. If a porous plastic was available it would reduce vibration transmisson. Gortex comes to mind. It is a strange situation where a reamer and a material can not provide an answer. I was told wood is possible. Ebony for example. Ships bearings were made this way.
I agree with user510 's comments.
To be clear since I posted so many photos, I have photographed only one set of E50 bushings. The only other set I own are the originals still in the motor.
In evaluating the surfaces of these parts, it's important to take into account digital noise present. Look at the part surface, then at some area just outside the part. In particular on the second set, the combination of lower lighting and high sharpening gives a certain amount of grain to everything. I apologize for that, but I'm simply not set up right now to do a better job.
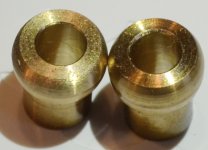
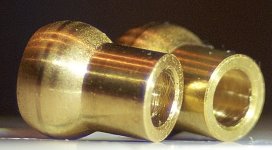
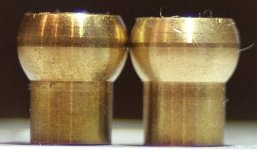
That aside, while it may not be apparent in the photos, all of the bushings, save the E50 set, have a uniform appearance on all surfaces, I.D. and O.D. and that uniform appearance includes little "dots".
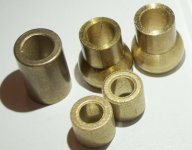
The set for the stepped pulley do look quite different, in that the alloy is much brighter and the "coral" look much more predominant. Thinking back, I can't say I know the provenance of the stepped pulley bushings. They might well have been part of that parts lot I purchased. I'll have to check. If that's the case I may opt to buy replacements from Simone, assuming he offers them.
To be clear since I posted so many photos, I have photographed only one set of E50 bushings. The only other set I own are the originals still in the motor.
In evaluating the surfaces of these parts, it's important to take into account digital noise present. Look at the part surface, then at some area just outside the part. In particular on the second set, the combination of lower lighting and high sharpening gives a certain amount of grain to everything. I apologize for that, but I'm simply not set up right now to do a better job.
That aside, while it may not be apparent in the photos, all of the bushings, save the E50 set, have a uniform appearance on all surfaces, I.D. and O.D. and that uniform appearance includes little "dots".
The set for the stepped pulley do look quite different, in that the alloy is much brighter and the "coral" look much more predominant. Thinking back, I can't say I know the provenance of the stepped pulley bushings. They might well have been part of that parts lot I purchased. I'll have to check. If that's the case I may opt to buy replacements from Simone, assuming he offers them.
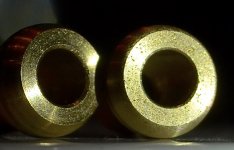
Interesting, I see a few where it appears that the ID is solid bronze, in general there seems to be a lot of tooling marks on the running surfaces of some of these parts.
The second pair actually look like oilite, the others not sure.
Why not just check the fit of the stepped pulley bushings on the shaft, and measure the OD? They might be just fine.
I did not realize that those pictures were all of the same E50 bushing set. The important point is that the interior has been machined in such a fashion that it appears to completely block the pores.
The pair I recently removed from my MKII do not look like sintered bronze inside or out, and were absolutely dry when received. I dropped them in hot oil, but had problems immediately upon installation - did not have enough experience at that point to know definitively I had not done something wrong.
I can say the motor performed quite poorly compared to the one with original bushings. Several years of observing the differences hammered this point home, and I finally had to address it.
I'm unfortunately one of those people who, at least for the moment, does not have a tool capable of measuring bushings, or for that matter, the pieces they fit into, with any degree of accuracy. If someone were to point me to a decent tool, plus a set of bore gauges, I'd be most appreciative.
Heck, I don't even know what the tolerances are supposed to be, so best I could do is, as you say, slip a bushing over a shaft and decide if it feels right - which I have a feeling is hardly the ideal way to do it!
I wonder how many people who decide to replace bushings are in the same boat as I.
Heck, I don't even know what the tolerances are supposed to be, so best I could do is, as you say, slip a bushing over a shaft and decide if it feels right - which I have a feeling is hardly the ideal way to do it!
I wonder how many people who decide to replace bushings are in the same boat as I.
Why not just check the fit of the stepped pulley bushings on the shaft, and measure the OD? They might be just fine.
I did not realize that those pictures were all of the same E50 bushing set. The important point is that the interior has been machined in such a fashion that it appears to completely block the pores.
The pair I recently removed from my MKII do not look like sintered bronze inside or out, and were absolutely dry when received. I dropped them in hot oil, but had problems immediately upon installation - did not have enough experience at that point to know definitively I had not done something wrong.
I can say the motor performed quite poorly compared to the one with original bushings. Several years of observing the differences hammered this point home, and I finally had to address it.
I'm not certain, but could you be talking about the Eddy Current Brake? if so, yes, it needs to be adjusted. Here is a page that can tell you more.
EddyBrake
EddyBrake
I have 124 mk 1 that has the plate between the motor and the pulley scraping against the pulley when in motion. Is that plate necessary? Also, it seems a little loose. Do I have to remove the motor to adjust that plate and how so?
Any help much appreciated
I re-read your posting, and agree it sounds like you are talking about the shield. Check this photo.
http://www.theanalogdept.com/images/spp6_pics/TD124 customer/2128/msE50/DSC_4094.JPG
You do want to keep the shield. If you're planning on removing, cleaning and re-lubricating the motor, that would be the time to straighten out the shield.
http://www.theanalogdept.com/images/spp6_pics/TD124 customer/2128/msE50/DSC_4094.JPG
You do want to keep the shield. If you're planning on removing, cleaning and re-lubricating the motor, that would be the time to straighten out the shield.
As others have stated you need to keep the metal shield, what others have not stated is that it is reputedly mu-metal and should be handled with care in order to retain its shielding properties. (It looks like a sheet of mu-metal I have here so I think that is likely)
It floats on the motor supports.
Usually if the pulley is hitting it could mean one of several things:
It floats on the motor supports.
Usually if the pulley is hitting it could mean one of several things:
- motor pulley height is misadjusted - highly likely if you have ever removed the pulley
- the shield is not properly seated on the motor mounting stanchions
- The thrust pad is badly worn and the shaft has dropped slightly
Thanks guys for the insight. I am a little confused on "changing the height of the motor pulley" How does one do that? I see that there is a screw set in the motor pulley but that does not seem to affect the height of the pulley. One can pull the pulley up but it sets back into place. Adjusting the motor grommets does not adjust the plate it simply moves everything together. Do I have to remove the motor and disassemble the pulley from the motor itself? Is the placement of the motor to the chassis determined by the thickness of the grommets?
Sorry for all the questions, but I had a problem earlier with step pulley making noises, and read here to clean both pulleys and use baby powder on the belt and it worked like a dream; you guys obviously know what you are doing.
Thanks
Sorry for all the questions, but I had a problem earlier with step pulley making noises, and read here to clean both pulleys and use baby powder on the belt and it worked like a dream; you guys obviously know what you are doing.
Thanks
- Home
- Source & Line
- Analogue Source
- Restoring and Improving A Thorens TD-124 MKII