I am over the moon these days because my new turntable project has come to an end after 4 years of planning ,significant expense and personal effort.
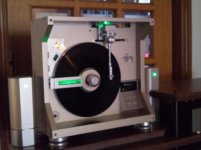
It is based on the vertical standing,parallel tracking Mitsubishi LT-5V.
But nothing from this turntable has been used in stock form.
All,and i mean ALL parts have been modified to a small or larger extent to produce the result that i was after.For this project two donor tables were used.
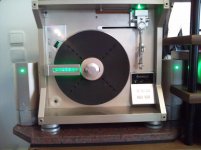
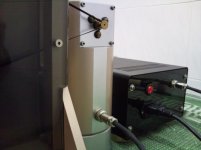
It now has twin belt drive,external heavy duty PSU,a platter with 6 kilos of rotating mass,
upgraded tonearm and cabling,and a sandwich chassis made from aluminum and bronze.Other parts are made from leaded iron.
Turntable only weighs 65 kilos,with motors 92 kilos,with PS 101 kilos!
It is placed on a custom cut 25 kilos granite plate which is decoupled from
the supporting self by a thick elastomer sheet.
It is DEAD quiet,has perfect rotational stability and it's parallel tracking
works like a dream.
Please see photos:
It is based on the vertical standing,parallel tracking Mitsubishi LT-5V.
But nothing from this turntable has been used in stock form.
All,and i mean ALL parts have been modified to a small or larger extent to produce the result that i was after.For this project two donor tables were used.
It now has twin belt drive,external heavy duty PSU,a platter with 6 kilos of rotating mass,
upgraded tonearm and cabling,and a sandwich chassis made from aluminum and bronze.Other parts are made from leaded iron.
Turntable only weighs 65 kilos,with motors 92 kilos,with PS 101 kilos!
It is placed on a custom cut 25 kilos granite plate which is decoupled from
the supporting self by a thick elastomer sheet.
It is DEAD quiet,has perfect rotational stability and it's parallel tracking
works like a dream.
Please see photos:
Attachments
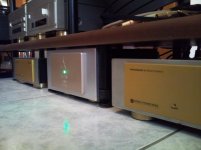
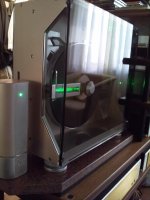
And here are some more pictures of the PS unit,the turntable with custom plexi cover,detail from rear with transparent cover,motor and PS.
Attachments
Last edited:
The original turntable is vertical.The parallel tracking arm does not work otherwise.
The arm is absolutely zeroed in left to right and front to back.Then with a micrometric weight you just dial in your tracking weight.
The company blurb was that it is essentially immune to airborne and ground feedback.
It is a parallel tracker with small pivoting movement that when reaches 0.1 deg of tracking
error the servos cut in and correct it to zero.
It works!

It was a present from my father when i was accepted in the university (i am a vet).
Other tables came and went but this one was always a constant!
I had already tuned it (on a budget) some 10 years ago and came to understand all
the "problems" of the original (built to a price point) execution.
Then a fellow audiophile fell in love with the previous "mildly" (1000 euro cost) tuned
LT-5V i had in my system and offered me a price i couldn't resist!
So i took the money and bought three used LT-5Vs to use for my project.
BUT things pretty soon went out of hand and the whole project took me 4 years to
design,make prototypes in wood,then in CNC cut metal parts,that i personally prepped and painted.Then was the assembly and tuning of various subsystems and the electronics (nightmare) to convert them in controlling two motors with perfect sync.
The parallel tracking is modified to allow even less error,the tonearm is modified with magnesium parts from other turntables,the wiring is all mono-crystal silver from cartridge
to phono stage.
The platter is using (under it) bronze peripheral weights and the subplatter is made from two original subplatters with added bronze weights so that it equalizes the frontal weight.
The spindle carrier has triple modified bushings cut from self lubricating bronze and the whole
assembly is mounted on the chassis with a silicone flange to further dampen any vibrations/noise.
The clamp is a three parts heavy duty aluminum design and utilizes a spring from a car valve!
It is decoupled from it's original carrier which was then been remodeled in aluminum
to incorporate a new metering scale and my beloved green leds!
The chassis is a sandwich construction made from a 2.5 cm thick aluminum between
two plates of 1 cm thick bronze.Between the different metals there is always a 1 mm
sheet of soft silicone to aid coupling and dampening.
Two separate supplies with different transformers are used in the PS box to power the
motors and electronics.
Total cost:I would say somewhere around 5000 euro (excluding the cables and cartridge)
I have kept photographic material from the whole process and if there is enough interest
i can write a detailed presentation of this effort...
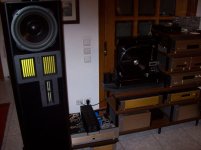
And there is my previous (now sold) effort on the subject...
Other tables came and went but this one was always a constant!
I had already tuned it (on a budget) some 10 years ago and came to understand all
the "problems" of the original (built to a price point) execution.
Then a fellow audiophile fell in love with the previous "mildly" (1000 euro cost) tuned
LT-5V i had in my system and offered me a price i couldn't resist!
So i took the money and bought three used LT-5Vs to use for my project.
BUT things pretty soon went out of hand and the whole project took me 4 years to
design,make prototypes in wood,then in CNC cut metal parts,that i personally prepped and painted.Then was the assembly and tuning of various subsystems and the electronics (nightmare) to convert them in controlling two motors with perfect sync.
The parallel tracking is modified to allow even less error,the tonearm is modified with magnesium parts from other turntables,the wiring is all mono-crystal silver from cartridge
to phono stage.
The platter is using (under it) bronze peripheral weights and the subplatter is made from two original subplatters with added bronze weights so that it equalizes the frontal weight.
The spindle carrier has triple modified bushings cut from self lubricating bronze and the whole
assembly is mounted on the chassis with a silicone flange to further dampen any vibrations/noise.
The clamp is a three parts heavy duty aluminum design and utilizes a spring from a car valve!
It is decoupled from it's original carrier which was then been remodeled in aluminum
to incorporate a new metering scale and my beloved green leds!
The chassis is a sandwich construction made from a 2.5 cm thick aluminum between
two plates of 1 cm thick bronze.Between the different metals there is always a 1 mm
sheet of soft silicone to aid coupling and dampening.
Two separate supplies with different transformers are used in the PS box to power the
motors and electronics.
Total cost:I would say somewhere around 5000 euro (excluding the cables and cartridge)
I have kept photographic material from the whole process and if there is enough interest
i can write a detailed presentation of this effort...
And there is my previous (now sold) effort on the subject...
Attachments

Last edited:
Very cool, it was hard to tell from the photographs in the original post just how much effort you actually put into your TT.
I've got more TT than I know what to do with at this point, so I'll not be building one of these, but would still be very interested to see the process and read your (further) comments. Others might potentially be interested in replicating your efforts.
Have you posted over on Vinyl Engine | The Home of the Turntable ? I think a lot of people there would find it very interesting as well. (Just don't post exactly the same things there and here.)
I had a Mitsubishi DP-EC7 back in the late 1980s and early 1980s - I can see some common design elements, (disk size measurement optics, etc.) but I bet this TT with your mods is quite good, far better than my old TT was..
Last edited:
Thanks Kevin!I am a member on Vinyl Engine too...
However all of you that are interested can visit the DIY section of the What's Best Forum where i have posted a 13 part
detailed description (with many huge photos) under the name "The story of my LT-5V"
Since i am a moderator there, i felt obliged to write my story in that site first.
You may have to register to see the photos...i am not sure.
Regarding the LT-5V in original form:it is an excellent player with some really original thoughts behind it, that were restrained by the built to a price point...
Unfortunately very few people know how to set it up as there are things that even the manual doesn't say...There are at least four more points to adjust desides the ones that the manual says...You have to really dig into it's parallel tracking mechanism (five in mine) to make it sing...

new project for ya!
Congrats - looks absolutely like it should - engineered and solid yet with finesse. Love it.
Congrats - looks absolutely like it should - engineered and solid yet with finesse. Love it.
EPISODE-1
It all started back on 1986 when i finished high school and had successfully
entered the University community.My father bought me as a gift, a Mitsubishi
set of components (amp/preamp/cassette player/tuner and THE Turntable:the LT-5V) plus floor standing danish Jamo speakers.
Of course the eye candy of the whole system was the turntable!
About 1/3 of that was the cost of the turntable and rightfully so!
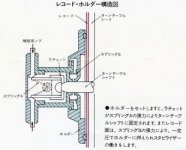
It was vertical,the record had to be pushed onto the platter and stabilized with a clamp,
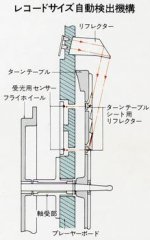
was completely automatic (record size sensing/speed set/cue in/end lift ) and was using
a complicated parallel tracking arm that in contrary to the norm had a (limited) pivot movement!
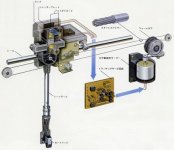
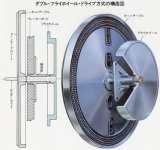
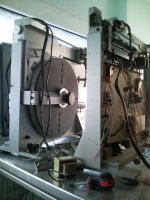
It was belt driven, with a motor that would rotate a sub-platter at the back, connected with
a polished steel rod with the platter on the front.
On board cartridge was an MM AudioTechnica.
I remember that there was not a single person that would come into our house and not gasp in amazement looking at it!
Through this turntable i listened all the records of my university years...It worked without a single problem for years and years.
At times other turntables came and went (best was a DENON DP72L) but this was with me always even after i made my own family and moved to my house.
Through the years i came to understand the way it worked,it's strong points and it's weak ones!
The parallel tracking mech was very well executed but a lot of things could be done to support it's function...
So at first, i took out the power supply and placed it in a separate case,took out the motor,placed it in a separate iron ''tower'' and used a longer belt to rotate the sub-platter.I have designed a different clamp that utilized a stiffer spring to gain better contact between records/platter.
Then i tossed away the original (rather flexible) plastic feet and used in their place a solid 3cm MDF board
with Sony ES feet,used extra MDF boards to strengthen the chassis, changed the tonearm wires
to silver ones and bought a nice VDHul "The Frog" cartridge...
Last of all i painted it black (from the original silver).
With this transformation the sound moved up several notches and i was in content
for another seven years...
Until an audio friend saw it and said :"I WANT THIS ONE!" and had the money to back up his statement!
I knew that working samples of this were sold at ebay for around 150 euro,and so i promised my
friend that he could have mine the moment i could make a "new" one the way i have dreamed it!
I wanted rigid chassis construction,twin motors,heavier platter/sub-platter assembly,superb power regulation,better tracking and looks to die for.
So i bought two (and later another one) working samples to use as donors for all the parts i needed and started to design
the shape of things to come...
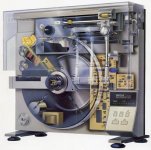
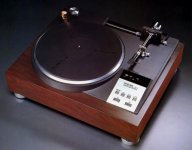
The photos are of the original thing,and pictures of the
various mechanisms that make this work.
It all started back on 1986 when i finished high school and had successfully
entered the University community.My father bought me as a gift, a Mitsubishi
set of components (amp/preamp/cassette player/tuner and THE Turntable:the LT-5V) plus floor standing danish Jamo speakers.
Of course the eye candy of the whole system was the turntable!
About 1/3 of that was the cost of the turntable and rightfully so!
It was vertical,the record had to be pushed onto the platter and stabilized with a clamp,
was completely automatic (record size sensing/speed set/cue in/end lift ) and was using
a complicated parallel tracking arm that in contrary to the norm had a (limited) pivot movement!
It was belt driven, with a motor that would rotate a sub-platter at the back, connected with
a polished steel rod with the platter on the front.
On board cartridge was an MM AudioTechnica.
I remember that there was not a single person that would come into our house and not gasp in amazement looking at it!
Through this turntable i listened all the records of my university years...It worked without a single problem for years and years.
At times other turntables came and went (best was a DENON DP72L) but this was with me always even after i made my own family and moved to my house.
Through the years i came to understand the way it worked,it's strong points and it's weak ones!
The parallel tracking mech was very well executed but a lot of things could be done to support it's function...
So at first, i took out the power supply and placed it in a separate case,took out the motor,placed it in a separate iron ''tower'' and used a longer belt to rotate the sub-platter.I have designed a different clamp that utilized a stiffer spring to gain better contact between records/platter.
Then i tossed away the original (rather flexible) plastic feet and used in their place a solid 3cm MDF board
with Sony ES feet,used extra MDF boards to strengthen the chassis, changed the tonearm wires
to silver ones and bought a nice VDHul "The Frog" cartridge...
Last of all i painted it black (from the original silver).
With this transformation the sound moved up several notches and i was in content
for another seven years...
Until an audio friend saw it and said :"I WANT THIS ONE!" and had the money to back up his statement!
I knew that working samples of this were sold at ebay for around 150 euro,and so i promised my
friend that he could have mine the moment i could make a "new" one the way i have dreamed it!
I wanted rigid chassis construction,twin motors,heavier platter/sub-platter assembly,superb power regulation,better tracking and looks to die for.
So i bought two (and later another one) working samples to use as donors for all the parts i needed and started to design
the shape of things to come...
The photos are of the original thing,and pictures of the
various mechanisms that make this work.
Attachments
Yes indeed,i am a sentimental fool.
You won't know how much fool i am until you see the whole effort...and many others.
And yes that is my D2D-1 before i upgraded it.I'll shoot and post a picture for you of it
on it's new state.
I didn't buy the IRIS as i have a Sony SCD-777ES tuned to the max which is a much better transport than the IRIS.
But you can't beat the Processor-3 as a tubed dac (especially in my upgraded 24/192 version).
I still use the D2D-1 for dejittering and I2S-e protocol...
EPISODE-2
This turntable was sold also under the DIATONE name (a subsidiary of Mitsubishi Heavy Industries).This was mostly for Japan as the Diatone name had a certain audio reputation there, but for the rest of the world it was sold under the Mitsubishi name.Rumors say that in the the electronics, NEC had led a helping hand too.
You can watch it working on youtube:http://www.youtube.com/watch?v=PvuZa...e
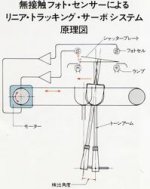
If you have to ask why they went into trouble making a vertical standing turntable,the company
brochure blurb was:"The tonearm hangs vertically down, statically balanced in all three dimensions and therefore able to follow even warped discs and cope with vibrations with much less tendency to skip out of the groove."
"The vertical turntable configuration is much less sensitive to feedback than horizontal units because the vibration from the speaker systems is at right angles to the motion of the stylus in the groove"
As for floor/shelf vibrations, i can verify all that.As for warped records it is true for vertically
warped records but they have implemented a fixed sensitivity threshold to the off center hole phenomenon!
Indeed, if the center hole of the record is waaay of center the tonearm recognizes it after a few spins
and automatically lifts and returns to the rest position!
This is extremely useful for protecting the sensitive cantilever of expensive cartridges!
I have also seen a Japanese brochure showing the turntable sans feet screwed onto the wall (which should be a good thing given the fllexibility of the original feet)
And you thought that "on wall" flat screen TVs were a novel idea!
How about "on wall" flat turntables?
If someone asks about the coupling of the record to the platter because the gravity doesn't help due to the platter orientation,i would say that it is a justified question.
Here is a solution that they have used that i discovered after measuring four different platters (and i couldn't believe my eyes!).
The platter is NOT flat!!!It is slightly concave (the periphery is raised with regards to the center) and the pushing action of the center clamp forces the record to "copy"
this form!The difference in height between edge and center is 3mm to all the platters that i have measured,so it is NOT a production mistake but a designers decision!
And to counteract this the headshell is oh so slightly tilted (!) to the center of the record so it always tracks the grooves with the proper azimuth!
This is something that i have never heard for any other turntable but it has been done in cd player mechanisms!
All VRDS cd spinners use slightly concave (inverted) "platters" that deform the cd (with the use of a clamp) and the laser head is again slightly tilted to be always perpendicular
to the cd surface!Teac says that the slight deformity of the cd makes a better contact
and dampens any vibrations...
All this (and other small things) proved to me that serious thought was behind this construction which i could use to build something really special.
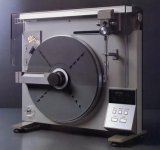
I took some hints out of the LT-1 which was a "Japan only" issue.(see picture)
This had a more massive construction (about 5 more Kgs) ,direct drive,and even better (the BEST) tracking ability allowing only a maximum of 0,05 degrees error!
This is extraterrestrial teritory for all pivoted arms!
Was only sold in Japan in small numbers and pristine specimens fetch today very high prices...
I was lucky to find one i a very bad condition that was sold for spares from a japanese seller and persuaded him to send me the whole tracking mechanism (with the tonearm) without having to pay for the whole turntable.
So that i could study the execution and maybe borrow some parts to use in my turntable.
This turntable was sold also under the DIATONE name (a subsidiary of Mitsubishi Heavy Industries).This was mostly for Japan as the Diatone name had a certain audio reputation there, but for the rest of the world it was sold under the Mitsubishi name.Rumors say that in the the electronics, NEC had led a helping hand too.
You can watch it working on youtube:http://www.youtube.com/watch?v=PvuZa...e
If you have to ask why they went into trouble making a vertical standing turntable,the company
brochure blurb was:"The tonearm hangs vertically down, statically balanced in all three dimensions and therefore able to follow even warped discs and cope with vibrations with much less tendency to skip out of the groove."
"The vertical turntable configuration is much less sensitive to feedback than horizontal units because the vibration from the speaker systems is at right angles to the motion of the stylus in the groove"
As for floor/shelf vibrations, i can verify all that.As for warped records it is true for vertically
warped records but they have implemented a fixed sensitivity threshold to the off center hole phenomenon!
Indeed, if the center hole of the record is waaay of center the tonearm recognizes it after a few spins
and automatically lifts and returns to the rest position!
This is extremely useful for protecting the sensitive cantilever of expensive cartridges!
I have also seen a Japanese brochure showing the turntable sans feet screwed onto the wall (which should be a good thing given the fllexibility of the original feet)
And you thought that "on wall" flat screen TVs were a novel idea!
How about "on wall" flat turntables?
If someone asks about the coupling of the record to the platter because the gravity doesn't help due to the platter orientation,i would say that it is a justified question.
Here is a solution that they have used that i discovered after measuring four different platters (and i couldn't believe my eyes!).
The platter is NOT flat!!!It is slightly concave (the periphery is raised with regards to the center) and the pushing action of the center clamp forces the record to "copy"
this form!The difference in height between edge and center is 3mm to all the platters that i have measured,so it is NOT a production mistake but a designers decision!
And to counteract this the headshell is oh so slightly tilted (!) to the center of the record so it always tracks the grooves with the proper azimuth!
This is something that i have never heard for any other turntable but it has been done in cd player mechanisms!
All VRDS cd spinners use slightly concave (inverted) "platters" that deform the cd (with the use of a clamp) and the laser head is again slightly tilted to be always perpendicular
to the cd surface!Teac says that the slight deformity of the cd makes a better contact
and dampens any vibrations...
All this (and other small things) proved to me that serious thought was behind this construction which i could use to build something really special.
I took some hints out of the LT-1 which was a "Japan only" issue.(see picture)
This had a more massive construction (about 5 more Kgs) ,direct drive,and even better (the BEST) tracking ability allowing only a maximum of 0,05 degrees error!
This is extraterrestrial teritory for all pivoted arms!
Was only sold in Japan in small numbers and pristine specimens fetch today very high prices...
I was lucky to find one i a very bad condition that was sold for spares from a japanese seller and persuaded him to send me the whole tracking mechanism (with the tonearm) without having to pay for the whole turntable.
So that i could study the execution and maybe borrow some parts to use in my turntable.
Attachments
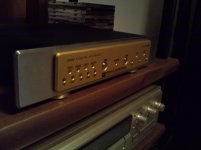
And Jacco here is a photo of my D2D-1 in it's current state.
It has been fine tuned by the original Sonic Frontiers designer Greg Dolick,
plus some more ideas of my own regarding the PS section...
PLUS i couldn't resist making it look like the rest of my SF gear,as it should have been produced anyway!
It has been fine tuned by the original Sonic Frontiers designer Greg Dolick,
plus some more ideas of my own regarding the PS section...
PLUS i couldn't resist making it look like the rest of my SF gear,as it should have been produced anyway!
Attachments
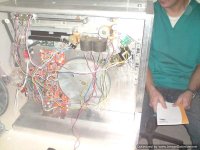
EPISODE-3
The #1 sample (very bad condition visually / non rotating platter),came from a guy in England.Cost:35 pounds plus another 35 for shipping.It was just a torn belt and a couple leaked caps...
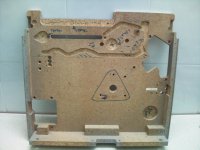
I quickly stripped it down to it's bare wooden chassis to take my initial measurements.
I was not after an exact copy of the chassis as i wanted it more compact and more rigid.
I had to design it so that everything would be as close as physically and electrically (board wise) possible.
The only parameter that could not be altered was the distance and position of the rolling
parallel tracking mechanism to the spindle (hmmmm).
So, i moved the position of the buttons cluster closer to the platter and also moved the position of the clamp/track measuring cluster, as i decided to use a separate heavy duty clamp and do a complete remodeling of the whole thing.
This enabled me to reduce it's width by 3cms and i also managed to reduced the total height of the turntable by a further 1,5 cms.
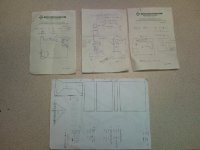
I have kept for archiving reasons some early thoughts and drawings from that era.(Mostly done on prescription paper!!!)
Then it was off to the CNC shop where my design was translated into a proper CAD file.
We first did it in MDF board and corrected some major issues...
Another wooden model was cut to see how things went after corrections and all looked ok.
Next step was to actually mount all the systems onto the wooden chassis.
Then it was time to really trim away minute chassis details that would really elevate the execution status...things like clever wire routing and spacing / clearing of moving parts to a degree of perfection that the original turntable could only dream of...
Unfortunately these wooden "prototypes" were thrown away by the CNC guys when the final design was decided.
I had endless conversations about materials and their special characteristics that lead me to decide on using a "soft" type of aluminum for the main "board" of the chassis
(where all parts are attached) and a harder type of aluminum (used in aircraft manufacturing) for all the other parts.
I ordered both sides machining as i was going to use a much thicker chassis
(2,5 cm where the original wooden was 1,8 cm) and certain parts needed their places milled in, plus all the main openings/holes.
For the countless screwholes that would hold various attachments /boards/subsystems i decided to make them on my own when i would have the metal parts in my hands.
I knew it would be a difficult job to do but the CAD files were paid by the hour and my cost would be sky-high for the myriad of holes to compute and execute!
So i went out and bought a fine tap and die set to be ready for the task.
In the meantime my search through ebay was fruitful enough and made me an owner of
another couple of LT-5Vs, this time much better examples!
The first one was pristine actually as it was boxed for more than 20 years by the widow of a german audiophile.It costed me around 250 euros (ouch! )and about 50 more for shipping.
The second came from Denmark (150+50 euros) ,slightly used ,needed new belts but never the less a fine example!
Now all i had to do was wait for the first pieces to come out of the CNC machine.
You have to see the look on their faces when they ask you "How many pieces?" and you answer "One of each!"
Most of the time they think that you must be crazy to go into such an expense and trouble for just one piece!
Of course a certain percentage of insanity is vital when you are after something so complicated and time consuming...
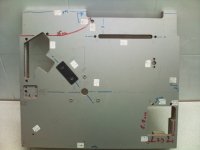
The #1 sample (very bad condition visually / non rotating platter),came from a guy in England.Cost:35 pounds plus another 35 for shipping.It was just a torn belt and a couple leaked caps...
I quickly stripped it down to it's bare wooden chassis to take my initial measurements.
I was not after an exact copy of the chassis as i wanted it more compact and more rigid.
I had to design it so that everything would be as close as physically and electrically (board wise) possible.
The only parameter that could not be altered was the distance and position of the rolling
parallel tracking mechanism to the spindle (hmmmm).
So, i moved the position of the buttons cluster closer to the platter and also moved the position of the clamp/track measuring cluster, as i decided to use a separate heavy duty clamp and do a complete remodeling of the whole thing.
This enabled me to reduce it's width by 3cms and i also managed to reduced the total height of the turntable by a further 1,5 cms.
I have kept for archiving reasons some early thoughts and drawings from that era.(Mostly done on prescription paper!!!)
Then it was off to the CNC shop where my design was translated into a proper CAD file.
We first did it in MDF board and corrected some major issues...
Another wooden model was cut to see how things went after corrections and all looked ok.
Next step was to actually mount all the systems onto the wooden chassis.
Then it was time to really trim away minute chassis details that would really elevate the execution status...things like clever wire routing and spacing / clearing of moving parts to a degree of perfection that the original turntable could only dream of...
Unfortunately these wooden "prototypes" were thrown away by the CNC guys when the final design was decided.
I had endless conversations about materials and their special characteristics that lead me to decide on using a "soft" type of aluminum for the main "board" of the chassis
(where all parts are attached) and a harder type of aluminum (used in aircraft manufacturing) for all the other parts.
I ordered both sides machining as i was going to use a much thicker chassis
(2,5 cm where the original wooden was 1,8 cm) and certain parts needed their places milled in, plus all the main openings/holes.
For the countless screwholes that would hold various attachments /boards/subsystems i decided to make them on my own when i would have the metal parts in my hands.
I knew it would be a difficult job to do but the CAD files were paid by the hour and my cost would be sky-high for the myriad of holes to compute and execute!
So i went out and bought a fine tap and die set to be ready for the task.
In the meantime my search through ebay was fruitful enough and made me an owner of
another couple of LT-5Vs, this time much better examples!
The first one was pristine actually as it was boxed for more than 20 years by the widow of a german audiophile.It costed me around 250 euros (ouch! )and about 50 more for shipping.
The second came from Denmark (150+50 euros) ,slightly used ,needed new belts but never the less a fine example!
Now all i had to do was wait for the first pieces to come out of the CNC machine.
You have to see the look on their faces when they ask you "How many pieces?" and you answer "One of each!"
Most of the time they think that you must be crazy to go into such an expense and trouble for just one piece!
Of course a certain percentage of insanity is vital when you are after something so complicated and time consuming...
Attachments
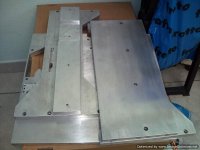
PART-4
First part to be cut was the main "board" of the chassis that is the base for most systems...
As said before this was going to be cut in a softer grade of aluminum that has less "ringing".
Since there was going to be a "both sides" machining (which means that the CNC
cuts everything from one side of the metal surface which then is flipped so it can cut into the other side too),the crucial part is the repositioning of the flip side of the metal board to the exact calculated position so that the file execution of the back side is carried out in alignment to the front.
Needless to say that i was right above their shoulders watching things closely.
It took the lathe 4 hours to complete the work on both sides.When i took it in my hands i was in heaven.
As we say in my country: "the water had started to run through the channel".
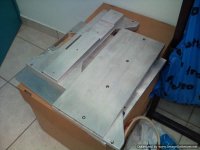
The next day the other parts were cut.These were 4 more:a 3cm thick base plate, two side plates and a smaller bottom plate with 2 cm thickness, and a top plate with 1.5 cm thickness.
These were cut from a very hard/dense aluminum alloy used in aircraft construction.
They were going to be screwed together with M8 inox bolts calculated so that their heads would be flush to the metal surface when tightened (plus one washer).
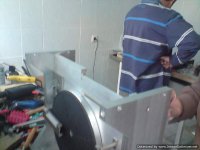
Then i had to screw things together and see if my measurements have been correctly executed.A three hours session on my bench and it started to look like the image in my mind...
I had to do this as a)i had to drill and tap the major screw-holes b)i had to calculate the actual height of the motor casings considering the height of the spikes and cups and c)to measure
the side openings from where the belts were going to pass through and give the side panels back to the CNC to do it.
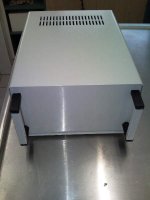
In the mean time i went to the local electronics shop and bought a 10X20 sheet steel box to use for my outboard power supply...
First part to be cut was the main "board" of the chassis that is the base for most systems...
As said before this was going to be cut in a softer grade of aluminum that has less "ringing".
Since there was going to be a "both sides" machining (which means that the CNC
cuts everything from one side of the metal surface which then is flipped so it can cut into the other side too),the crucial part is the repositioning of the flip side of the metal board to the exact calculated position so that the file execution of the back side is carried out in alignment to the front.
Needless to say that i was right above their shoulders watching things closely.
It took the lathe 4 hours to complete the work on both sides.When i took it in my hands i was in heaven.
As we say in my country: "the water had started to run through the channel".
The next day the other parts were cut.These were 4 more:a 3cm thick base plate, two side plates and a smaller bottom plate with 2 cm thickness, and a top plate with 1.5 cm thickness.
These were cut from a very hard/dense aluminum alloy used in aircraft construction.
They were going to be screwed together with M8 inox bolts calculated so that their heads would be flush to the metal surface when tightened (plus one washer).
Then i had to screw things together and see if my measurements have been correctly executed.A three hours session on my bench and it started to look like the image in my mind...
I had to do this as a)i had to drill and tap the major screw-holes b)i had to calculate the actual height of the motor casings considering the height of the spikes and cups and c)to measure
the side openings from where the belts were going to pass through and give the side panels back to the CNC to do it.
In the mean time i went to the local electronics shop and bought a 10X20 sheet steel box to use for my outboard power supply...
Attachments

Very cool, it was hard to tell from the photographs in the original post just how much effort you actually put into your TT.
I've got more TT than I know what to do with at this point, so I'll not be building one of these, but would still be very interested to see the process and read your (further) comments. Others might potentially be interested in replicating your efforts.
Have you posted over on Vinyl Engine | The Home of the Turntable ? I think a lot of people there would find it very interesting as well. (Just don't post exactly the same things there and here.)
I had a Mitsubishi DP-EC7 back in the late 1980s and early 1980s - I can see some common design elements, (disk size measurement optics, etc.) but I bet this TT with your mods is quite good, far better than my old TT was..
I can help ................throw one my way !!!...

Beautiful work, how i adore sentimental nuts.
Is that a D2D-1 i see ?
(i'll start screaming if you also have the SF Iris on top of the Processor 3)
Jacco , you have a way with words ... breathtaking ...........
Last edited:
- Status
- This old topic is closed. If you want to reopen this topic, contact a moderator using the "Report Post" button.
- Home
- Source & Line
- Analogue Source
- My last turntable!