Looks great, what is the heat sink, and what is the board size?
Size is 86x53mm, the heatsink is a SK483-50mm wide. This board has both positive and negative regulator, for bipolar supplies. Inputs are on the left, outputs on the right.
Frans, in fact I was thinking about doing it only once and have two stuffing options as you suggested, but then I thought what the heck - it will mostly be needed for bipolar supplies anyway... also there was a fair amount of copy&paste possible so it was not so complicated..
Having them 'split' is nice also, when using the PSU on top of an amplifier board, it may be that the + and - sources are far apart. Although I like the current version, I may like to have the 'single' option too. Could it be possible to make the board split-able? We only need a bit of space in the middle and a few more mounting holes for the heat sink, so that after splitting there are still 2 holes for each sink.
We do not need the four mounting holes I think that it is possible to mount the PCB and the heat sink directly to the target PCB by using the same screws as that you use to attach the heat sink, just add a few spacers on the soldering side of the PSU PCB and it can be screwed to the target PCB by the same screws. I do think the assembly is not too heavy to do that. When doing this you will not need an connector on the output side of the PSU, just a few wires soldered in place and inserted in corresponding holes on the target PCB will do (but both options will be available).
Regards,
Frans.
Looks very good Alfred. I am looking forward to try it.
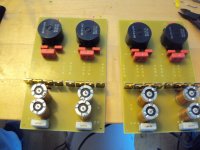
Mad, this is a 9.7V zener and it is actually a ferrite tube direct on the leg.
You still need an input low pass filter because the power buffer has a slight overshot.
Thank you Joachim.
What about output zoebel network - shall I use any?
 OK Traking service confirmed that it is in Germany
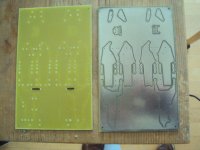
Hi glad you got them
I have put on the envelope a picture of the Silk screen.
Diodes sink tab faces towards output capacitors on your picture top of board is Imput.
2 Jumpers marked with felt tip are needed on this but wont be needed if we go for 2 layers boards and top cooper is used as ground plane.
I have put on the envelope a picture of the Silk screen.
Diodes sink tab faces towards output capacitors on your picture top of board is Imput.
2 Jumpers marked with felt tip are needed on this but wont be needed if we go for 2 layers boards and top cooper is used as ground plane.
Just got official telling off about my spelling mistakes on other tread.
Imput shuld be Input.
Yes my spelling is terrible.
Toold jou soo
How does this work ? Cartright - Easy Cartridge Alignment from The Soundsmith
How does this work ? Cartright - Easy Cartridge Alignment from The Soundsmith
fantastic... at first glance I thought its a joke, you just put the cartridge somehow and adjust everything with the knobs on box.... ;-)))) its magic....
looks like the test record has specific signals that the electronics in the box will be looking for. with a soundcard and/or oscilloscope you should be able to do most of this, don't you think?
the "adjust+" software and test record from Dr. Feickert will also give detailed information about the cartridge alignment, so it should be comparable.
Yes, i think it is something like that. I do not need it anyway because i can adjust my Lyras optically. This is no joke. When the edge of the needle in straight in the groove everything is fine. I mount the new cartridge simply where the old was. The swrews leave marks on the metal of the headshell.
Yes, i think it is something like that. I do not need it anyway because i can adjust my Lyras optically. This is no joke. When the edge of the needle in straight in the groove everything is fine. I mount the new cartridge simply where the old was. The swrews leave marks on the metal of the headshell.
And you can always ask Martina to pop around and make same magic.
Had a chance to get her to listen to "new" paradise so far?