Been itching to try a second generation uni-pivot arm. My first gen one worked but not well enough to replace my Rega RB250. I made it over complicated and butchered it with revisions. On top of that I was never able to make from spare pieces a cuing setup. I have a cuing setup from a thrift store tt that looks like it can be modified for a DIY uni-pivot arm.
I have read and reread many posts here about uni-pivots and as I already figured designs are all compromises, just as the various manufactured uni-pivots are. Aluminum wands, wooden wands, low slung counter weights, etc. One thread noted to keep lateral twisting to a min. that the pivot point should be in line with the height of the platter, but if that is so then the arm must sit on an angle upward to account for the cartridge and stylus thus affecting [greatly] VTA. Now I was just thinking if I can explain... What if one made the pivot point to sit in line with the height of the platter but the arm wand was bent upwards in a curve sorta like a vertical S shape arm. The cartridge can then sit in head shell properly aligned to the record surface but the wand will S back down to allow arm to sit on the lower pivot point, could that not give you both acceptable VTA for the stylus and the pivot will still be lower reducing the twisting that may arise with uni-pivots?
Now some may say why not just run a straight arm wand but mount it high enough above the pivot point so that the arm and cartridge will sit in proper geometry to the record surface but the pivot will sit lower in line with the platter height? But the that would move the CG well above the pivot point and is that not bad for the performance of the arm?
One more thing, what kind of differences can one expect sound wise if one were to use a wooden dowel rod to make an arm wand over say an aluminium tube. I used an aluminium tube on my first gen uni-pivot arm. But just curious about using a wooden dowel rod, or hey what about using a brass tube for an arm wand? Any ideas, thoughts, concerns over each ones strengths and weaknesses.
Just hoping forum visitors will be able to give answers and opinions to my questions, thanks in advance.
maybe a couple of ideas.
I did a search and found your thread on the TTs and arm you've done. Personally I like the Idea of a light rigid plinth vs a massive one...However your work is very nice and both look very good.
do a few vector drawings of the forces involved. The answer will be in there.
As far as material for an arm, I strongly suggest used "practice" arrows from a local Archery range. I bought 2 for $3.
Make your arm as long as physically possible. Trakcing error is greatly reduced.
now AFAIK, the inportant force in stabalizing the arm laterally is the relevant height of the centre of gravity of the counter weight. After all that's what actually keeps the arm stable over all.
I do like the idea of a wooden tonearm, but I think bamboo is the "weigh" to go (pardon the pun.
addendum:, I did a quick sketch or two...offsetting the cg height of the counter weight will have the same effect as making a "bent up" arm, and the results can be easily estimated. you can always stabalize the lateral twist using Frank Van Alstine's headshell trick.
Thanks Nanook.
My current idea that I have sketched and will redraw once I'm happy as workable as final drawing before purchase and construction, takes from things I have seen on some commercial Uni-pivots and DIYers. It seems there is no one ideology.
My thoughts are as follows.
1: An arm tube (it could be aluminium, wood or maybe a practise arrow if I can locate). I will due to fitment limitations utilize arm dimensions that Rega uses on its RB250. My table will not allow much longer arms.
2: The arm tube will be one piece going through the pivot point ( and housing) through to allow me to use a counter-weight that was attained from another thrift shop tt.
3: My uni-pivot will again utilize a ball point pen as tip set within a larger super structure to form an inverted tip. The uni-pivot tip will be set through an opening drilled (over-sized to allow fair fore and aft movement of arm) in my arm tube and will seat above the horizontal plane of the arm tube. The housing for the arm tube and seating for the uni-pivot point will be made out of a steel block ( round, square, or hexagonal outside shape. Thinking 25mm wide or dia. if round and 35mm in length.) It will be drilled out from the bottom side again over sized to allow fore and aft movement of arm so that warps can be ridden, but a dimple will be machined and polished to allow the inverted ball point pen tip to seat as a bearing in it, again it will physically be higher above the horizontal plane of the arm and of course the counter weight too. This tells my [layman's] mind that CG will be slightly below the pivot point.
4: An idea to help dampen twisting motion of the pivot (again I'm not engineer just a hobbyist) would be to cut and prep a metal rod oh say 5 mm. dia. and say 60mm long. I think of boring a lateral hole through the metal housing that forms to base of the pivot and holds the arm wand in place, just directly above the uni-pivot seating but 90 degrees to the arm wand. I imagine like the pole a tight rope walker carries if you see what I'm saying. I may be off in concept but I imagine having this rod running as a lateral balance to the arm and pivot would help dampen any twisting forces. I could be off or on in terms of effectiveness and maybe a 5 mm dia. steel rod that is 60 mm long is not long enough, too long or maybe irrelevant but my mind again pictures a tight rope walker holding a poll. I hope this makes sense.
I think my basic ideas are on the right track, CG below the pivot point and a lateral (mechanical) damper but if you or others have thoughts please feel free to share.
Thanks again.
Well I began the new project. Parts to date cost me about $11.00 Cdn.
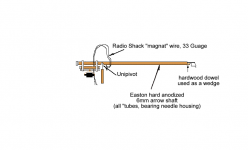
I did go with an aluminium tube as it was easier to get and it is 7/16ths dia. I am using 3/4in hex nuts and a matched bolt (cut down to tread into one (the top hex) nut. The bolt has a 3/32nd inch hole drilled into it to fit my ballpoint pen mounted tip as a uni-pivot bearing. The second hex nut below will be epoxied to the top one and bolt. The first is with bolt mounted, the second is more of a collar and was drilled out so that I can pass the aluminium tube through it. I'm going with a one piece arm tube (all Rega dimensions) and it will sit as you may be able to picture in your mind slightly below the pivot point and lower the CG a bit. The arm tube was itself drilled out over-sized so that the [inverted] pivot and it mount can pass with clearance through it.
I'm going to try using a counterweight from a thrift store TT. I did take some black acrylic paint (craft pant) and poured it down the tube twirling and tapping the tube so that excess paint will flow out but a thin film of acrylic paint will evenly wall the inside of the tube. It should help a bit in damping the arm, but meh who knows but I figured it was worth a try.
I will post photos of this project when I can and hopefully it will come out good. Stay tuned.
New tone arm is completed and has been set up for some early testing.
Link to updated photos of turntable and the new tone arm.
Well after at least 40 man hours of work, with revision and fixing errors the new tone arm is completed.
I call it "Ariele: and it is a properly functioning uni-pivot. The photo link above offers basic descriptions of the images but I will elaborate here.
Taking info shared to me here by others (thanks) and by studying commercial grade uni-pivots I came to a design that I figured should work and perform well. It is all apprehensive as you never know unless you do trial and error but my confidence was high.
1: I chose 7/16ths inch aluminium tubing. It will be measured to Rega RB-250 standards for pivot to spindle length and offset etc. The arm was marked out and at the pivot point drilled through to provide a hollow (shown in photos) so that the uni-pivot can go through the tube and keep the tube's CG lower than the pivot ( slightly).
2: The pivot consists of 1/2 inch dia. ready rod cut and shaped to length and style desired. The threaded rod will thread through a 1/2 inch coupling hex nut that has been drilled to have a little grub screw to help hold things tight once VTA has been adjusted. The pivot point is taken from a ball point pen with a hard chrome tip and ball with a brass ink tube. I cut the ink tube down (flushed out the ink and tried to stuff some heavy oil mixed with Vaseline into the tube) to about 1.5 inches long and drilled out a hole in the threaded rod to seat and epoxy the brass tube in place so that tip will be straight up and solidly inverted. The gold coloured conical housing came from the exterior pen tube finger grip and helps finish off the look.
3: I took 2 3/4 inch hex nuts measured and cut out a 3/4 inch bolt (taking its head off) and fed it through one hex nut. I then centre punched and drilled a slightly over-sized dimple so that ball point pen pivot tip could seat inside the dimple. The 2 hex nuts will be epoxied together to form a pivot housing and adding more mass including keeping CG below pivot point, as photos linked to will show.
4: The block the whole set up will mount to is a wood block to seat on my turntable plinth. It will also hold my anti-skating rod to fish the weight and line too and affix the cueing mechanism that came from an old thrift store buy Toshiba turntable. The cueing mechanism had to be reworked and works pretty good. It is smooth, can be adjusted to set for different cartridge heights and works well enough. It's a little fast due to weaker than I'd like damping but it's not too bad.
5: Originally I was going to terminate arm wires to a box made to house the female RCA plugs but I discarded that as a space taking part that was better served by just soldering the arm wires to the set of RCA's. Gold plated but not too expensive as I was not going to cut up expensive cables knowing that the project may not be successful. The wires are better than cheapie cr*p so that is well enough for the time being.
6: The head shell progressed from cut and shaped acrylic (thrown away) to a bras game token (coin) sanded smooth and clear coated , drilled to proper geometry and epoxied to a filed down and cut aluminium rod that was then epoxied to the front hollow opening of the arm tube. The finger lift is a chromed steal pin epoxied in line with the arm so that it has no bearing on lateral azimuth.
7: Tone arm was sprayed multiple coats of flat back paint to build up a heavy, pebbly finish. I poured through and drained out black acrylic paint inside the tube. This hopefully helps dampen arm ringing.
8: I originally made a counter weight out of epoxying 8- 7/16th inch flat washers, filing the edges with epoxy and once cured sanded and painted to give a one piece look but the weight is too light. I was going to epoxy on more washers but found the old Toshiba's TT counter weight worked just fine. It has been groove from the manufacturer out on its inside and I added an epoxy pimple on the back of the arm tube so that the weight can be spun to adjust TF and the pimple through frictions holds it tightly enough. The TF scale on counter weight was checked and verified to my external TF gauge.
9: The anti-skate is a steel ball ( from a beads package sold at craft stores) and 5lb fishing line fed through an arm wand and an extension post on the back of my tone arm pivot housing. My anti-skate band on a test record verified that the anti-skate using at this time with the DL-110 cartridge that the the middle point is accurate.
10: I cross drilled a hole perpendicular to the arm front to aft line and right above the pivot point. This hole was threaded out so that a 2 inch screw with its head cut off can be finger turned left to right to left again if need be to adjust like a pole that a tight rope walker uses laterally damping and azimuth adjustments so that the cartridge does not ride twisted or adversely twisting left to right when in play. The arm tracks beautifully and in play the cartridge rides like a rock, smooth and square to the record.
11: After careful setup and initial playback I am very impressed with the arm and cartridge set up. It is hard to tell if it is better than the RB250/DL-110 setup but I think it maybe. I have cd's recorded using the RB250/DL-110 setup. I plan to make new copies of the music on cd so that I can better compare both set ups easier. But initial listening may be telling me that this arm/cartridge stet up is out performing my RB250 set up which itself is a good modest priced tone arm. But time and listening will need to follow. All in all I spent including the RCA cables about $25.00 Cdn. Had fun and yes AGRIVATION too. It is delicate work this tone arm stuff and screw ups can be a pain but the arm looks likes something a person may actually buy and I wanted that, good looks to go with good sound too.
I hope you all enjoyed reading a looking at the photos of my project.
Phileas Fogg said:New tone arm is completed and has been set up for some early testing.
I hope you all enjoyed reading a looking at the photos of my project.
I'm impressed!
Magura
Originally posted by Phileas Fogg I hope you all enjoyed reading a looking at the photos of my project.
I did! It looks awesome, very well done!
Well I did some comparisons of the same music recorded onto CD from the Rega RB250/Denon DL-110 setup and the DIY arm with the DL-110. It is so hard to have our acoustic memory hold as you switch from one recorded CD to the other but the differences I seem to notice is that the Rega setup has a slightly more laid back mid range with an upper mid range being a touch edgier or brighter. The DIY arm seems to have mid range being a little more up front and a little less edgy in upper mid range. As for highs and bass. Both arms gave solid bass with the Rega being a bit more distant or laid back and the DIY being a bit more up front or punchy. The DIY arm seemed to have a bit more definition to higher frequencies and the Rega was a bit more diffuse but both were very close in highs.
In the end to think that this DIY arm is giving performance that is a run for if not a bit better than the Rega is great and something to be proud of for myself.
In the end to think that this DIY arm is giving performance that is a run for if not a bit better than the Rega is great and something to be proud of for myself.
the cool thing about DIY unipivots is...
with a little patience, they can sound very good. Mine cost me CAD$2.19, less the cartridge and does run in the same leaugue as my 1100 times as much SME.
The main difference is in the tonearm wire, and I'll remedy that pretty soon too.
Phileas Fogg, arm looks good. A little heavy though?
with a little patience, they can sound very good. Mine cost me CAD$2.19, less the cartridge and does run in the same leaugue as my 1100 times as much SME.
The main difference is in the tonearm wire, and I'll remedy that pretty soon too.
Phileas Fogg, arm looks good. A little heavy though?
Re: thanks for the info....
Holding it in my hand with the Rega RB 250 in the other shows me that it is similar in overall weight if not a touch lighter but it's hard to get it right with just your two hands holding each.
Just got finished playing Tchaikovsky's' 1812 overture and the DIY arm survived the canon shots well enough and not sounding worse for the wear than when I played the RB250 on the same track.
All in all as time passes and I spin more vinyl I get more impressed with my handiwork.
But all this messing around has me now designing first in my mind and sketching on paper a new turntable plinth idea that is going to be very different than the one you see in my photos. I read on TNT about Audiomeca's Belladonna turntable and Septum arm along with comments by their designer Pierre Lune and based on such have begun designing a spindle bearing that will be inverted rather than my more conventional spindle bearing. I also plan to engineer a plinth that will be more rigid but lighter compared to my current setup. I will continue to design and refine to come up with a new winter project in plinth design... Stay tuned.
Nanook said:the pictures just made it look a little "girthy"
Holding it in my hand with the Rega RB 250 in the other shows me that it is similar in overall weight if not a touch lighter but it's hard to get it right with just your two hands holding each.
Just got finished playing Tchaikovsky's' 1812 overture and the DIY arm survived the canon shots well enough and not sounding worse for the wear than when I played the RB250 on the same track.
All in all as time passes and I spin more vinyl I get more impressed with my handiwork.
But all this messing around has me now designing first in my mind and sketching on paper a new turntable plinth idea that is going to be very different than the one you see in my photos. I read on TNT about Audiomeca's Belladonna turntable and Septum arm along with comments by their designer Pierre Lune and based on such have begun designing a spindle bearing that will be inverted rather than my more conventional spindle bearing. I also plan to engineer a plinth that will be more rigid but lighter compared to my current setup. I will continue to design and refine to come up with a new winter project in plinth design... Stay tuned.
Re: Re: thanks for the info....
Lurne,,, I had one of his arm's in 1981. A real beasuty. In a moment of weakness i sold it and the Oracle it was on...
dave
Phileas Fogg said:designer Pierre Lune
Lurne,,, I had one of his arm's in 1981. A real beasuty. In a moment of weakness i sold it and the Oracle it was on...
dave
- Status
- This old topic is closed. If you want to reopen this topic, contact a moderator using the "Report Post" button.
- Home
- Source & Line
- Analogue Source
- Thinking about a new DIY uni-pivot arm, but I have questions