The most current thrust plate is brass/teflon, I had it on my 360 platter as well as on my latest Certus direct drive.
On the 360 platter the oil was a reddish color, while on the direct drive it was clear/yellow and I believe a much thicker viscosity/weight, but you may want to check with chris or read through the archives for the appropriate oil.
On the 360 platter the oil was a reddish color, while on the direct drive it was clear/yellow and I believe a much thicker viscosity/weight, but you may want to check with chris or read through the archives for the appropriate oil.
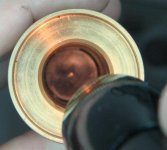
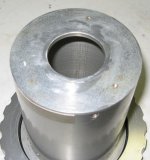
Hi. I'm puzzled. Looking inside the bearing sleeve I can see a black plate with a small brass dot in the middle, see the picture. I think there is already a thrust plate in place. From the bearing documentation, the bearing sleeve bottom should look like brass all the way to the bottom and end to nothing. Any idea what I got there?
Attachments
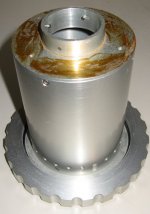
I found a very nice piece to be use as motor enclosure. It is kind of an antic, a very hold sensor that I saved years ago as souvenir. Originaly, it was a sun radiation sensor used into an automated weather station.
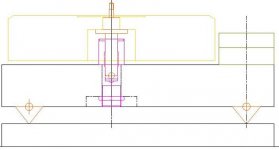
The case is very nice. Just a few mods and it will be a world class motor pod to use with my Teres. To validate all dimensions I entered all parts into AutoCAD. Here a side view of the table, platter, bearing, etc, resting on a plate. I'll need to plate because my motor pod is slightly too high, but it is so nicely done that I don't want to cut the case.
The case is very nice. Just a few mods and it will be a world class motor pod to use with my Teres. To validate all dimensions I entered all parts into AutoCAD. Here a side view of the table, platter, bearing, etc, resting on a plate. I'll need to plate because my motor pod is slightly too high, but it is so nicely done that I don't want to cut the case.
Attachments
thrust plate:
yep. I know that - what you have there is an early thrust plate. I had one of those too. What it is is a brass plate covered with a very thin layer of teflon - and the teflon is worn through where the ball runs on it. When you have it out in your hand, it look slike the protective film that comes on polished brass sheet. I took the layer off mine because it was loose anyway and I was afraid it would bind on the shaft.
To be honest thats whats in mine right now and it works fine - but I did get the newer thrust plate from Chris as well. When ever I get to change the oil I'll put it in then.
BTW, compressed air is about the best (and maybe only) way to get it out. Follow the reassembly procedure from the Teres site.
Fran
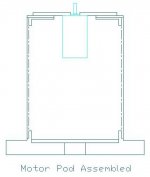
Here a slice view of the proposed motor pod with the motor in place.
There is plenty of space too add lead pallet to add weight. One of the nice feature of this assembly is the large, heavy base for a perfect, leveled motor placement on the turntable shelf.
I will install a section of PVC tube inside the pod to insulate the motor from the lead.
There is plenty of space too add lead pallet to add weight. One of the nice feature of this assembly is the large, heavy base for a perfect, leveled motor placement on the turntable shelf.
I will install a section of PVC tube inside the pod to insulate the motor from the lead.
Attachments
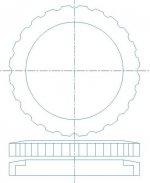
This sensor casing was covered originally by a glass bulb. So a large nut was screwed on the sensor bottom plate to hold the glass in place. This nut is very nice and big, adding some weight and look to the motor pod. Here a drawing of this big nut. It is more than 6 inches in diameter 
Attachments
And now the complete ACAD view of the assembled motor pod. The actual sensor casing will be modified by cutting the small length of pipe on the top plate. This original hole is big enough to let the motor pass through. Then I'll install a new 4mm mounting plate on top of it with the motor mounting holes. I may also add a motor power on/off switch.
Attachments

As far as I remember, its on the Teres site under information. I think, only think that there was a drawing for a square plinth.
Anyway, the ovaloid one is easy to figure out. The big diameter is a bit over 12" and the small diameter is about 3". The distance between centres is on the square plinth drawing. If you are CNC milling your plinth and platter, then you can easily accurately locate the bearing mount for the platter in the plinth so that the platter and plinth align exactly.
BTW, the bearing drawing is also up there if you intend buying a Teres bearing you could machine the plinth to take it.
Fran
Chris Brady of Teres Audio called me back today, right after the Denver Audio Fest. I was very friendly and helpfull. A real gentleman. No wonder he built a renowned audio business. Client relation is the base of any real succesfull venture. The prices for the new trust plate, new tape pulley were quite raisonnable. I can order the parts easily by paying with PayPal. Excellent customer service I must say.
I will certainly buy myself a Teres record clamp as soon as budget will permit, maybe for Christmas. We never know
Chris confirmed that he recommend for the bearing oil, automatic transmission oil, any brand. I just bought a quart of Mobil 1, synthetic ATF oil.
Finally he also mentionned that the mylar tape he recommend is 10mil thick compare to normal VHF tape that is only 5mil. I will buy also a lenght from him.
Thanks again Chris.
Algar_emi said:Can I use any brand of synthetic 5W30 oil? I saw Chevron oil at Wallmart and Canadian Tire stores.
Chris recommends an ATF fluid (red colour) which came supplied with my 340. It is available at Crappy Tire, "Mobil 1 Synthetic ATF" (Automatic Transmission Fluid).
Good luck with your Teres

- Status
- This old topic is closed. If you want to reopen this topic, contact a moderator using the "Report Post" button.
- Home
- Source & Line
- Analogue Source
- My DIY Teres Turntable