Its how those cement resistor boxes are rated, nothing to worry about yet. With 15% load factor they can easily rise 40-45C above ambient. 70C case temp you got its no strange if there was 25C to 30C around them. At 70C they are usually still 100% rated. They break at about 250C+.
I just got a big change by removing the transformer from the metal plate base and attaching it on a piece of wood (wenge).
The difference is most evident in highs. Cymbals and other brass seem much clearer, more natural and focused. Same with the snare drum bursts and bass drum kicks. Plus a vague feeling that highs were out of phase is now mostly gone. Downside is that sometimes things can feel a bit muddy.
The mechanical hum from the trafo is also barely audible now.
The difference is big even with the wood on top of the metal plate. I still have to decide what to do with the rest of the psu, so short trafo cables made me keep it really close.
Current thoughts are to keep only trafo out of the box with really short cables with XLR socket/plug to pass the secondaries in the chassis.
Could you please elaborate a bit more?")
I cant' say nothing for Duelunds but I've tried in my Mez, for CCS setting resistors: Mills, Caddocks and plain MOX.
The resistor that sounded fuller, more detailed and musical was the Caddock.
The MOX is a bit harsh but detailed, the Mills,sweet but a bit dull with loss of detail.
In a similar app (the CCS setting resistor of my My_Ref variant PS) Caddock MP were better than any audio grade and industrial resistor I've tried (KOA SPR, PRPs, carbon film, metal film, tantalum film, etc.)
Are you talking about MP915 series?
And they are really cheaper than the rest too
No, I'm talking about MP930. I think they're better suited for a hot rodded Salas shunt.
I've used MP915 for my simple shunt on the My_Ref.
But it depends also on how well they're heatsinked...
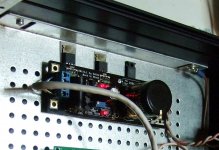
Dario, like this MP930 one I used in the photo?
Exactly
Cool! MP930s, That's what I used too. I just happened to have a pair of 10 Ohm in the parts bin, In the other set of holes I used a pair of millitary grade 1% metal film 21.5 Ohms = 6.8 Ohm HOT ROD!!
Front panel is out getting powder coated. I'm anxious to get started wiring it up next week.
Thanks for making my day with the MP930 news.
I may just remount my R Core TX too.
Ron
Front panel is out getting powder coated. I'm anxious to get started wiring it up next week.
Thanks for making my day with the MP930 news.
I may just remount my R Core TX too.
Ron
Niko what was your impression of the caddocks?
Dario's description is really tempting... Plus they are in stock...
Don't know because I did not have the opportunity to do an A/B with some other while aural memory would be fresh. I did some bypass of the ref filter too, so it would be a soup of a conclusion. I put them there for good measure as by Dario and 2-3 other guys independently recommended Rset position is parts quality sensitive.
I finally managed to get a circular saw, so I worked on the chassis today.
Here are the front and back panels. They were cut to size, squared and sanded (back is upside down :S )

I still have to open the led and IEC holes but I am exhausted and it s getting too late to use the router....
I still have to decide how I am going to finish the wenge. I tried some raw linseed oil on a scrap piece but it s getting too dark. I might leave it like this and just finish the knob to protected it from hand-dirt. The end grain is pulling dirt like a magnet...
The knob's face was rounded a bit and its base was routed so it is now about 2cms in the front panel, with a padding of about 7mm around it. It looks very nice IRL. The photo is not doing it justice... I love it so far... I just need to be extra careful not to ruin it now with some silly mistake...
Tomorrow I will cut the side panels and hopefully start gluing it together
Here are the front and back panels. They were cut to size, squared and sanded (back is upside down :S )
I still have to open the led and IEC holes but I am exhausted and it s getting too late to use the router....
I still have to decide how I am going to finish the wenge. I tried some raw linseed oil on a scrap piece but it s getting too dark. I might leave it like this and just finish the knob to protected it from hand-dirt. The end grain is pulling dirt like a magnet...
The knob's face was rounded a bit and its base was routed so it is now about 2cms in the front panel, with a padding of about 7mm around it. It looks very nice IRL. The photo is not doing it justice... I love it so far... I just need to be extra careful not to ruin it now with some silly mistake...
Tomorrow I will cut the side panels and hopefully start gluing it together
Attachments

Last edited:
- Home
- Source & Line
- Analog Line Level
- Salas hotrodded blue DCB1 build