It's the cartridge input series resistor so you can in fact use the 1/4 W resistor in this location provided it is metal film.
Ok. Thank you!
Dregs and Stuff
Just a heads up, the last two strain gauge cartridges I have purchased have had problems that would generally make them unusable.
The first a 450C in fairness to the seller was reported to produce a distorted output - the stylus (even a replacement) does not consistently couple to the transducers well and that creates a problem. I suspect that it can be fixed at some point.
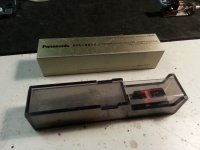
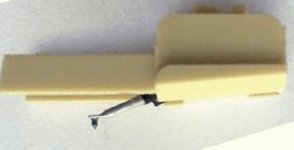
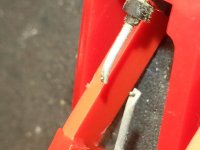
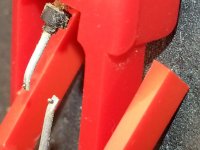
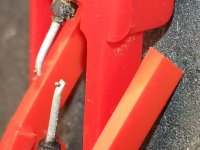
The 451CR I just purchased for $187.00 last week and which arrived today had a dead left channel upon unboxing, but since I wanted to determine whether or not these can be dismantled and the innards moved to a new body I decided to eat it. I am sure I could have returned for a full refund, but I quickly decided not to.
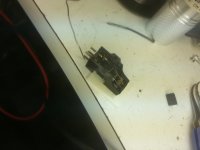
I opened it up and discovered as I had surmised that there was a broken lead. Somehow despite various physical challenges I succeeded in repairing the cartridge, and it works OK. It's not great match to the high mass Schick so it was only on it for a few minutes.
It looks like it is feasible for a skillful individual to rehouse one of these. The inner plastic carrier with the strain gauges I think could be transferred to a custom machined housing.
I think this 451C is a candidate for rehousing if I can find someone interested in doing the job.
Just a heads up, the last two strain gauge cartridges I have purchased have had problems that would generally make them unusable.
The first a 450C in fairness to the seller was reported to produce a distorted output - the stylus (even a replacement) does not consistently couple to the transducers well and that creates a problem. I suspect that it can be fixed at some point.
The 451CR I just purchased for $187.00 last week and which arrived today had a dead left channel upon unboxing, but since I wanted to determine whether or not these can be dismantled and the innards moved to a new body I decided to eat it. I am sure I could have returned for a full refund, but I quickly decided not to.
I opened it up and discovered as I had surmised that there was a broken lead. Somehow despite various physical challenges I succeeded in repairing the cartridge, and it works OK. It's not great match to the high mass Schick so it was only on it for a few minutes.
It looks like it is feasible for a skillful individual to rehouse one of these. The inner plastic carrier with the strain gauges I think could be transferred to a custom machined housing.
I think this 451C is a candidate for rehousing if I can find someone interested in doing the job.
Attachments
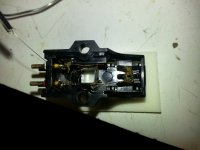
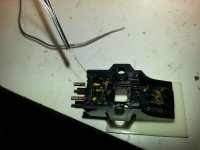
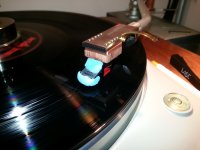
Based on the disassembly and what turned out to be a successful surgery I have concluded that damping the top cover plate is a good thing to do, it is actually in contact with the plastic transducer cradle for want of a better term. This whole assembly is sort of floating inside. (Just clips hold it in place)
I am tracking my 465C series at 4.3 - 4.5gms, and the 451C at 2.7 - 2.8gms. I have found that dropping too low results on a rapid increase in HF mistracking which will be obvious and unpleasant when it happens. The threshold may differ a bit from cartridge to cartridge, but my experience is obviously limited to a total of six cartridges (450C, 451C x 3, 460C, and 465C)
The 465C is a tremendously good match to the Schick when mounted on a Yamamoto HS-5 with my copper and cocobolo spacers. This one is in the running for the best sounding cartridge I have ever had on the arm, it might be it.
Attachments
I was going to bid on that one , but a little voice in my head said give it a rest already !
I have 3 versions with 4 stylus assemblies for now and enough, or until that Audiophilia disease kicks in and need more 😎
Looking thru a stereo microscope at the Panasonic diamonds, and comparing them with my various other LOMC,s they are at least twice as big with considerable more tip mass.
Some have too much glue on the back side even going way up the cantilever. A hot knife to remove some of it will help.
They were cheap and you can't really expect much , but even though a new more rigid body is going to help, I believe a replacement modern tip/cantilever will take it further in sonic refinement and especially , tracking ability.
2.6 grams ( 450c2) is good for about 90% but with the 10% heavily modulated tracks you can hear it rather abruptly mistrack on certain piano notes.
I think it's mostly the heavy tip mass rather than actual elements causing this because these strain gauges don't have the typical high frequency resonance or peak in comparison to modern LOMC,s
They go way out there.
As good as they sound now , when fully modded and brought full circle , along with your circuit, they will compete with just about any combo for way less money.
Regards
David
I was going to bid on that one , but a little voice in my head said give it a rest already !
I have 3 versions with 4 stylus assemblies for now and enough, or until that Audiophilia disease kicks in and need more 😎
Looking thru a stereo microscope at the Panasonic diamonds, and comparing them with my various other LOMC,s they are at least twice as big with considerable more tip mass.
Some have too much glue on the back side even going way up the cantilever. A hot knife to remove some of it will help.
They were cheap and you can't really expect much , but even though a new more rigid body is going to help, I believe a replacement modern tip/cantilever will take it further in sonic refinement and especially , tracking ability.
2.6 grams ( 450c2) is good for about 90% but with the 10% heavily modulated tracks you can hear it rather abruptly mistrack on certain piano notes.
I think it's mostly the heavy tip mass rather than actual elements causing this because these strain gauges don't have the typical high frequency resonance or peak in comparison to modern LOMC,s
They go way out there.
As good as they sound now , when fully modded and brought full circle , along with your circuit, they will compete with just about any combo for way less money.
Regards
David
Thanks for the info! It seems to me that to replace the cantilever is a must for revealing SG full potential. I expect a long and fun journey ahead. But my priority has shifted now, I just got my roller air bearing and am starting to modify my SME table to an air bearing one. I am really excited. Both projects are fun to do.
There are options for better styli than even the Jico or OEM Panasonic. I would guess the OEM stylus mass is about half that of the Bliss, but it seems effective in collecting fluff and dust off of less than perfectly clean records, when it gets critical spectacular mistracking occurs because the flatted end of the cantilever rides so close to the record surface.
I am looking forward to getting a couple of Dave Slagle's styli soon.
I am looking forward to getting a couple of Dave Slagle's styli soon.
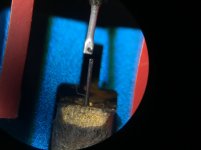
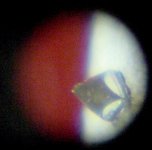
Pics of size differences for comparisons sake
1st- left -Mc 10 (Megasonics) Sao Win Lomc design next to Panasonic
2nd- left - monster Cable Genesis 2000 Boron to same
3rd left - Spectral MCR Reference solid rod diamond infused next to same
1st- left -Mc 10 (Megasonics) Sao Win Lomc design next to Panasonic
2nd- left - monster Cable Genesis 2000 Boron to same
3rd left - Spectral MCR Reference solid rod diamond infused next to same
Attachments
I was sort of hoping that was a Bliss, but that's even bigger..
Yes a better cantilever and lower mass stylus is only going to help.
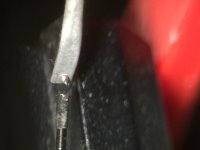
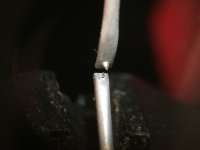
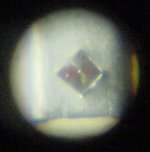
Here are some shots of the Panasonic OEM stylus and the Bliss.
The Bliss is the one that looks sort of like a bullet.
Edit: Somehow I forgot to post this and now it's somewhat out of sequence.. LOL Oh well.
Yes a better cantilever and lower mass stylus is only going to help.
Here are some shots of the Panasonic OEM stylus and the Bliss.
The Bliss is the one that looks sort of like a bullet.
Edit: Somehow I forgot to post this and now it's somewhat out of sequence.. LOL Oh well.
Attachments
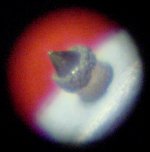
Hi Kevin, the ad said the stylus was for a 460 and said Pfanstiehl. I've seen other with that name that don't look like that. This one stood out!
I am also posting some closeups pics of an original stylus I purchased directly from the Panasonic dealer that I shot through a cheap microscope. And also a bonded tip one I bought for cheap.
Kevin- just wanted to let you know I am looking forward to listening to your preamp and have most of the parts now for a point to point build - only the time factor is in the way. Thank you for the design and critical listening comparisons!
Avwerk, those photos really show the cantilever and stylus size difference-thank you.
Attachments
There are three secondaries and six wires. You MUST use a safety earth as outlined below, this is not optional. From post #254
AC Primary Side:
Note I recommend a 1.0A MDL fuse for primary protection, which should be placed before the power switch on the line side of the AC connection.
A safety earth must be provided and connected directly to the metal chassis, and the power transformer electrostatic shield. (orange lead)
The PSU common (noting that the filament supply floats!) should be connected through a 10 ohm 2W resistor in parallel with a pair of 1N5408A diodes in an anti-parallel connection (anode to cathode) to the safety earth. (chassis)
Transformer Color Codes:
Black - Primary
Red - HV secondary (J1 - J2)
Yellow - Filaments (J5 - J6)
Green - Bias (J3 - J4)
Orange - Electrostatic shield (connect directly to chassis!)
Most notes in parenthesis are added details for this post.
Thanks Kevin!
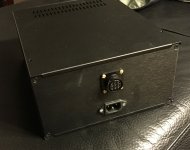
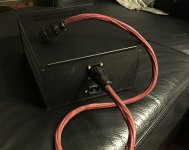
I almost finish the power supply. However, I still miss some parts, one 10uF 350V and some pins for power plug. Here are some photos. The power switch has led indicator. I connected the led on J7-J9 6.3V. I soldered the orange wire to the ground pin of IEC AC power jack which is connected to chassis(orange wire and white wire).
I almost finish the power supply. However, I still miss some parts, one 10uF 350V and some pins for power plug. Here are some photos. The power switch has led indicator. I connected the led on J7-J9 6.3V. I soldered the orange wire to the ground pin of IEC AC power jack which is connected to chassis(orange wire and white wire).
Attachments
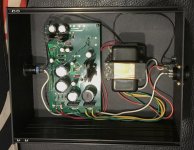
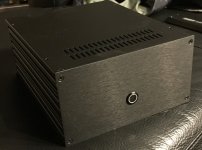
I don't see a fuse, you absolutely must have a fuse in the line (not neutral) side of the AC mains! 
The led probably needs a series dropping resistor (say 470 ohms) and be sure to observe polarity.
Even worse it appears that you have placed the switch in the neutral leg of the AC circuit which is just wrong. You need to rewire all of the AC wiring as it is unsafe as implemented. AC line L (not N) > Fuse > switch > transformer > AC Line N (neutral)
You can add the fuse and swap the wires going to the switch and transformer.
As an aside the colors are wrong, the ground wire should be green or green/yellow stripe, at least mark it green so it is obvious it is ground.
The ground should be bolted separately to the chassis.
The fuse should be a 1A MDL type in a proper bulkhead type fuse holder.
I don't see a fuse, you absolutely must have a fuse in the line (not neutral) side of the AC mains!
The led probably needs a series dropping resistor (say 470 ohms) and be sure to observe polarity.
Ok. I will add a fuse and a resistor. Thank you!
- Home
- Source & Line
- Analogue Source
- Playing With Panasonic Strain Gauge Cartridges (And A Dedicated Phono Stage)