Now that's what these forums CAN be about...
...and almost always are-the sharing of ideas and comments. I've met very few of the forum participants in "real" life but every single one of them have been great folks seeking their version of the truth (about 20 or so, mainly at planet10's DIY 'fest held annually on Vancouver Island). Not everybody is a mechanical type (that's me") ), some are loudspeaker gurus (Dave et al) or amplifier people (Greg the Geek). Funny thing is that I've never encountered a DIY digital guy out there, but I have that somewhat covered (Mike damuffin).
), some are loudspeaker gurus (Dave et al) or amplifier people (Greg the Geek). Funny thing is that I've never encountered a DIY digital guy out there, but I have that somewhat covered (Mike damuffin).
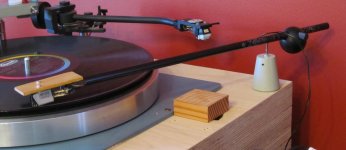
canzid: I'm sure Morton would appreciate the arrow shaft. Maybe you could drill and cut the shaft for him too (if you could do that I'd greatly appreciate it). Any pictures of your arm? Don't worry too much about a hanging weight. It is so easy to do.
Here's how I do it:
Regarding "outriggers" I don't really use them on the arm. This can be over-kill. I prefer a "Longhorn" mod (essentially an outrigger for your cartridge) for my cartridge. I suppose something similar could be accomplished by attaching some very thin threaded rod and 4 nuts. This would provide the benefits of a finely tuneable azimuth and some of the benefits of the Longhorn modification in one shot. would do it.
...and almost always are-the sharing of ideas and comments. I've met very few of the forum participants in "real" life but every single one of them have been great folks seeking their version of the truth (about 20 or so, mainly at planet10's DIY 'fest held annually on Vancouver Island). Not everybody is a mechanical type (that's me
), some are loudspeaker gurus (Dave et al) or amplifier people (Greg the Geek). Funny thing is that I've never encountered a DIY digital guy out there, but I have that somewhat covered (Mike damuffin).canzid: I'm sure Morton would appreciate the arrow shaft. Maybe you could drill and cut the shaft for him too (if you could do that I'd greatly appreciate it). Any pictures of your arm? Don't worry too much about a hanging weight. It is so easy to do.
Here's how I do it:
- get a scap of dowel that is slightly larger than the hole in the existing counter-weight
- the dowel needs to be about 1/2" longer than the existing counter-weight
- whittle down a taper into the dowel, ensuring that the small diameter side can fit into the counter-weight hole
- once you see what the diameter needs to be, whittle the dowel to that dimension, except the last 1/8" or so. This will hold the weight and the dowel together using gravity.
- you should have about 1'4" to 3/8" extending from the top of the counter-weight.
- drill a small hole through the dowel laterally
- all that's left is to tie some thin wire, string or strong thread to the dowel through the hole and the arm. I just knot the string /wire/thread together once and leave the loop large to make it easy to put on the arm. done.
- Some tape or heat shrink can create a spot to allow the string to grip the arm tube. If wanting azimuth to be easily adjustable, instead of just using a loop, make a small slip knot (it will frustrate you) so that there is at least 1/4" between the tonearm and the dowel. Then just twist the knot on the arm to adjust azimuth
- If using a loop, 2 O-rings can be used to locate the counter-weight. That's all...
Regarding "outriggers" I don't really use them on the arm. This can be over-kill. I prefer a "Longhorn" mod (essentially an outrigger for your cartridge) for my cartridge. I suppose something similar could be accomplished by attaching some very thin threaded rod and 4 nuts. This would provide the benefits of a finely tuneable azimuth and some of the benefits of the Longhorn modification in one shot. would do it.
living the dream...
Hey Squiffy,
how are things? Ya, double the money. No worries, my snob persona will allow me to ignore whatever I choose to
To do a proper job with all new materials and bespoke wiring and RCA plugs the costs can get out of hand pretty quickly. 20' of whatever tonearm cable, 2 good (but perhaps not "great") RCA plugs, good cartridge tags, and if using a purchased (wood) headshell the sky is the limit. And don't get me started on the high cost of tonearm lifts, etc.
If I can get set up to make the headshells then life would be a lot easier. I could then set a reasonable price for the headshells.
Stew you are an audio Snob!!!
Nah not really
As for the value of your arm I'd say double your money sell it for five bucks and live the dream.
I'm not helping here am I?
Hey Squiffy,
how are things? Ya, double the money
. No worries, my snob persona will allow me to ignore whatever I choose to To do a proper job with all new materials and bespoke wiring and RCA plugs the costs can get out of hand pretty quickly. 20' of whatever tonearm cable, 2 good (but perhaps not "great") RCA plugs, good cartridge tags, and if using a purchased (wood) headshell the sky is the limit. And don't get me started on the high cost of tonearm lifts, etc.
If I can get set up to make the headshells then life would be a lot easier. I could then set a reasonable price for the headshells.
Stew, I don't know if you've considered the Henry Ford concept of doing things, for the 219 using mass production techniques, lets say for the headshell, use a multi jig & pillar drill to get bits of wood to the size & shape of your choice ! Its surprising just what you can do in this manner. If you recall the wooden headshell I made for my 219, the smooth curves were done in this manner.
Its much easier to make say 6 headshels all the same, using simple jigs to do one side or shape at a time, than trying to to make 6 individual ones.
Its much easier to make say 6 headshels all the same, using simple jigs to do one side or shape at a time, than trying to to make 6 individual ones.
Henry Ford methods...
...certainly come to mind (but he was an absolute brute and a thief as well: Henry Ford II redesigned the Model T into what became the model A, but was never credited with the design or the work he did. Henry Ford passed all the work off as his own). I have higher standards than Henry Ford regarding credit where it is due.
Jay, my schooling is in manufacturing process technology, so as a minimum batch processing is a must to maximize my own productivity. This is why I was wanting to get involved with Kickstarter. Any funds raised would help set up a bespoke shop with the required tools to allow consistent batch processing (particularly of the headshells, but even for something as simple as drilling the arm tubes).
We didn't learn about Ford 11 at school in England....otherwise.
I have worked with people with learning / physical difficulties etc, In a workshop environment & using straight forward Jigs that I made from MDF, bits of Ali & simple clamps, i.e. very simple tools, (a pillar drill can be used in all sorts of ways with the right kind of Jigging) It was possible to manufacture all manner of items in a very cost effective way.
Sometimes a step back in terms of manufacturing technology can let you make a good start.
using jigging
The use of jigs is but one of several steps to help eliminate sample to sample variance. Another is the use of consistent high quality materials. In the case of the 219, this is covered by the use of a reputable manufacturer's (Easton's) arrow shafts, great quality male bearings (super fine ball point pen "nibs"), good mechanical connectors soldered correctly, good wiring and good wiring termination. The use of aluminum is a personal one, and not based on sonics. I still have issues with folks cutting carbon-fibre and the possible toxic effects the dust can have on one's lungs. And although I've never tested it, I do like the sound of wooden headshells (I know I may not be able to hear the difference, but I like to think that somehow it helps the sound of the music that comes from the tt/tonearm/cartridge mechanical system sound more natural). So pretty basic thoughts about the materials.
Once the material considerations and availability and suitability of the materials has been taken into account, the rest is in implementation and care in putting the things together. So jigging helps with quality cutting and fabrication of the materials into useable parts and ultimately in assemblies. So no real magic there
Rather than take much more "virtual ink" for this discussion about the use of jigs, I'd like to concentrate on the personal experiences of the folks who want to build one of these stupid, simple tonearms and those of the folks who have constructed their own arms and their listening experiences.
another canadian 219
"I'm sure Morton would appreciate the arrow shaft. Maybe you could drill and cut the shaft for him too (if you could do that I'd greatly appreciate it). Any pictures of your arm?"
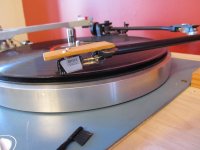
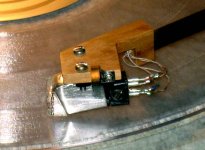
My 219.
XX75 shaft. Ballpoint pen bearing into a notch I punched inside the arrow shaft after drilling a hole for the pivot. Mouse wire. Regular cartridge tags. Thorens arm counterweight and Gates tonearm base, because I happened to have them lying around. Headshell is wood glued onto a metal bracket i found in the hardware store - pressure fit around the arrow shaft, although I should epoxy it. Might glue a strip of wood at 90 degrees on top of the headshell to minimize any potential flex (one day- lol).
Reclaimed items: wood, pen, mouse wire. Most expensive item - the arrow, since i had to buy a pack of several. A couple of $ for the tags, and a few for a hanging counterweight (a heavy metal cog form a surplus store, but currently sitting on the shelf) So perhaps not quite $2.19, maybe $10.
Arm: mounting distance 290 mm, 15mm overhang, 19 degree offset. Current cartridge Stanton 681eee, previously had a Stanton 500. Works like a charm.
The arm oscillates slightly at first when placed on the vinyl (TT off), but is easily stilled and shows no sign of this once the TT is going (McCurdy gets to speed in 1/4 of a turn)
Mortron has already picked up the arrow shafts and is borrowing my pipe cutter, but otherwise he is far better at DIY than me, so I will leave him to it.
"I'm sure Morton would appreciate the arrow shaft. Maybe you could drill and cut the shaft for him too (if you could do that I'd greatly appreciate it). Any pictures of your arm?"
My 219.
XX75 shaft. Ballpoint pen bearing into a notch I punched inside the arrow shaft after drilling a hole for the pivot. Mouse wire. Regular cartridge tags. Thorens arm counterweight and Gates tonearm base, because I happened to have them lying around. Headshell is wood glued onto a metal bracket i found in the hardware store - pressure fit around the arrow shaft, although I should epoxy it. Might glue a strip of wood at 90 degrees on top of the headshell to minimize any potential flex (one day- lol).
Reclaimed items: wood, pen, mouse wire. Most expensive item - the arrow, since i had to buy a pack of several. A couple of $ for the tags, and a few for a hanging counterweight (a heavy metal cog form a surplus store, but currently sitting on the shelf) So perhaps not quite $2.19, maybe $10.
Arm: mounting distance 290 mm, 15mm overhang, 19 degree offset. Current cartridge Stanton 681eee, previously had a Stanton 500. Works like a charm.
The arm oscillates slightly at first when placed on the vinyl (TT off), but is easily stilled and shows no sign of this once the TT is going (McCurdy gets to speed in 1/4 of a turn)
Mortron has already picked up the arrow shafts and is borrowing my pipe cutter, but otherwise he is far better at DIY than me, so I will leave him to it.
Attachments
nice arm canzid!
canzid et al:
Well, I'm able to purchase shafts as singles locally. I've looked at using what I think are respectable parts (cartridge tags, RCA plugs, internal wiring, etc.), and wiring in a length suitable for a continuous piece from cartridge tags to RCA input on a preamp/phono stage (so 5 X 4 ft. as a minimum length). These parts are from an "approved audiophile" source and include Cardas tags, Neutrik spring loaded RCA plugs and an unbranded 44 awg X 7 (36 awg equivalent) silver plated copper Teflon covered tonearm wire. So the wiring is the single most expensive portion of the tonearm. $80-$100...depending on tonearm wire and connectors. That's without any headshell. Spend as much as you like...I figure that if I were to sell them following common practices, they'd sell for about $500 with a headshell. That should include a tonearm mount and an arm lift. (arm lifts are expensive!).
I'm going to follow audiostar's suggestion and put a single arm up for sale in Vendor's Bizarre or Swap Meet. A base (with a tonearm rest but no cueing/lift), the bearing, headshell, wiring...ready to mount on the turntable of your choice. Good basic RCA plugs (speakercraft)
I do like the canzid headshell
The slight oscillation is usually due to actually placing the stylus tip on the LP surface. No matter how careful you are, it's impossible to get it perfect. Even using a mechanical tonearm lift, the same thing usually happens. Regarding any with resonance issues, the use of small cork plugs at one end or the other (or both) of the arm shaft increases mass, but can also act as mechanical damping material.
Great to hear. I was unsure of his capabilities. And meeting folks face to face is always a treat in this rather solitary hobby.
canzid et al:
My 219.
XX75 shaft. Ballpoint pen bearing into a notch I punched inside the arrow shaft after drilling a hole for the pivot. Mouse wire. Regular cartridge tags. Thorens arm counterweight and Gates tonearm base, because I happened to have them lying around. Headshell is wood glued onto a metal bracket i found in the hardware store - pressure fit around the arrow shaft, although I should epoxy it. Might glue a strip of wood at 90 degrees on top of the headshell to minimize any potential flex (one day- lol).
Reclaimed items: wood, pen, mouse wire. Most expensive item - the arrow, since i had to buy a pack of several. A couple of $ for the tags, and a few for a hanging counterweight (a heavy metal cog form a surplus store, but currently sitting on the shelf) So perhaps not quite $2.19, maybe $10.
Well, I'm able to purchase shafts as singles locally. I've looked at using what I think are respectable parts (cartridge tags, RCA plugs, internal wiring, etc.), and wiring in a length suitable for a continuous piece from cartridge tags to RCA input on a preamp/phono stage (so 5 X 4 ft. as a minimum length). These parts are from an "approved audiophile" source and include Cardas tags, Neutrik spring loaded RCA plugs and an unbranded 44 awg X 7 (36 awg equivalent) silver plated copper Teflon covered tonearm wire. So the wiring is the single most expensive portion of the tonearm. $80-$100...depending on tonearm wire and connectors. That's without any headshell. Spend as much as you like...I figure that if I were to sell them following common practices, they'd sell for about $500 with a headshell. That should include a tonearm mount and an arm lift. (arm lifts are expensive!).
I'm going to follow audiostar's suggestion and put a single arm up for sale in Vendor's Bizarre or Swap Meet. A base (with a tonearm rest but no cueing/lift), the bearing, headshell, wiring...ready to mount on the turntable of your choice. Good basic RCA plugs (speakercraft)
I do like the canzid headshell
Arm: mounting distance 290 mm, 15mm overhang, 19 degree offset. Current cartridge Stanton 681eee, previously had a Stanton 500. Works like a charm.
The arm oscillates slightly at first when placed on the vinyl (TT off), but is easily stilled and shows no sign of this once the TT is going (McCurdy gets to speed in 1/4 of a turn)
The slight oscillation is usually due to actually placing the stylus tip on the LP surface. No matter how careful you are, it's impossible to get it perfect. Even using a mechanical tonearm lift, the same thing usually happens. Regarding any with resonance issues, the use of small cork plugs at one end or the other (or both) of the arm shaft increases mass, but can also act as mechanical damping material.
Mortron has already picked up the arrow shafts and is borrowing my pipe cutter, but otherwise he is far better at DIY than me, so I will leave him to it.
Great to hear. I was unsure of his capabilities. And meeting folks face to face is always a treat in this rather solitary hobby.
hanging weight
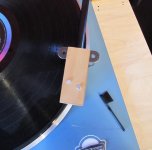
have upgraded the counterbalance weight using the arm rest from the lenco and some gaffa tape. I believe I perceive an improvement.
P1060619.jpg
have upgraded the counterbalance weight using the arm rest from the lenco and some gaffa tape. I believe I perceive an improvement.
P1060619.jpg
Attachments
hung weights...
pde2000,
QUOTE]have upgraded the counterbalance weight using the arm rest from the lenco and some gaffa tape. I believe I perceive an improvement./QUOTE]
Sometimes it is difficult to perceive improvements, mainly because we do them (or make the thing we're listening to. So far most who have tried the 219 and any "improvements" like hanging the counter-weight have agreed with me, so perhaps I too should learn to trust my ears.
pde2000,
QUOTE]have upgraded the counterbalance weight using the arm rest from the lenco and some gaffa tape. I believe I perceive an improvement./QUOTE]
Sometimes it is difficult to perceive improvements, mainly because we do them (or make the thing we're listening to. So far most who have tried the 219 and any "improvements" like hanging the counter-weight have agreed with me, so perhaps I too should learn to trust my ears
.proper cables
thanks for the advice stew. now I have terminated the headphone wires at the pivot to run a regular cable up to the amp and all hint of hum is gone - an objective improvement. the cable came out of my junk box, so a freebie. the thing I love about this arm is how easy and cheap it all is, and yet I get very good music from it. this is a counter revolution against the audiophile world where looks and price carry more weight than measurable improvements. my childhood was dominated by science exploration and music, this experiment reminds me of those happy days. I cannot fault this arrow. bless you stew, may you find the rewards you are looking for, they sometimes appear in unexpected places.
paul
thanks for the advice stew. now I have terminated the headphone wires at the pivot to run a regular cable up to the amp and all hint of hum is gone - an objective improvement. the cable came out of my junk box, so a freebie. the thing I love about this arm is how easy and cheap it all is, and yet I get very good music from it. this is a counter revolution against the audiophile world where looks and price carry more weight than measurable improvements. my childhood was dominated by science exploration and music, this experiment reminds me of those happy days. I cannot fault this arrow. bless you stew, may you find the rewards you are looking for, they sometimes appear in unexpected places
.paul
Basis Audio Superarm 9 - The Audio Beat - www.TheAudioBeat.com
Basis Audio: Basis Audio Superarm 9 Tonearm
Here is the newest Basis superarm 9 for $14,000. I wonder what Nanook's diy $14,000 one of a kind worth it for the money tonearm would look like! I would be incline to buy Nanook's version!!!
Basis Audio: Basis Audio Superarm 9 Tonearm
Here is the newest Basis superarm 9 for $14,000. I wonder what Nanook's diy $14,000 one of a kind worth it for the money tonearm would look like! I would be incline to buy Nanook's version!!!
continuous cable from cartridge clips...
...to preamp/phono stage.
Firstly thank you all for the compliments. I appreciate them. But please remember that I didn't invent anything and that the nanook 219 is more of a refinement of the Altmann "joke" tonearm than anything else, with a few additions based on my semi-educated guesses and/or observations.
Guys,
I cannot stress enough the importance of a continuous run of wire from the cartridge clips to the preamp/phono stage inputs. Whether using an existing cable (with insulation/dielectric) or single runs of insulated small stranded wire, a continuos run will give the best results. I use 5 lengths of wire:
What else? 1 pair of RCA plugs, 4 cartridge tags, and a tiny bit of solder for the ends of the ground wire and to solder the cartridge tags.
Soldering " mid-wire" is something that I avoid at all costs. If a more convenient arrangement is required, just terminate the wire to 2 RCA jacks and a ground lug either right at the base of the tonearm or at a hidden location at the back of the turntable.
audiostar (and everyone else): I'd give it a whirl, but at a much lower cost (like how 'bout CAD$13995, I'll throw in the freight or a home visit to set it up). I find it worrisome that tonearms cost this (or that they can actually sell these at these prices). I am not trying to be disrespectful here, but come on. Some tonearms simply cost a certain amount because machine time and materials cost a certain amount. Add some profit for the maker (say 40% markup or 28.6% gross profit, something reasonable to offset development costs), some for a national distributor so that in-country support can be had (say 28.6% gross profit) and some for the dealer (say 35% gross profit). If we add this all up, the total gross profit should be something approaching 100%. Let's create a materials and machining budget of say USD$2500 (which I think would be pretty hard to actually use up). so the arm would sell for about USD$5000. Where could more money be spent?
I suppose a special custom built one of a kind jewel Vee bearing cup, and a custom (and perfectly lapped/matched) male counterpart? lets say $2000. But I can't imagine that a very high spec off the shelf one couldn't be used. Same thing with tonearm wire. Say USD $100/ft X's 20 ft= $2000 . I don't think the aluminum tubing could be improve upon. Maybe get same special "nanook" branded tubing, but other than that? A petrified mammoth tusk ivory headshell? Er.... anything else? I don't think so---wait! Unobtanium RCA plugs, say $2000 ea (I don't know what would be most expensive, platinum, palladium, or gold....but gold does have its practical limits based on durability and toughness) grand total: (2000+2000+4000). And of course a counter-weight: + 80-100 grams of platinum (currently trading at USD$4841 daily high as of today per 28.4 grams, so say USD $12k+ for the counter-weight without machining). Without headshell. So without wire or headshell I could spend $20k +, but seriously? Now would it sound good? Don't know, don't care. But if someone wants to finance the project I'll build it. Back to reality: I think I'd be hard pressed to spend more than $1000 for a DIY "ultimate" tonearm that I'd confident would take on all comers. And quite a bit of that $1k would be tied up purchasing a very good pre-made cueing device and mounting method.
Now back to reality further: The "cork" tweak" should work for pretty much everyone wanting a higher mass tonearm. Under CAD$0.50 to do.
...to preamp/phono stage.
Firstly thank you all for the compliments. I appreciate them. But please remember that I didn't invent anything and that the nanook 219 is more of a refinement of the Altmann "joke" tonearm than anything else, with a few additions based on my semi-educated guesses and/or observations.
Guys,
I cannot stress enough the importance of a continuous run of wire from the cartridge clips to the preamp/phono stage inputs. Whether using an existing cable (with insulation/dielectric) or single runs of insulated small stranded wire, a continuos run will give the best results. I use 5 lengths of wire:
- 2 pairs for cartridge output
- a single for grounding to the tonearm and preamp/phono stage)
- 1 m run requires about 7.5 metres total (say 21" or 53 cm per run to run the length of the tonearm and allow for some extension outside the end of the arm tube, approx. 6" or 15 cm to allow for cable dressing, and 1 metre for the actual length from the turntable to the phono input)
What else? 1 pair of RCA plugs, 4 cartridge tags, and a tiny bit of solder for the ends of the ground wire and to solder the cartridge tags.
Soldering " mid-wire" is something that I avoid at all costs. If a more convenient arrangement is required, just terminate the wire to 2 RCA jacks and a ground lug either right at the base of the tonearm or at a hidden location at the back of the turntable.
Here is the newest Basis superarm 9 for $14,000. I wonder what Nanook's diy $14,000 one of a kind worth it for the money tonearm would look like! I would be incline to buy Nanook's version!!!
audiostar (and everyone else): I'd give it a whirl, but at a much lower cost
(like how 'bout CAD$13995, I'll throw in the freight or a home visit to set it up). I find it worrisome that tonearms cost this (or that they can actually sell these at these prices). I am not trying to be disrespectful here, but come on. Some tonearms simply cost a certain amount because machine time and materials cost a certain amount. Add some profit for the maker (say 40% markup or 28.6% gross profit, something reasonable to offset development costs), some for a national distributor so that in-country support can be had (say 28.6% gross profit) and some for the dealer (say 35% gross profit). If we add this all up, the total gross profit should be something approaching 100%. Let's create a materials and machining budget of say USD$2500 (which I think would be pretty hard to actually use up). so the arm would sell for about USD$5000. Where could more money be spent?I suppose a special custom built one of a kind jewel Vee bearing cup, and a custom (and perfectly lapped/matched) male counterpart? lets say $2000. But I can't imagine that a very high spec off the shelf one couldn't be used. Same thing with tonearm wire. Say USD $100/ft X's 20 ft= $2000 . I don't think the aluminum tubing could be improve upon. Maybe get same special "nanook" branded tubing, but other than that? A petrified mammoth tusk ivory headshell? Er.... anything else? I don't think so---wait! Unobtanium RCA plugs, say $2000 ea (I don't know what would be most expensive, platinum, palladium, or gold....but gold does have its practical limits based on durability and toughness) grand total: (2000+2000+4000). And of course a counter-weight: + 80-100 grams of platinum (currently trading at USD$4841 daily high as of today per 28.4 grams, so say USD $12k+ for the counter-weight without machining). Without headshell. So without wire or headshell I could spend $20k +, but seriously? Now would it sound good? Don't know, don't care. But if someone wants to finance the project I'll build it. Back to reality: I think I'd be hard pressed to spend more than $1000 for a DIY "ultimate" tonearm that I'd confident would take on all comers
. And quite a bit of that $1k would be tied up purchasing a very good pre-made cueing device and mounting method. Now back to reality further: The "cork" tweak" should work for pretty much everyone wanting a higher mass tonearm. Under CAD$0.50 to do.
Last edited:
I am obviously way late to this thread, and I will read it tonight, but I do have a couple of questions,
Is there a kit with some or all of the parts?
Is there a post with specific instructions?
I am a pretty good DIY'r, so I will not have any problems building this. Nor will I have any problems getting the parts myself, but If they are available through one supplier, so much the better.
I haven't built anything in a while, and I have the bug.
Thanks
I have found that this is a good solution for a HeadShell...Easy to Make, and it could be Slotted for adjusting...This one is at 20.5 Deg. with the Stylus Tip centered on the Arm to the Pivot...
An externally hosted image should be here but it was not working when we last tested it.
Attachments
Last edited:
to make you happy stew I have built a phonostage so I can terminate the headphone wires direct, then feed the line on to the amp with the remaining length. Malcolm (willbewill) from lencoheaven supplied the parts inc post for £17.50. based on texas instruments ne5532p opamp. compares very well to my other phonostages.
P1060627.JPG
P1060627.JPG
Attachments

pde2000, please don't do anything to make me happy...
...make yourself happy. Ultimately my opinion matters little.
I really just have a strong opinion concerning additional solder joints where there need not be any more, that's all. And terminating with RCA plugs and jacks increases the number of solder joints. Any additional solder joints can degrade the sound. It's a small detail that can contribute a degradation of the signal and is a personal pet peeve. Whether you can hear the difference or not, I don't know. It just makes sense to me that's all.
I am famliar with willbe and his many contributions. I am sure the phono stage sounds very good, and looks similar to the Hagerman Bugle2 kit. The Hagerman uses a BB OPA2134 while the one from willbe uses the TI ne5532p . Interesting to note that BB is now a TI company
It's never too late for this thread.
Hi to Simoon and welcome to what I refer to as the "219" thread (as compared to the "turntable" thread) .
The parts required are:
*Some have used the end caps from an old style "Buss" fuse (the little glass tube type fuses), but I prefer using pipe plugs or set screws that have a small divot in them and that I screw into a small piece of hardwood dowel. Some have also used a jewel Vee bearing.
**If building a tonearm wiring "kit" at least 20' of suitable wire will be required. If wanting to use RCA plugs and use whatever existing interconnects that you may have, then a minimum of approximately tonearm wire will be required. Sleds headshell is a nice design which he says is easy to make. It does look good and I am sure it sounds excellent. A pair of reasonable quality RCA plugs are required or a pair of RCA jacks are needed (if creating a setup with internal tonearm wire only, terminating in the RCA jacks, and then using whatever RCA interconnects one likes). If using a continous run of tonearm cable from the cartridge clips to preamp/phono input approximately 20' (single "run") is a minimum quantity.
*** See comments to Sled108 below
I bought most everything (hardware) at Canuck Tire, but any good hardware store will do.
Sled:
Hi to Simoon and welcome to what I refer to as the "219" thread (as compared to the "turntable" thread)
.Simoon: There is no kit of parts, but methinks I should offer one in the swap meet forum. Parts are very easy to make and come by here, but purchasing the arm shafts in a small quantity (as in a single piece) is not convenient as most archery stores will only sell you shafts by the dozen. A single 31' or 32" arrow shaft makes 2 arm shafts. I highly recommend the use of Easton arrow shafts only, as their specifications and quality control are a known quanitity. I use Easton XX75 "Gamegetter" shafts but you can spend more or less on similar Easton arrow shafts. I typically use about 14.5" of shaft in a 2411 "size". This means that the shafts I use have an OD of 24/64" (9.5 mm) and the wall thickness is 0.110" (0.2794 mm) . I don't think these shafts are available anymore, but the Platinum 2315 (9.8 grains or 0.635029318 grams per inch) still is and it would be the closest of the current offerings that I can see (but may be more expensive). You could consider the much cheaper and slightly heavier 2016 "XX75 Tribute shaft (10.6 grain or .68686844 grams per inch). Inches seem to be the standard dimensional units used for arrow shafts in North America.I am obviously way late to this thread, and I will read it tonight, but I do have a couple of questions,
Is there a kit with some or all of the parts?
Is there a post with specific instructions?
I am a pretty good DIY'r, so I will not have any problems building this. Nor will I have any problems getting the parts myself, but If they are available through one supplier, so much the better.
I haven't built anything in a while, and I have the bug.
Thanks
The parts required are:
- a suitably small pen nib (hopefully a salvaged one) using a metal ball and "holder", fine or extra fine would be suitable
- a mount for the pen nib
- a female bearing (see below*)
- some wiring suitable for tonearm wire**
- cartridge clips
- Reasonable quality RCA plugs or jacks (see below**)
- a headshell***
*Some have used the end caps from an old style "Buss" fuse (the little glass tube type fuses), but I prefer using pipe plugs or set screws that have a small divot in them and that I screw into a small piece of hardwood dowel. Some have also used a jewel Vee bearing.
**If building a tonearm wiring "kit" at least 20' of suitable wire will be required. If wanting to use RCA plugs and use whatever existing interconnects that you may have, then a minimum of approximately tonearm wire will be required. Sleds headshell is a nice design which he says is easy to make. It does look good and I am sure it sounds excellent. A pair of reasonable quality RCA plugs are required or a pair of RCA jacks are needed (if creating a setup with internal tonearm wire only, terminating in the RCA jacks, and then using whatever RCA interconnects one likes). If using a continous run of tonearm cable from the cartridge clips to preamp/phono input approximately 20' (single "run") is a minimum quantity.
*** See comments to Sled108 below
I bought most everything (hardware) at Canuck Tire, but any good hardware store will do.
Sled:
I looked closer at your headshell. It seems very good to me. If one is not completely accurate in positioning the base of the tonearm, then a slotted headshell should be used. An alternative may be to have one hole and one "arc" slot, so that the angle can easily be changed. Only a few degrees of rotational adjustment is required (I'd say from 20°-26° would be all that is required). It all depends on the exact pivot to spindle distance you are using and what overhang figure you are using. I just plunked mine down and moved the base around until I could use a alignment protractor (the Oracle "Calibrator" is the one I use, but any will do).I have found that this is a good solution for a HeadShell...Easy to Make, and it could be Slotted for adjusting...This one is at 20.5 Deg. with the Stylus Tip centered on the Arm to the Pivot...
hi ralf
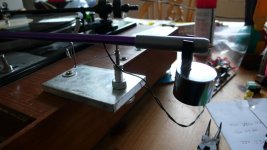
please, a cd? they are for levelling up shelving, that is a beer coaster i'll have you know (chosen for its unique properties of being near to hand and about the right thickness to compensate for my irregular floor). I find working at the dinner table helps as the height prevents my back hurting and we eat on our laps these days anyway
please, a cd? they are for levelling up shelving, that is a beer coaster i'll have you know
(chosen for its unique properties of being near to hand and about the right thickness to compensate for my irregular floor). I find working at the dinner table helps as the height prevents my back hurting and we eat on our laps these days anyway- Status
- This old topic is closed. If you want to reopen this topic, contact a moderator using the "Report Post" button.
- Home
- Source & Line
- Analogue Source
- my latest iteration of "Nanook's 219 tonearm"..