Testing transistors. Remember that NPN and PNP transistors read like a pair of back to back diodes. Look at the first pic here,
Testing Transistors
Forward biased they should read around 0.6 to 0.7 (on diode range) on a DVM and open circuit reverse biased. Thats really all you need know to make basic checks. Shorts show up whether in or out of circuit. If in doubt remove or unsolder at least any two leads and then test.
Testing Transistors
Forward biased they should read around 0.6 to 0.7 (on diode range) on a DVM and open circuit reverse biased. Thats really all you need know to make basic checks. Shorts show up whether in or out of circuit. If in doubt remove or unsolder at least any two leads and then test.
Testing transistors. Remember that NPN and PNP transistors read like a pair of back to back diodes. Look at the first pic here,
Testing Transistors
Forward biased they should read around 0.6 to 0.7 (on diode range) on a DVM and open circuit reverse biased. Thats really all you need know to make basic checks. Shorts show up whether in or out of circuit. If in doubt remove or unsolder at least any two leads and then test.
Thanks. It seems that the transistors are hopefully alright then, although I will test the voltage on F1/2 on the power supply.
Is there anything I can replace the 60W bulb with such as a heater or hairdryer? My local DIY shop is closed, and everywhere else seems to have phased them out...
No mains filament bulbs in the house ")
Heaters and hairdryers are to low a resistance. The beauty of the bulb lies in that the filament reads quite a low resistance when cold. As long as the current drawn remains low the bulb passes quite a high current and powers the amp. If the current is to high (as in a fault) then the filament gets hot and its resistance rise sharply limiting the current that can be drawn.
If you remove the two fuses first and then power up directly and quickly have a measure that the -37 volts is correct then that should be OK. More than that and I would advise the bulb tester.
F1 is -56 volts, and F2 is -59, without the fuses attached and the internal fuse is bypassed (no 22mm fuses around).
I'm going to wait until I can get a bulb and more fuses before proceeding.
That sounds as if it could be OK. Also, I misread the circuit earlier (no black blobs where any of the traces join
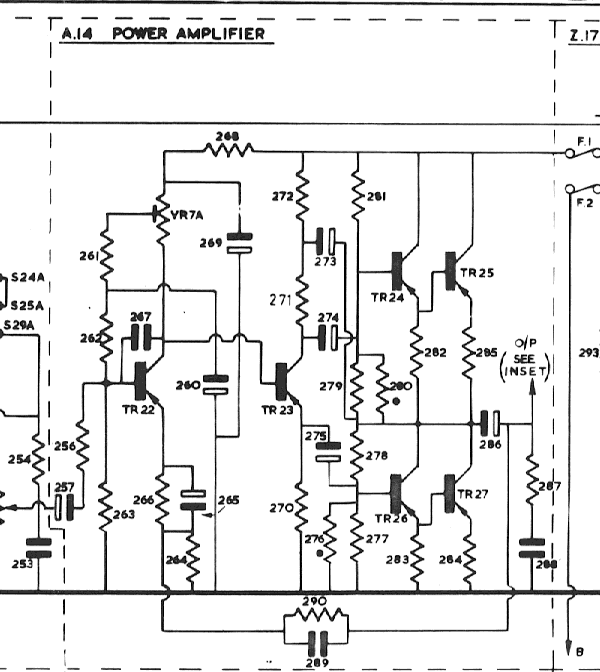
) in saying -37 volts. 33 volts seemed a lot for the regulator to have to drop (70-37) and so your measured -59 or so sounds much more reasonable. So all is good so far. If you look at the diagram F1 and F2 should have the same voltage on them as they go to the same point so maybe just recheck that. Sometimes flux and oxidation can prevent a good contact with the meter probes.
That sounds as if it could be OK. Also, I misread the circuit earlier (no black blobs where any of the traces join
So all is good so far. If you look at the diagram F1 and F2 should have the same voltage on them as they go to the same point so maybe just recheck that. Sometimes flux and oxidation can prevent a good contact with the meter probes.
Both are 60.8 after I let the supply stabilize for a few seconds and measuring to the back of the solder joint. I've got a 100W light bulb wired up in series with the amplifier using a old extension cable, although it's not lighting up even dimly as far as I can see.
I will move on to replacing the output fuses (1A 20 mm) and power up the unit with the light bulb still connected. Can I use normal 3A fuse?
Last edited:
I will move on to replacing the output fuses (1A 20 mm) and power up the unit with the light bulb still connected. Can I use normal 3A fuse?
So far so good then. And now you want to replace a 1 amp fuse with a 3 amp
Well on safety grounds, when its all fixed and working you must fit the recommended fuses as replacements. Be aware there are fast and slow blow types so its important to use the correct one. Very important for the mains fuse protecting the transformer too. Usually you will see F or T (time delay) or AS (anti surge) on the fuse end caps.
So that said, we have a bulb limiter in place and the power supply is putting out around 60 volts. With that set up you can use your 3 amp fuse or just link them out for test purposes. As long as the bulb is in place.
Do one channel at a time.
This sounds an easy fix then.
The resistors if they have suffered at all will have gone high in value. The fact the bulb lights brightly means they are not open circuit and so a fair chance they are OK. We can check and confirm that later.
So that leaves one or more of the output transistors as faulty (we'd always normally replace them as a pair) and with possible collateral damage to one or more of the two driver transistors. Again it would be good practice to just replace them.
What are the transistor device numbers for TR24, 25, 26 and 27
That could be a problem then, although as I was searching for some data on the AL102 regarding their specs, I turned this up,
Armstrong 521/525 output transistor replacement
I was wondering about the possibility of fitting silicon and would ideally have liked to have tried it for real on an amp as small component changes are required.
Someones already done it though. The parts are cheap.
Armstrong 521/525 output transistor replacement
I was wondering about the possibility of fitting silicon and would ideally have liked to have tried it for real on an amp as small component changes are required.
Someones already done it though. The parts are cheap.
That could be a problem then, although as I was searching for some data on the AL102 regarding their specs, I turned this up,
Armstrong 521/525 output transistor replacement
I was wondering about the possibility of fitting silicon and would ideally have liked to have tried it for real on an amp as small component changes are required.
Someones already done it though. The parts are cheap.
Sorry for the bump, what do you think the cost to update to new transistors would be? It was a lovely amp come to think of it...
You are replacing the output transistors seen mounted to the heatsink, pic 4 of the linked repair article. That's the AL102 marked parts, centre and right side. As per the article, you need MJ2955 replacement transistors which are similar and unmistakably large. The driver transistors, if they also need replacement, are possibly TO39 package BSV44 (unlisted) but BSV17, 2N4033, 2N4036 and equivalents will likely work too. How about looking at TR34,T36 (assuming this an A15 series card) or TR24, 26 and telling us the part numbers in case these are also germanium types?I can't see any markings are both the existing wires are gray!...Also, which transistors do i actually replace!?
For schematics, see also Jim Lesurf's pages on the 500 series . Though the 525 receiver will differ from 521 because of the the tuner, the 5th (regulator) transistor can be distinguished by noting its leads go the power supply board instead of the amplifiers.
The Base, Collector, Emitter connections for all large TO3 package transistors are the same - all you have to be sure of, is to mark the leads connecting to the 2 pins (Base and Emitter) before disconnecting, in such a way that you can't later confuse them. That assumes they aren't actually socketed, as was common for the era and saves you the effort. Otherwise, the Collector (the metal case) will be connected via a mounting bolt with a solder tag. This will identify it with some certainty. Note that these transistor cases need to be isolated electrically, from the heatsink - use new bushes, mica and grease and test for shorts before repowering. The driver transistors will also have the same connections as each other - just note the alignment from the other board and refit likewise.
Last edited:
The Base, Collector, Emitter connections for all large TO3 package transistors are the same - all you have to be sure of, is to mark the leads connecting to the 2 pins (Base and Emitter) before disconnecting, in such a way that you can't later confuse them. That assumes they aren't actually socketed, as was common for the era and saves you the effort. Otherwise, the Collector (the metal case) will be connected via a mounting bolt with a solder tag. This will identify it with some certainty. Note that these transistor cases need to be isolated electrically, from the heatsink - use new bushes, mica and grease and test for shorts before repowering. The driver transistors will also have the same connections as each other - just note the alignment from the other board and refit likewise.
Argh, I didn't notice that the transistor body didn't connect to the chassis! I'll resolder them later today.
So you are saying that it doesn't matter which way around the leads go? I THINK I got them the same way around as before...
It seems a lifetime ago that this thread was on the go
(And use a bulb tester when you power up initially)
Haha, I will thanks!
Err...not quite - I meant only that all TO3 transistors have the same arrangement of connections. Just look at any TO3 connection diagram and check what they are though, as they must be correct, even if that is not strictly necessary to know, if you just replace the parts with the connections exactly in their original positions.....So you are saying that it doesn't matter which way around the leads go? I THINK I got them the same way around as before...
If you have lost the original connection positions, refer to the schematic and use the output transistor symbols for TR25,27 to identify the base and emitter leads and trace them on the PCB to the appropriate leads to those transistors. The collectors will surely be plain enough and help identify which transistor, TR25 or 27, you have. Google is your friend, so just type "MJ2955 pinout" into your browser and presto! You now have images of the connections for all TO3 transistors and if you look about, there are images and refs. for most other old package transistors too.
Now, how about telling us the part numbers you read?
Last edited:
Thanks for your help, I think I've completed all the instructions properly!
The 100w test bulb didn't light up when I turned it on, however some unknown resistor let out some smoke! Why do all the resistors i replaced all measure different values on each board? What setting should I be testing resistors on, 2000k, 200k, 20k, 2000 or 200?
The 100w test bulb didn't light up when I turned it on, however some unknown resistor let out some smoke! Why do all the resistors i replaced all measure different values on each board? What setting should I be testing resistors on, 2000k, 200k, 20k, 2000 or 200?
Last edited:
People that bought European built Hammond organs reported resistors from the seventies and late sixties aged badly. That is they change value, radically. American resistors from the same era, from production lines that sold parts to the US military, are pretty stable. These resistors look the same, only the paint is different. If you find a lot of off tolerance resistors, i'd suggest measuring every one with a view to replacement. Silver 4th band resistors are 10% tolerance, gold 5%. You can't get a good reading on resistors attached to a transistor, the transistor sucks current sort of randomly.
If you can read the color code, you can test a resistor on the appropriate scale. You try to use the scale that makes the resistor read about half value for best accuracy. So a green third band resistor, (megohm) you use the 2000k scale. A yellow band, 200k, an orange band 20k, red band 2000, brown or black band, 200. If the first part of the color code is above twenty, like red-red (22) increase scale one click. Color code mnemonic poem is on wikipedia.org I believe under resistor.
Note resistors under 10 ohm are affected badly by the meter battery: better use a calibrator resistor you bought from the store to compare to.
TO3 transistors won't fit in a socket or circuit board backwards because the pins are closer to one end than the other. If there are flying leads connected to the transistor and you forgot which was which, the base is the one that you get 400 to 650 ohms when you put the plus meter lead on it and the minus lead on the case, with meter on 2000 ohms scale. The output transistor base connects to a driver transistor collector usually, the emitter connects to speaker usually.
Bushes, that is an Australian use of the word, I'm sure. In the northern hemisphere, bushes are found in yards and nurseries. Those round plastic things that go around the TO3 transistor lead are called ferrules or washers in US terminology. They come in an insulation kit with the mica washer from multicomp. I buy the multicomp brand insulation kit from newark.com, the US farnell division. If you buy the Keystone brand mica washer, you don't get the ferrules that make the transistor line up automatically.
I'm messing with an amp I started in 2012; learning is not as productive as production repair. But it makes a smarter person of you, for the next time. Working up the nerve to try something that emits smoke and burns up $5 parts is not something I'm ready for every day. Where I live any part is $6, I have to order $.02 resistors from North Carolina or further away.
Wear safety glasses at turn on especially without the light bulb in series with the AC. I've blown dies out of TO3 transistors right through the steel case and across the room.
Good luck.
Last edited:
- Status
- This old topic is closed. If you want to reopen this topic, contact a moderator using the "Report Post" button.
- Home
- Amplifiers
- Solid State
- Armstrong 525 distortion on one channel